Something old, something new, something borrowed, something blue.

Yes, I know that’s an old rhyme for a bride on her wedding day, however I think it applies pretty nicely to my process of getting ready to be a bridesmaid when I attended my brother-in-law’s wedding this past September.

I was totally thrilled when I heard the news that there would be a wedding in my husband’s family, although a bit less so when I realized I only had two months before we’d be getting on a plane and I’d need to have a bridesmaid’s dress to bring with me. Could I have bought one myself? Of course. As a sewist, though, such an idea seemed nearly incomprehensible. Where do people go to buy clothes these days anyways? I hadn’t purchased an article of clothing that wasn’t lounge or underwear in years, let alone a formal gown.

So, I steadfastly set to making my own dress. The colour for the bridal party was baby blue, so I ordered some viscose crepe from L’Oiseau Fabrics and chose out a pattern from my small collection of Burda Magazines. From the photo, it looked like a stunning, elegant dress that would be perfect for a special event such as this one.

BurdaStyle Magazine Issue 12/2012 Pattern 112

Although I was ordering the fabric online based on a not-super-clear photo, it turned out to be the perfect colour. I could hardly wait to get started. Until, that is, photos starting popping up in our bridesmaids’ WhatsApp group. Elegant gowns made up of layers of organza and chiffon – much fancier than my matte and drapey viscose crepe, which was probably a more appropriate choice for everyday wear. I didn’t know what to do. I was really starting to feel that the stress was building up, but I went ahead and made a toile of the Burda pattern anyways.

The fit of the Burda pattern right off the bat was actually fantastic. I just didn’t feel that the fabric I had purchased would do it justice. I decided at that point that I had to find a fancier fabric – a lace, sequinned fabric, or embroidered mesh that I could overlay onto the fabric I had already bought. I got to searching online at all the Canadian fabric stores I could think of (and trust me, I could think of a lot), but it turns out not so many online shops here carry gown-worthy fabrics (if you know of any, do let me know below in the comments!). I’m also lucky to live in a city full of fabric stores – none of which (other than Fabricland) were open in the evenings after I finished work or on Sundays, the only day of the week I was available to shop during daytime hours (whyyyyy????).

There was one new-to-me shop – City Choice Textiles in North York – which, based on their Instagram, seemed to be a treasure trove of laces and embroidered fabrics, and happened to be open until 7PM on weekdays (checking their hours now, they also now appear to have open hours on Sundays). One day I managed to finish work early and was able to make it up there for a visit. It really was a treasure trove (and the prices were amazing!), but amongst all the glitzy bolts, I found nothing in the colour I needed. I felt extremely disappointed, as it really seemed like if I were to find anything anywhere, this would be the place.

I was really starting to feel like I’d have to resort to buying a dress. I was at 3 weeks until our flight, and I still didn’t even have fabric.

My next plan of action took a bit of convincing my husband to do the shopping for me. He works downtown some days, so I asked if he would be willing to stop by Leo’s Textiles on Queen Street and do some shopping. He was hesitant and I was desperate, and anyways I had enough confidence in his eye for colour to choose something nice. He sent me a series of photos alongside a swatch of the viscose crepe I wanted to put underneath, and he came across some beautiful blue silk chiffon. I told him to grab 4 yards of it and take it home for me.

Honestly, he chose the perfect colour and fabric. Am I lucky or what?

Next I had to figure out what type of dress I was going to make – the Burda gown was too complex to do with two layers (and the silk chiffon was much too sheer without a lining). I figured I’d keep it simple – a bodice that I already knew fit me, some flutter sleeves, and a simple gathered skirt with an A-line lining (to reduce bulk at the waist). I wouldn’t have to make a toile and I wouldn’t have to try any fancy new techniques aside from getting used to sewing chiffon (which is rather delicate and sometimes does not appreciate going through the sewing machine – spoiler: sewing the chiffon actually turned out to be the least of my worries).

I really Frankenstein’d the pieces for this dress together. I started with the bodice of McCall’s 8032, which I knew I liked the fit of, and the skirt from Butterick 6138, and by now it’s been long enough that I can’t even remember which sleeves I altered to create the bell/flutter sleeves, but I think they were from the McCall’s 8038. I was going to use the A-line skirt from Gertie’s Ultimate Dress Book for the skirt lining (which I had used previously for a bridesmaid dress – also in light blue – but alas, I grew a bit since then), but once I drafted it to be floor length I saw the huge amount of fabric that it would actually use, and realized it would be way too heavy to wear.

Instead I went with the skirt for McCall’s 8038, which is more fitted and mermaid-skirt-y. This ended up being a good decision, I think.

I got to cutting everything out. I used tissue paper laid out underneath the chiffon to make cutting it out a bit easier. I used nearly every last inch of the chiffon (lengthwise, anyways), and carefully underlined it by hand with the viscose crepe (which I still had plenty of, thinking I was going to use it with the yardage-gobbling Burda dress). This was tricky, as the chiffon bubbled and fluttered with the slightest breeze that hit it.

I finally got to sewing up the bodice and that was when I hit my next road block. I tried on the bodice – and, well, let’s just say that the darts were especially pointy. I was crestfallen. I could not wear such a, erm, pointy dress to a wedding, let alone set foot outside in it. I decided to troubleshoot the dart situation, and found many sewing articles addressing that very issue. I seam ripped the bodice darts several times (not at all an easy thing to do with delicate silk chiffon) and sewed them over and over again. I changed the curve of the dart, how I sewed the tip of it, whether I back stitched or didn’t back stitch or tied knots or didn’t – every time they came out pointy. I figured it boiled down to the bubbly nature of the chiffon and there was no getting around it.

I was pretty much out of fabric. I didn’t have much time left. Starting over wasn’t really much of an option. The stress was really starting to set in. That’s when I decided to pull out the big guns – I was going to convert the bodice to a princess seam bodice. I used the bodice pattern and drafted it into princess seam pattern pieces. I used the existing bodice pieces for the larger centre portions of the princess seam pieces, and I scraped together the smaller side pieces out of the largest scraps I could find left of the silk chiffon.

And by golly! I did it. The princess seams were so much better. Not perfect – no. The chiffon still bubbled in places, and if you look closely, you can see the holes left from seam ripping the darts out. But I felt happy when I put it on, and that was enough.

The skirt was relatively easy after all that. I used French seams for it, so the seams would look nice as they were visible through the sheer fabric. The zipper area was tricky, as it’s hard to install an invisible zipper and also do a French seam. So, I did a sneaky thing and used the pieces of the fabric that were cut on the selvedge (which is already “finished”, technically!) so I wouldn’t have to worry about it finishing that seam.

I made the sleeves out of two layers of the chiffon rather than a layer of chiffon and a layer of viscose for a more ethereal look. I cut one layer shorter than the other so that the layers were apparent. They came out kind of uneven (because that chiffon is just so darn SLIPPERY and shifty) but at that point it was the kind of imperfection I could put up with.

I hemmed the whole thing and inserted a waist stay to help hold up the skirt, which was a little on the heavy side, and it was finally done! I ended up later adding another row of hooks to the waist stay so that I could make it even snugger, allowing for any possible weight fluctuation. I also added some ribbons tacked down at the waist that could go on the hanger to provide a bit of extra support when the dress is hanging in a closet for longer periods of time.

To accessorize, my sister-in-law lent me the perfect silver heels which fit just right, and I had a fascinator from Lilliput Hats which I bought for my sister’s wedding and just happened to be the perfect colour to go with it.

After the long flight and before the wedding, I gave the dress a good press (how lucky was I that the apartment where we were staying had a fresh new iron?) and it was good to go.

Honestly, I was so happy with how it came out in the end. I felt like an absolute princess. The fabric was so wispy and floaty. The fit was elegant but comfortable. After all the stress and worrying, I was so glad with how it turned out. I got lots of compliments throughout the night, and people could hardly believe I had made it myself.

Here are some awkwardly-cropped photos from the photographer since I have no other full-length photos of me in the dress and didn’t want to include other family members without their consent (photo credit goes to Shmuel Diamond Photography). Not sure why I ended up in the same spot in every family photo but okay! I chose the one on the right because I like how you can see the flowy skirt blowing in the wind, hehe.

Anyways, that was a lot of talk about one dress! Honestly it was all a bit stressful getting such a big project done with a time crunch, and during the process it really seemed like all I could think or talk about was this dress (do other sewists experience the same thing? No?). In the end, I’m so glad it worked out and I could float around for the evening in such a special dress 🙂

Thanks for reading the first post I’ve written in a very long time 🙂

Please let me know if you’ve ever made a special garment for a special occasion that wasn’t quite as easy as you thought it would be! Did it all turn out in the end?

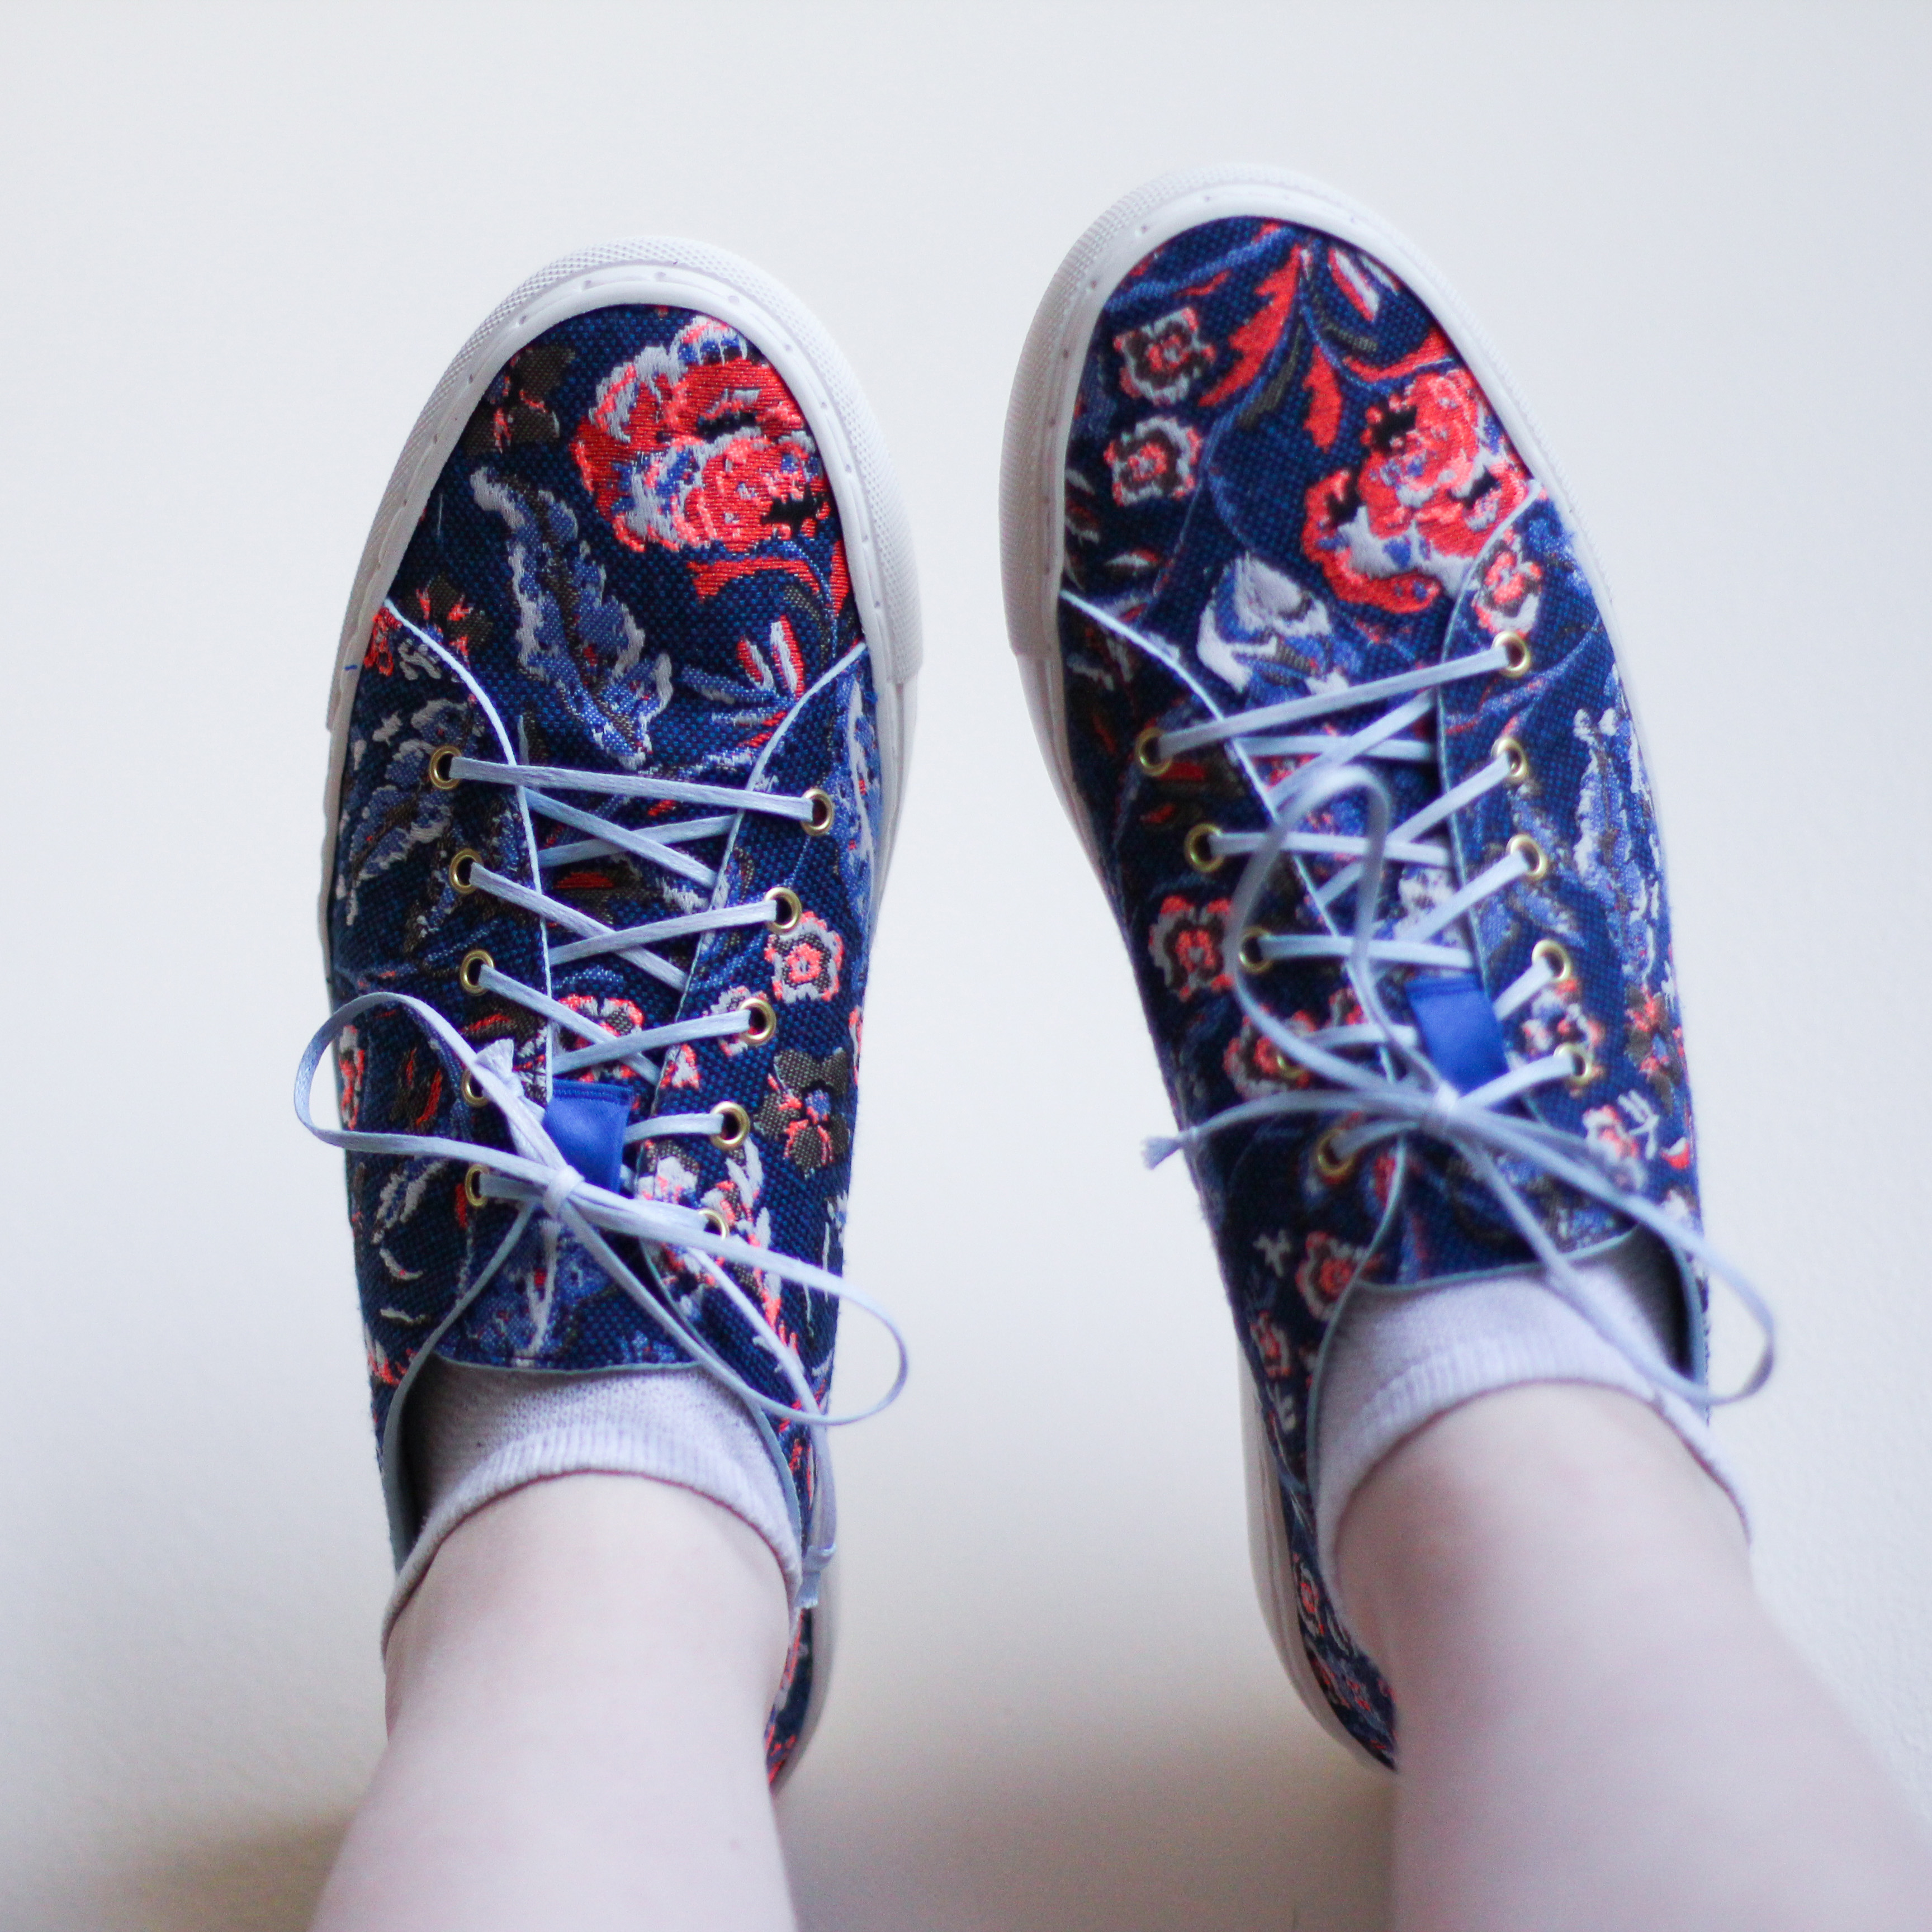
SneakerKit Round Two

Shoes1a

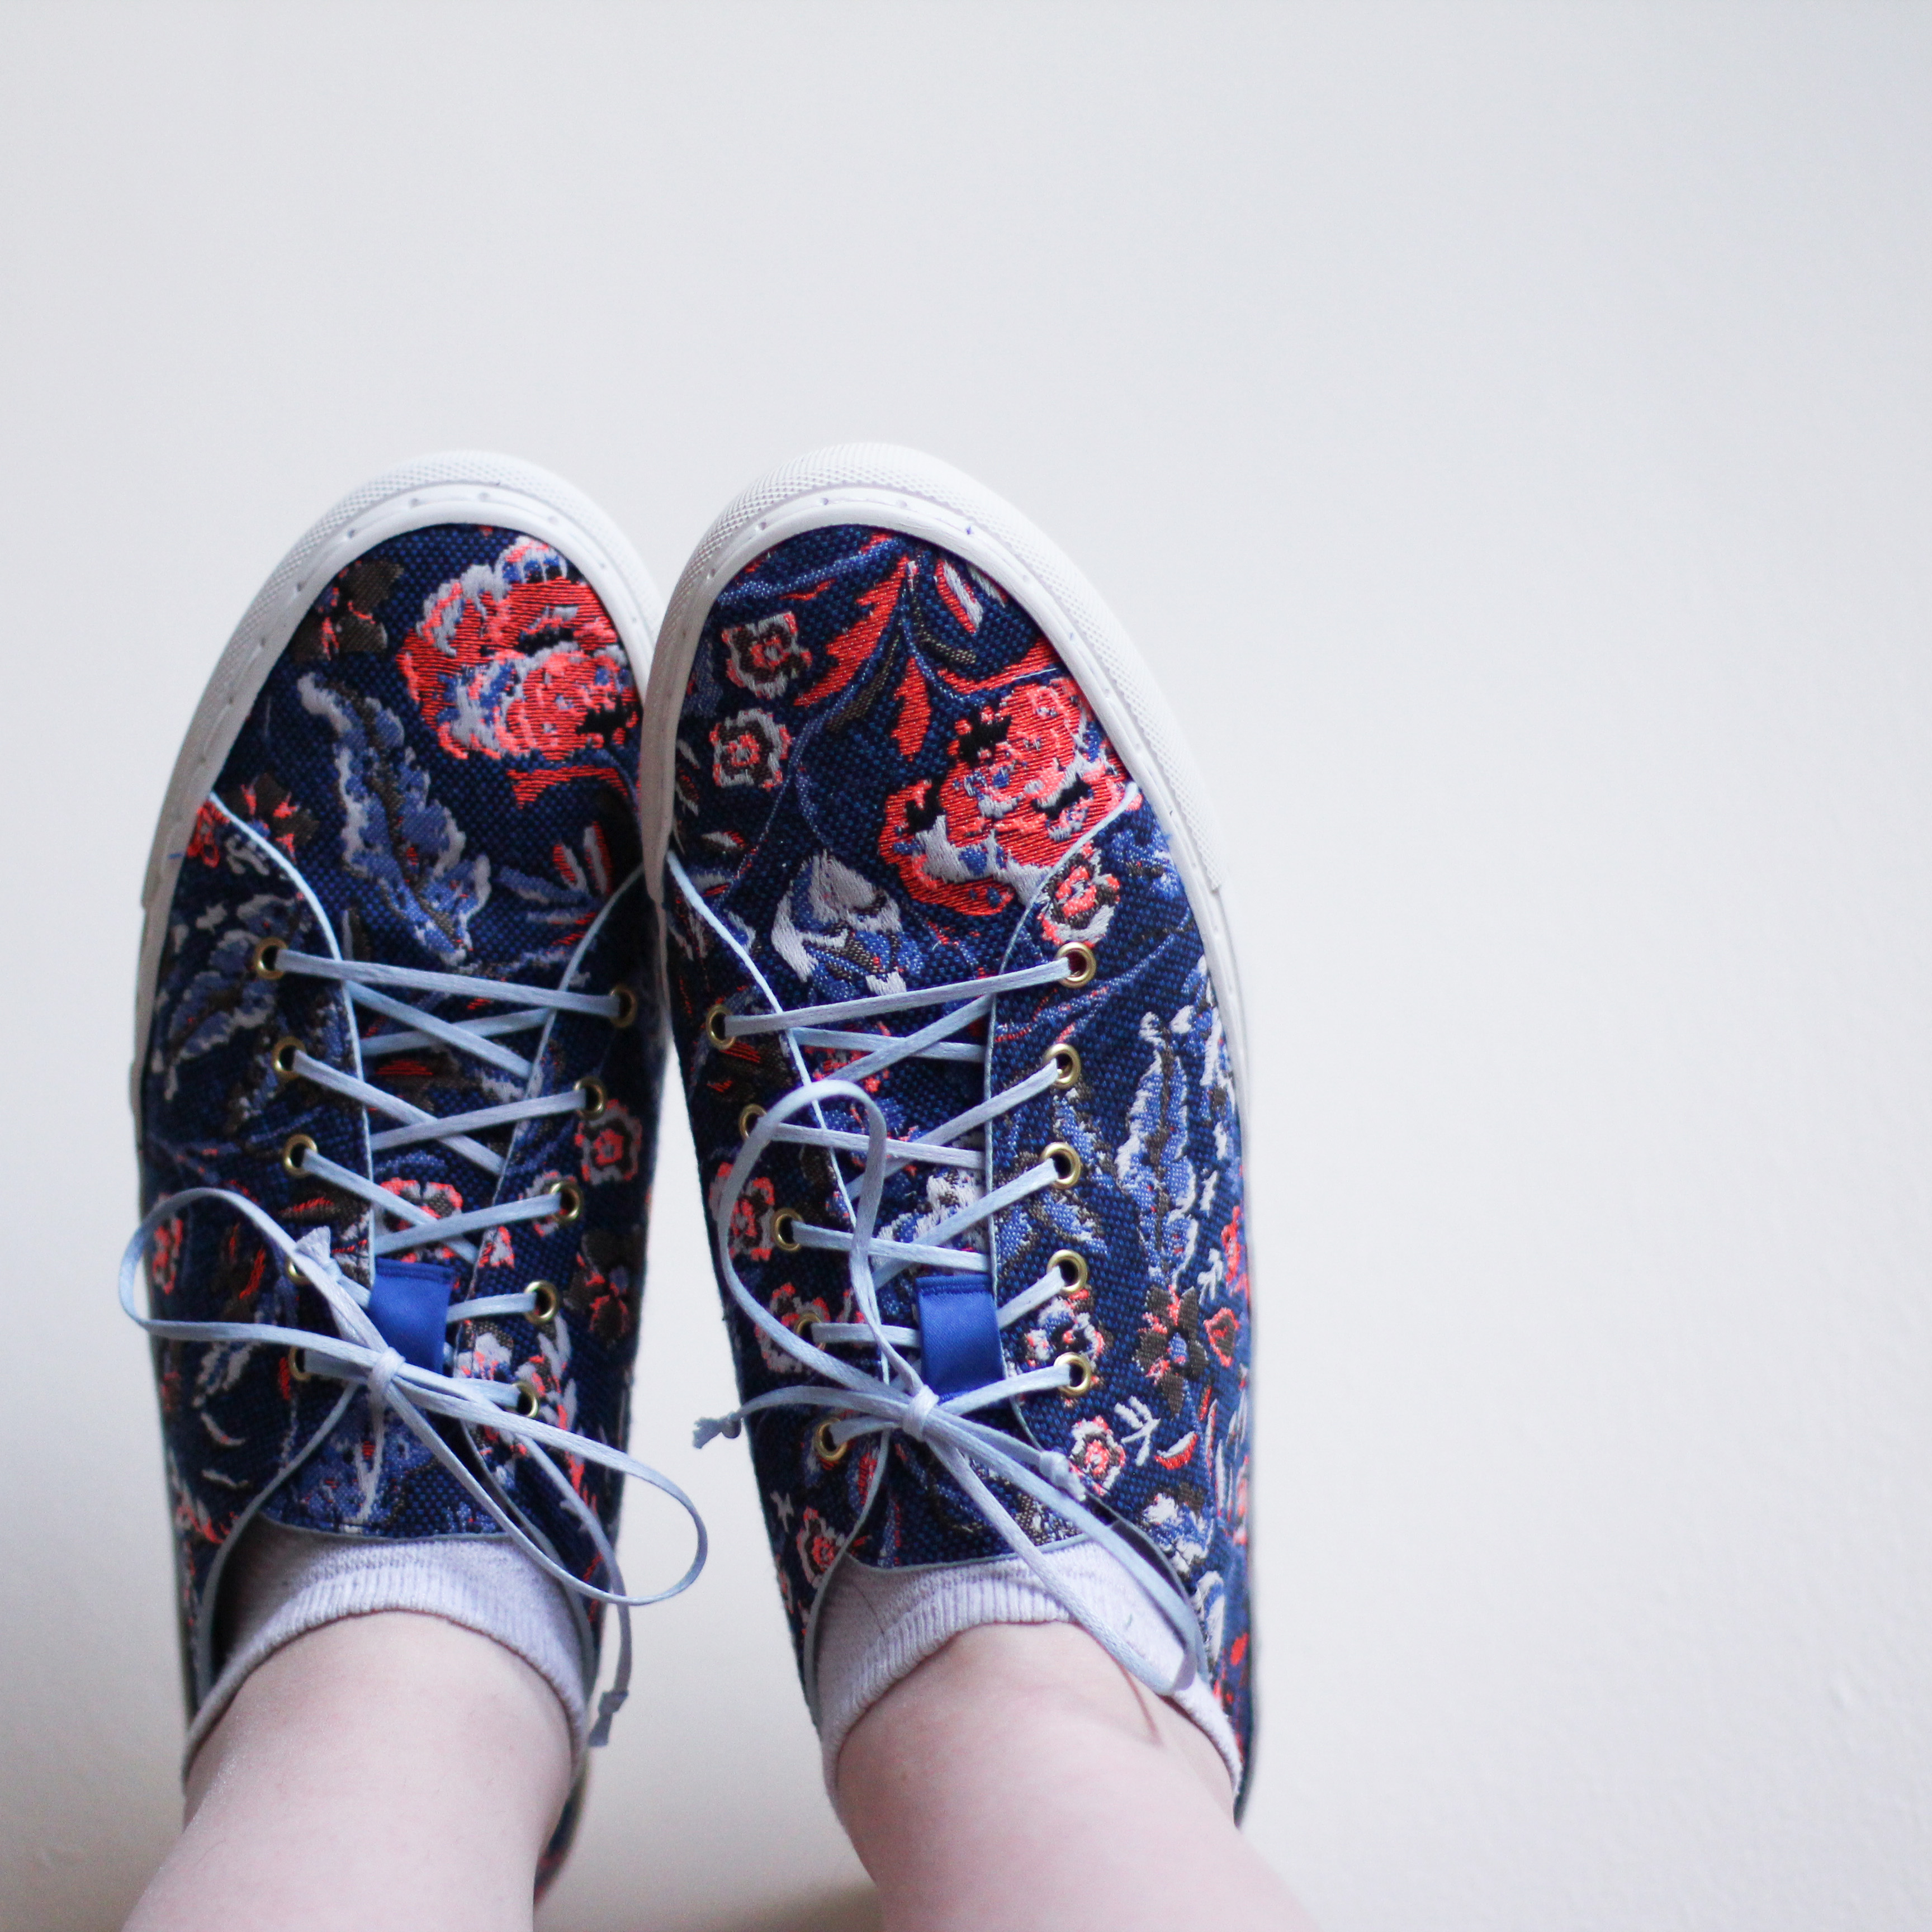
If you can recall, I tried my hand at making sneakers using SneakerKit last summer, but I made the (beautiful) mistake of attempting to cross-stitch leather. I also wasn’t totally pleased with the quality of the kit. Since then, though, the sneaker-making bug came back, and SneakerKit changed the insoles that were giving us trouble. SneakerKit is based in the Netherlands, and since international shipping is pricey, I thought our trip to Amsterdam would be a great chance to get another pair.

I follow SneakerKit on Instagram, and for a long time I’ve been seeing them share sneakers using fabric and a product called Decovil. Considering how much I love fabric, the idea of using fabric to make shoes really excited me. I had never heard of this Decovil stuff before (though I assumed it was a sturdy fusible interfacing – which it is), so I looked for it in Amsterdam and found it quite easily. The idea to use Decovil with SneakerKit isn’t my own, and I figured out a lot of it from @tinesews on Instagram, who has a highlighted story (in German) showing how she did it.

Shoes1c

And now, I’ll show you my way.

I did stay awake in bed for a few nights trying to think of the best way to do it. Tine lined her sneakers by using spray glue to glue the lining to the Decovil on the inside, and then finished the raw edges with bias binding. I didn’t have spray glue, so I wanted to find another way.

First, I used the template that comes with SneakerKit (downloadable from their website) and traced the pieces onto the non-adhesive side of the Decovil. Basically, I followed the same steps for cutting out leather that SneakerKit provides. I didn’t mark the punch holes.

dav

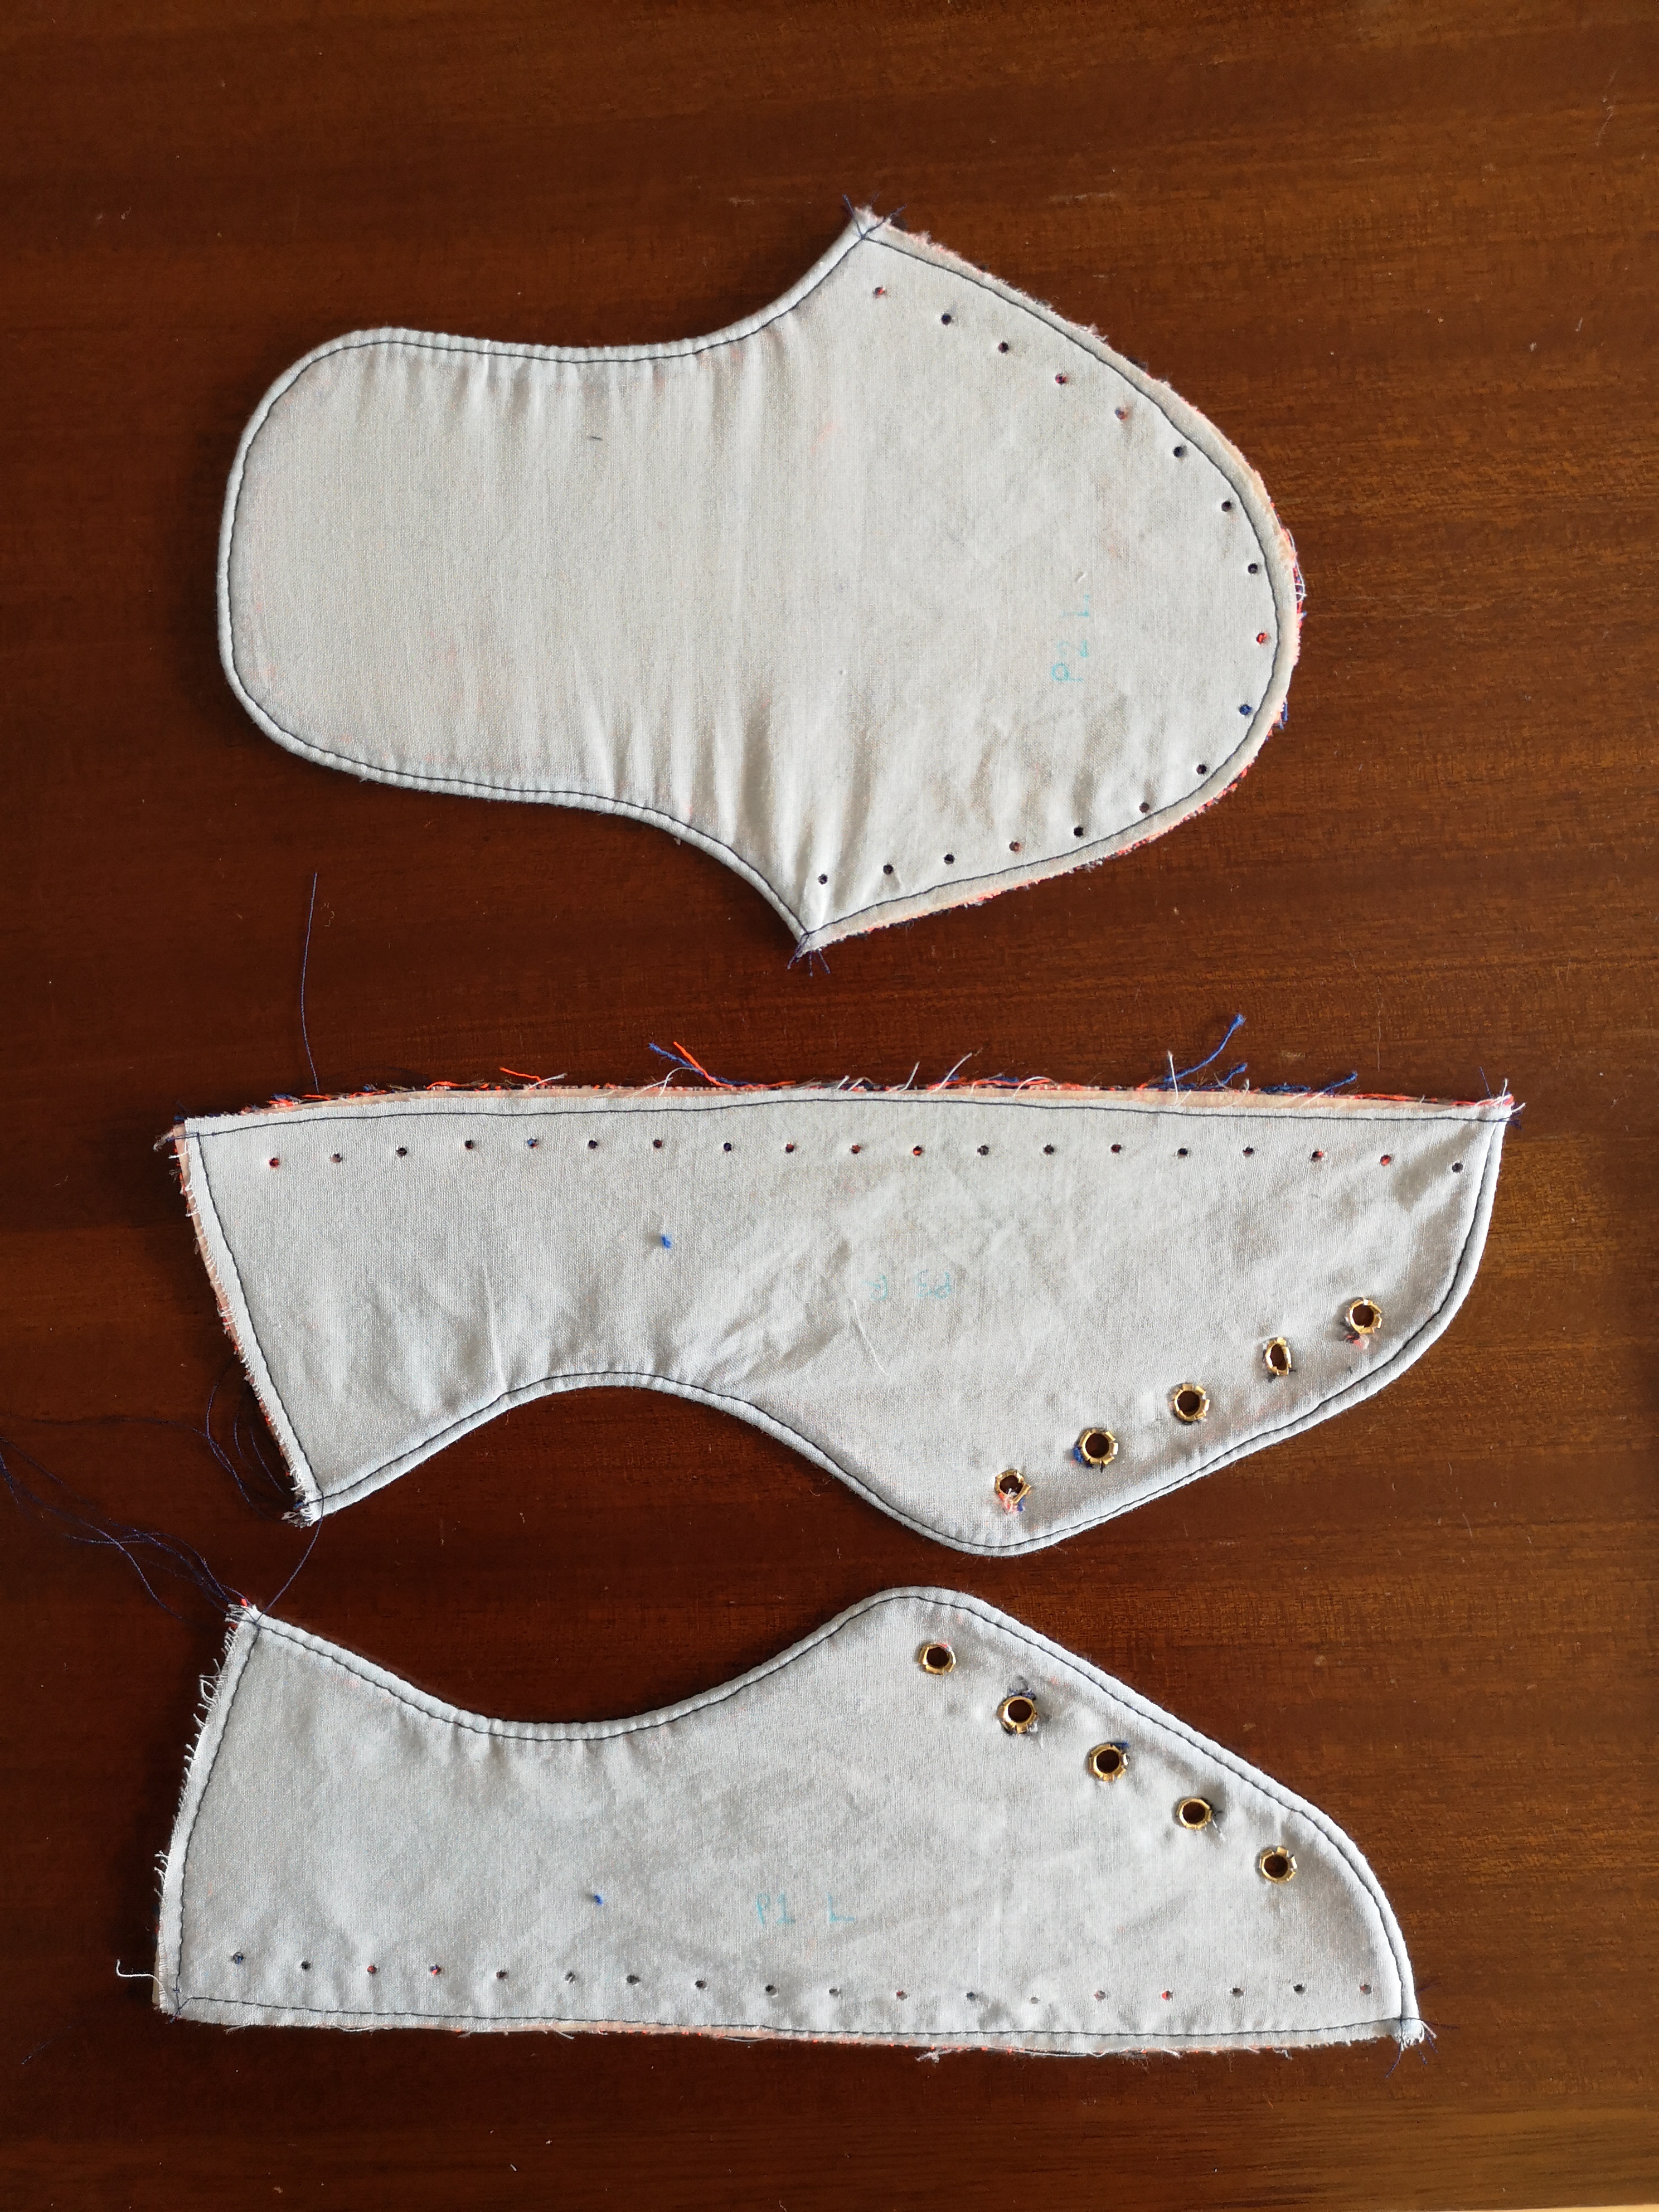
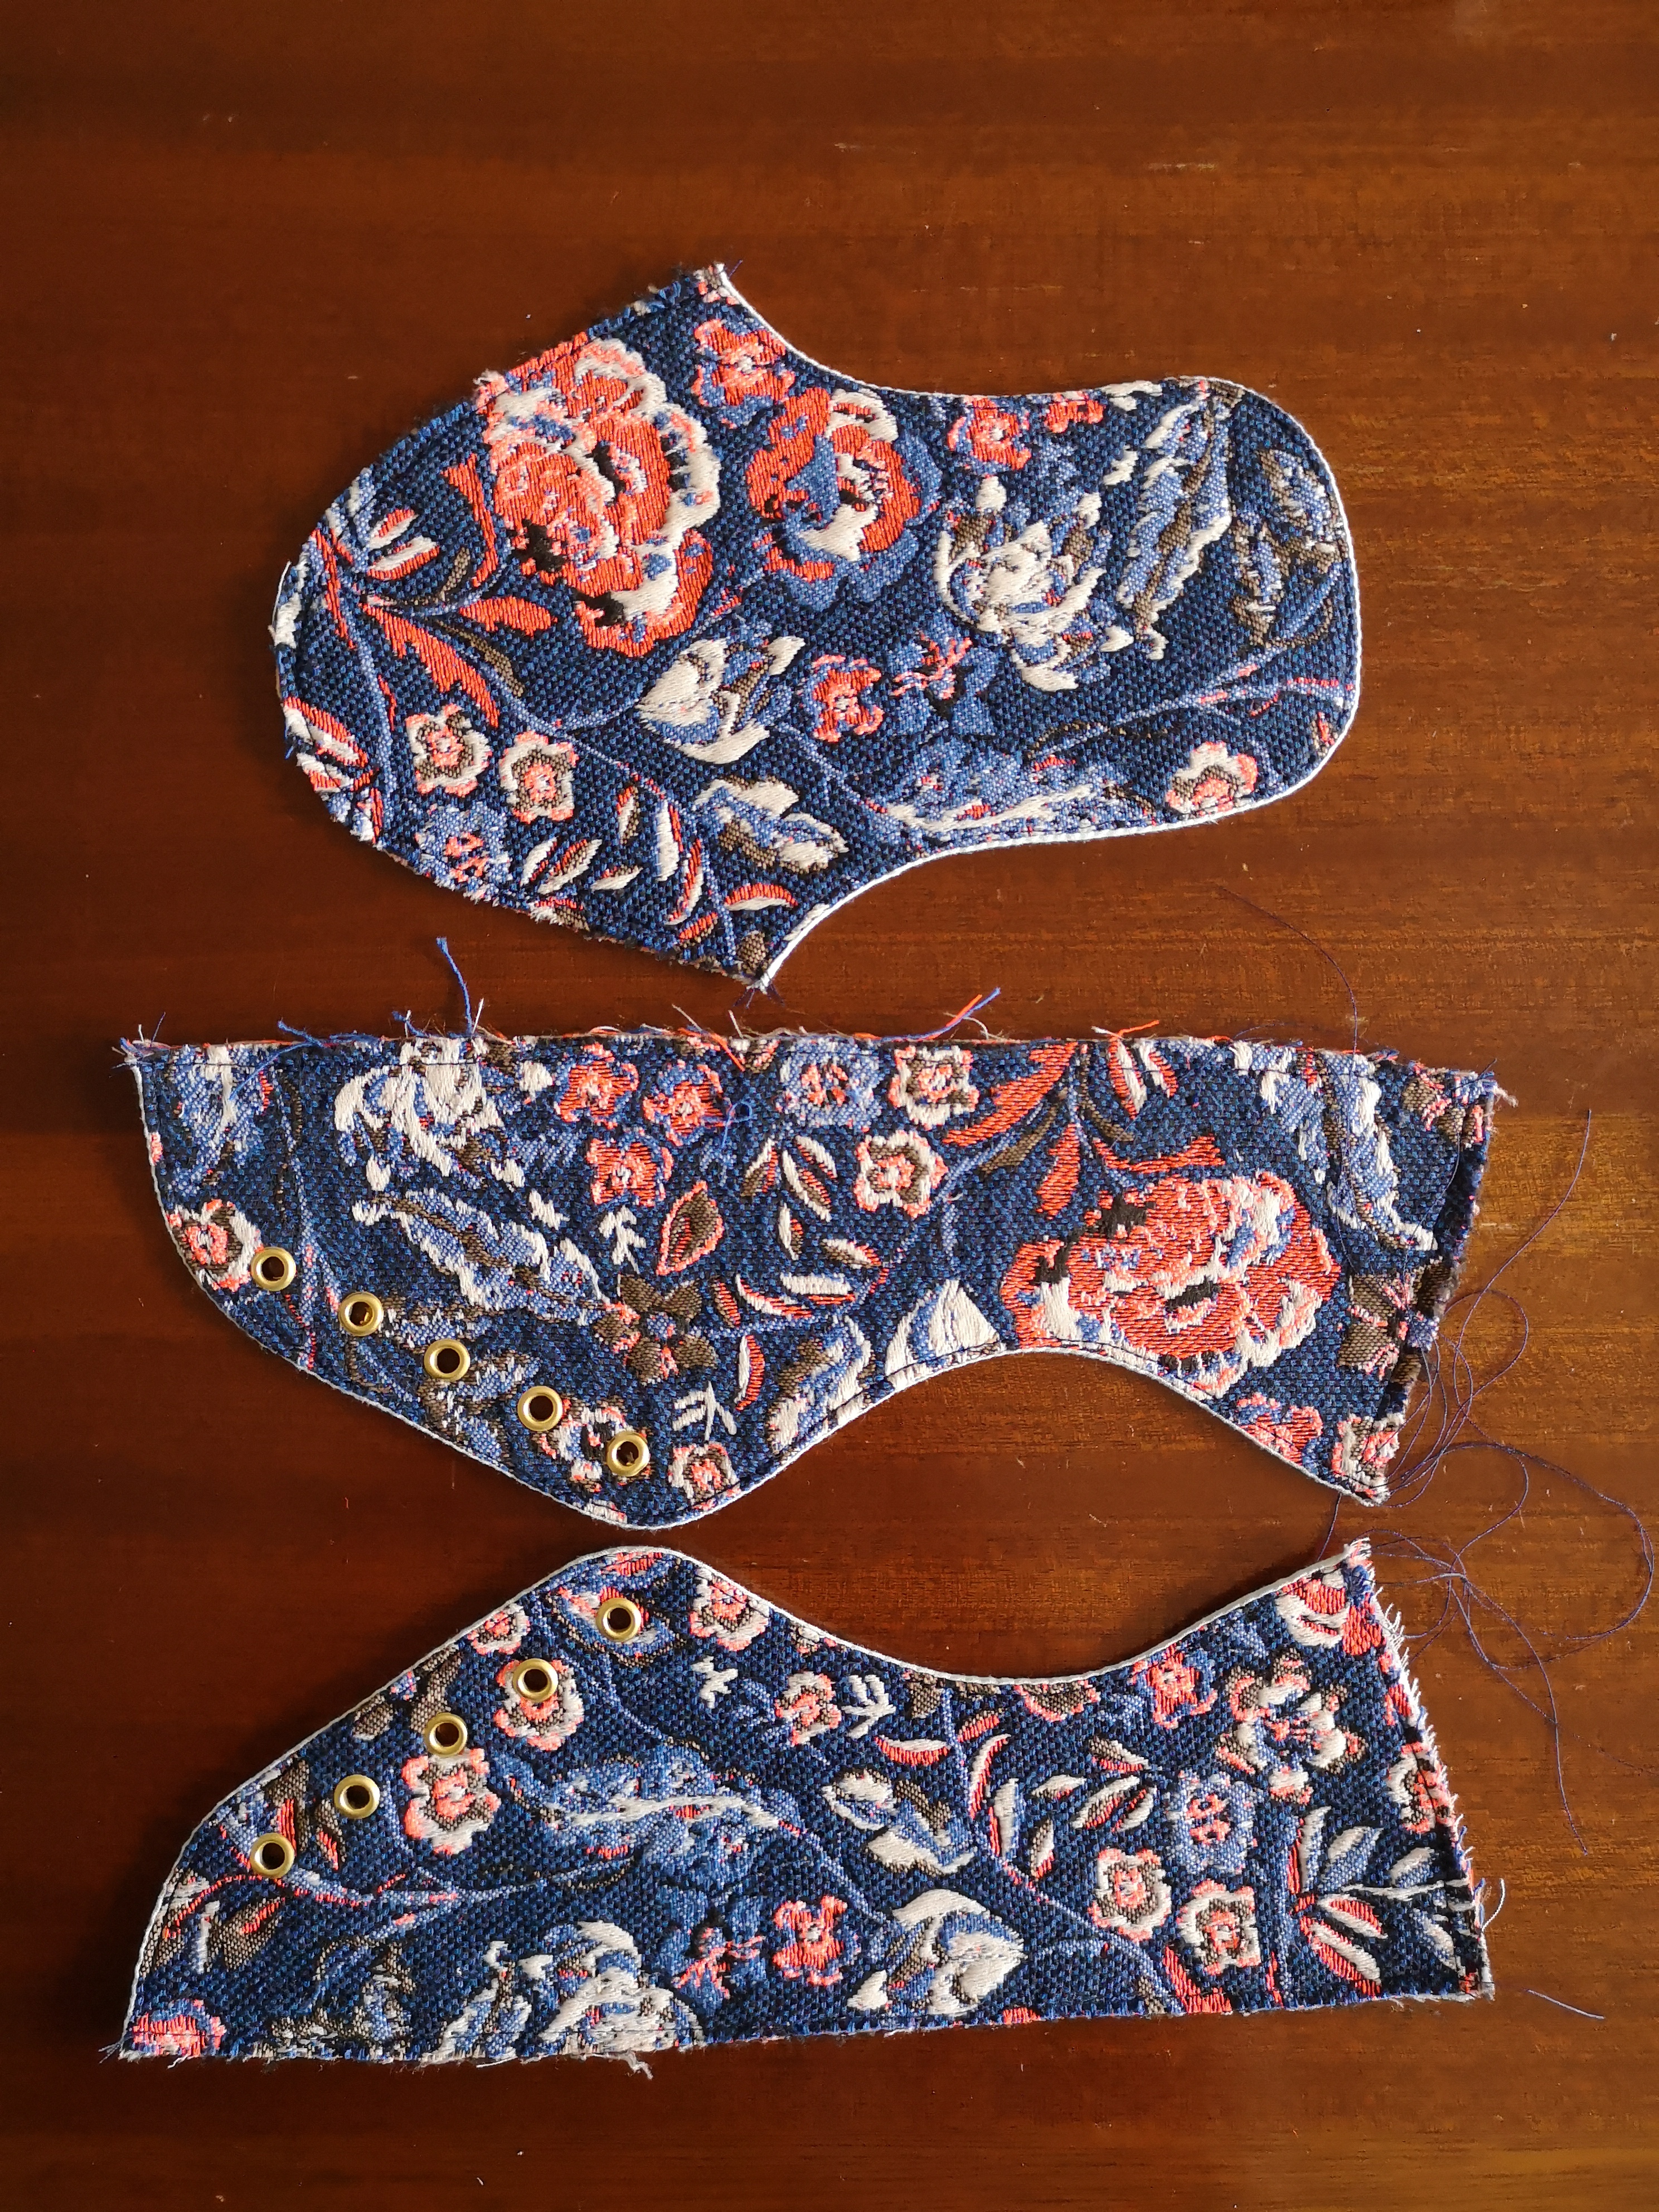
I cut out the pieces and ironed them to the wrong side of my main fabric, making sure to leave a good border all around each piece for seam allowances. I cut out the pieces, but eyeballed a 1/2″ seam allowance along the top edges of the sneaker sides, and around the long part of the centre piece that would be the tongue.

dav

Then I placed these pieces on the lining fabric and cut out the lining using the interfaced main fabric as a template. I sewed the lining to the right side of the main fabric, stitching right along the edge of the Decovil.

I trimmed the seams and clipped the curves, and turned the lining fabric to the inside. I found the lining fabric got kind of tight and pull-y, but I managed to press it out enough that it wasn’t a problem.

Then I topstitched the edges, which also helped keep the lining from flipping out. I also stitched down the open raw edges of the pieces so the lining wouldn’t pull back up.

Once all the pieces were sewn, I marked them and prepared them according to the SneakerKit instructions, but I didn’t punch holes up the back of the shoe/ankle. This is because those holes are used to stitch the two side pieces together (P1 and P3) and I decided I would do this on the sewing machine.

dav

On the tongue, there is supposed to be a little slit in the leather for the laces to be held in place. Since cutting into the fabric would leave an ugly raw edge, I decided to stitch a small piece of bias binding on top of the fabric. I used a very narrow and dense zigzag stitch to tack it in place where marked on the pattern.

dav

I installed eyelets before proceeding. This was a huge pain in the neck. I bought Prym 4mm eyelets in Amsterdam and the tool that came with it kept squishing the eyelets into ovals. To fix this, I used the little hole-punch that came with it and did one or two knocks with the hammer using the tapered end (the end that doesn’t have a hole-cutting…circle) and this helped get things going in the right direction. I then finished them off using the little tool.

dav

Once all the pieces were ready for assembly, I sewed bias binding onto pieces P1 and P3 (at the back) instead of using the small rectangular piece in the pattern (I used the machine for this – it sewed fine through the Decovil using a size 80 needle). I also found that at this point the fabric was fraying on all my pieces, so I covered each raw edge in fray check.

dav

After that point, I assembled the sneakers according to the Sneaker Kit instructions! And that’s it! They say you can finish SneakerKit in a day, but with all the prep I had to do with the Decovil, the lining, and the eyelets, it took me two. Still, not too shabby for a new handmade pair of shoes!

Shoes1b

Blush Solina Dress and Breaking The Pattern Review

solina4_web

In the late fall, Named Patterns released previews of their book Breaking The Patternand I knew I had to have a copy. The book has ten base patterns with several variations of each, as well as suggestions on how to further change things up using other pattern pieces that come with the book. The styles included have the fresh and modern look that Named is known for. The photos in the book are beautiful and inspiring (though I’m not sure what it is with the trend of holding a leaf while posing these days) and had me flipping through the book over and over again.

When I saw the previews I had my eye on the Ruska Knot Dress, the Solina Dress, and the Saraste shirt dress. I made the Saraste shirt dress a few weeks ago using some Liberty of London cotton lawn, but I didn’t really feel I could pull off the button-up collar look. The pattern was well-drafted though and the dress came out beautifully, but it just wasn’t for me, so I sold it to a friend so it can be worn and loved.

shirtdress3

In sewing the patterns, I felt a bit frustrated by the instructions. Some of the steps had long chunks of text with few diagrams to break them up. A lot of the steps actually just tell you to go to another pattern’s instructions and follow a step there. At one point I actually turned to that step and the step told me to go to a different step for a different pattern. I felt kind of like I was looking at those little doodles in my elementary school textbooks where they told you “Go to page 89!” and when you went to page 89 it said “Go to page 203” and so on and so forth, and in the end it got you nowhere.

Since the instructions seemed kind of vague to me, I felt that a less experienced sewist would struggle constructing the garments from this book. Some parts of the book have actual photos to complete steps that include somewhat crucial sewing skills (like setting in sleeves or installing an invisible zipper) that I feel like someone should know if they’re making these patterns to begin with.

The patterns all come on sheets that need to be traced, since the pattern lines all overlap each other. What really bothered me is that there was no chart or numbers indicating where specific pattern pieces could be found, and the sheets weren’t all organized by pattern. So in order to find a piece I needed to trace, I needed to go through all the pattern sheets and open them up and flip them over until I found it.

Anyways, I would still recommend this book because the patterns in it are gorgeous and very well drafted (I sewed both the Saraste and Solina dresses without any changes to the pattern). Named patterns are often quite pricey (and don’t always come with several variations), so to get 10 (not including several variations) for the price of the book is pretty good bang for your buck.

Shortly after finishing and sending away my sort-of failed Saraste dress, I traced out the pieces for the Solina dress. It looks pretty complex with all its ties and interesting pleats, but I actually found it really quick to put together.

The pattern doesn’t have a lining and I can’t really picture how I could add one without needing tons of fabric (since there is no waist seam I can’t think of a way to only line part of it). This made it really quick but also the fabric I bought is slightly translucent so I’ll need some sort of slip or nude undergarments. I have no regrets about my fabric choice, though, because the tencel twill I bought from Matchpoint Fabric is deliciously buttery and soft, and I love the drape of it much more than the heavier tencel twill I usually buy elsewhere.

solina1_web

I was concerned throughout the project that the dress would be too long and would maybe look like a bathrobe? But once I had the waist ties sewn in I tried it on and loved how it looked. Fortunately I have long legs so the length doesn’t look awkward (the patterns are drafted for a 5’8″ woman) and I can picture it looking really cute with sandals in the warmer months.

I would also note that the sleeve ties are a touch long, and if you don’t wind them around your wrist twice you’ll have long lengths of ties dangling about. If I make this pattern again with the ties I would probably shorten them. To begin with having them there will be a bit impractical.

solina2_web
I give the “holding-a-leaf-except-it’s-a-flower” thing a try. I think I get the appeal!

I’ll be honest, I don’t really know when I’ll wear this dress. It’s quite the statement piece. I have a lot more fun making statement pieces though, so I don’t really mind. I’ve already been thinking about making more of these, but maybe with short sleeves and a skirt that ends at the knee for something more summer-appropriate and casual. It’s the kind of dress that you can really change up based on skirt and sleeve length and fabric choice.

Have you bought a copy of Breaking the Pattern? What patterns are you planning to try?


The Sew Frosting Challenge: Self-Drafted Satin Dress

satindress1web

This is a special dress.

When I saw the floral satin for sale on the Club Tissus website, I knew I had to have it. I generally hate polyester, and I’ve never worked with satin. I was so in love with the print, though, that I ordered almost 5 yards of it and decided that I would make something incredibly special for the Sew Frosting Challenge happening on Instagram. I went on about the challenge and its merits in my vintage coat post a few weeks back, but I didn’t make that coat specifically for the challenge, and I wanted to take the challenge as an opportunity to go out of my comfort zone and make something I wouldn’t normally make.

I knew exactly what dress I wanted to make from it – the Cassie dress from Wear Lemonade. Wear Lemonade makes beautiful sewing patterns that I am really hoping to try some day, and they also make some beautiful ready-to-wear garments. I was kind of sad that the Cassie dress didn’t have a pattern, and the ready-made dress is very much out of my budget. So I guess I had no choice but to make it myself!

I dug out the sloper that I very meticulously made in fourth-year university, when I drafted and embroidered a dress from scratch for my thesis. I don’t know why I haven’t used my sloper since then – it’s a basic block that I perfectly tailored to fit me! It was so easy to use it to make a bodice that would fit me exactly how I wanted. All I had to do was follow the instructions in my copy of Patternmaking for Fashion Design, and it was done! I had put aside a whole day for it and it took me about half an hour. I made a blouson bodice, which basically just has some extra ease in the waist that gets gathered into a waistband. I also made a boat-neckline, and drafted bishop sleeves and a cuff.

To support the very drapey (and static-y) poly satin, I underlined the bodice pieces with a lightweight cotton/silk fabric I had in my collection of lining fabrics. I left the rest of the dress unlined because I didn’t want it to feel weighed down.

The skirt was a very exciting and new process that I tried – professional pleating! There is so little information about profession pleating out there! I consider myself a research fiend, and I spent a few days figuring out how to prepare my fabric for pleating. I knew the fabric had to be polyester, and thanks to a new friend of mine from the Toronto sewing community, I found a place nearby called Sterling Button that has an in-house pleating service. I never would have found it if not for the Toronto Sewcialists Facebook group – Sterling Button doesn’t have a website and nowhere online does it say they do pleating!

satindresscloseupweb

From what I found, hemming pleated fabric is tricky. If you turn up already-pleated fabric, the pleats head in the opposite direction and don’t fold up neatly. If you machine-hem the fabric before pleating, you might shift the grain of the fabric and the pleats will come out wonky. I didn’t know what I should do.

Then I turned to my trusty Kindle copy of Claire Shaeffer’s Fabric Sewing Guide. That book is like the bible of how to sew with every fabric, and in the “special occasion fabric” section, she tells you that hemming should be done before having your fabric professionally pleated. Thank goodness for Claire Shaeffer!

Still, I didn’t want to serge the bottom and throw off the grain, so I hemmed the selvedge edge which I knew wouldn’t need finishing, and I stitched the whole thing by hand. I threw in 5 extra inches of width to the rectangle, just in case. I must’ve done my calculations wrong, though, because 2 days and $25 later, the pleated fabric came back about 3 inches too narrow (albeit beautifully pleated)!

I panicked for a few minutes, and then I decided to slightly ease each pleat apart until the width of the skirt matched my waistband. It worked! I was so pleased. I wasn’t able to match up the pleat folds by the zipper, but it was more important to me that the skirt fit around my body.

After stitching the skirt to the bodice waistband, I basted a grosgrain ribbon into the waistband for added support (I don’t want the waistband to go slouchy with time). I enclosed it with a waistband facing so the inside looks nice and neat.

To insert the zipper, I used pick stitches sewn by hand, since I had carefully matched the floral pattern on the back pieces and I didn’t want to mess it up by sewing it on the machine.

Really, the whole thing wasn’t too tricky a process, but with all the outsourcing and hand-stitching, it took me more than a week to complete this dress. I really enjoyed the creative process of drafting and took a lot of pleasure in all the hand-stitched touches. I also cannot get over the sleeve cuffs and the beautiful pearly shank buttons that Jenny at Sterling Button helped me choose. They just look so elegant!

satindress3web

I don’t know when I’ll get to wear this very special dress – I’m already waiting for the perfect special occasion to wear it! Still, the #sewfrosting challenge isn’t about practicality – it’s about making something extravagant just for the sake of it. I think this dress fits the bill.

My First Wool Coat: Burda 6462 Review

woolcoat4

A wool coat has been on my “to-sew” list for a while now. Not only had I always wanted the challenge of constructing a coat, but after donating the wool peacoat I had had since I was 15, I didn’t have a coat well-suited to the cool fall weather. I had been trying to get by for a few weeks of 5-degree weather with a raincoat (with no insulation other than it being made of plastic), so the need was becoming dire.

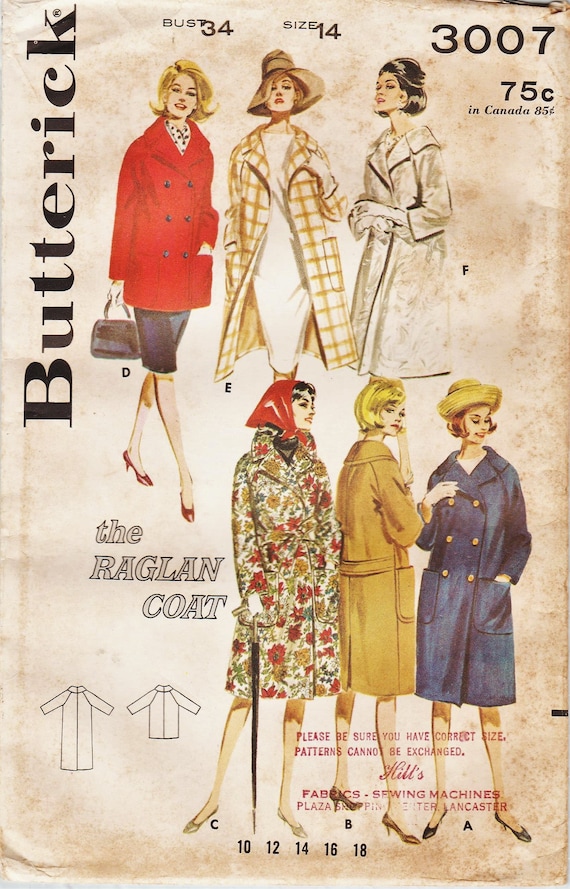
I scoured the Indie pattern scene, and didn’t really find any coats that I loved (with the exception of the By Hand London Rumana coat, which I am absolutely in love with, but has too many seams for the heavy boiled wool I had bought). There are a lot of indie designers making coat patterns now that have been insanely popular, and it’s becoming the norm for home sewists to venture into the coat-making world. Still, I found many of them a bit too boxy for my liking. I had originally planned to make a wool coat from my Vintage Butterick 3007, but I found the fit of it way too oversized to fit practically into my wardrobe.

I eventually found the Burda 6462, but I couldn’t find any pattern reviews. I’m big on reading reviews before I buy something, but I’ve heard good things about Burda’s drafting, so I ordered it anyways.

I thought about the fabric I would use for a very long time. I knew I’d be spending a lot on it, so I wanted to make the right choice. I originally really wanted a teal coat, and I found the perfect fabric at The Fabric Room, but since they sell fabric leftover from fashion designer Lida Baday, what they have is what they have – and they didn’t have enough to make a coat. I headed over to The Wool House on Queen St, and they had a big selection of boiled coating wools, but no teal. Still, when I saw the charcoal grey, I knew it’d make a versatile coat, and I could have a lot of fun with the lining. I chose a fun contrast lining (from The Workroom) because, honestly, how can you not if you make your own coat? I love the lining fabric so much that I was actually sad to only use it as a lining – luckily, there was about a metre leftover, and I think I can squeeze a skirt out of it!

I made a very basic muslin before starting, and it was pretty big – I didn’t really care about it being a loose-fitting coat, but the shoulders were clearly much too big. I went down a size and a half (from size 14), but didn’t make a new muslin of the smaller size because I felt rather confident about the fit. I also did a forward shoulder adjustment.

It was my first time working with boiled wool. Several online guides and tutorials warned me that boiled wool doesn’t press well. The one I got was a coating wool, so it’s also pretty thick. I had to cut out all the pieces one by one (rather than from the fabric folded), and I had to make all the marks with thread. Cutting out the pieces and interfacing them took two days.

The boiled wool was surprisingly pleasant to work with, and I’m glad I kind of just dove in. I finally got to use up my size 90 needles (I think I broke two though), and my machine and I braved through it. My main struggle was with the pattern instructions. If I hadn’t made my vintage Butterick coat pattern beforehand, I would have been totally lost with the construction. The Burda diagrams had a lot of zoomed in views that didn’t show context of the rest of the garment, and some of the instructions weren’t quite English. It’s really important to mark all the dots and notches, because that’s really your only guide as to how things fit together. I suppose if you’ve sewn many coats or garments with lapels it’s easy enough to figure out, but having only done it once I had a lot of trouble only going on the pattern’s vague instructions.

woolcoatlining

The lining was pretty easy to set in, and I followed the instructions in my Vogue Sewing Book on how to hem the lining in a coat. Turns out a coat lining needs a bit of ease so everything fits nicely, and it should be a bit “baggy” compared to the coat. The Vogue Sewing Book’s guide was fantastic, and I don’t know what I would have done without it.

woolcoatbuttonsThe last step was the buttonholes and buttons. I didn’t think my machine could handle buttonholes on the boiled wool, so I made them by hand using matching embroidery thread (a tip I saw somewhere on Instagram). I found some really cute buttons at Eweknit, and I worried that maybe they might be too small. I liked them too much to find something larger, so I used them anyways, and I don’t think they look too out of place. I think I also sewed the buttons on too tightly, because I have a bit of difficulty buttoning up the coat. I’m hoping they’ll loosen up a bit as I wear it!

woolcoat1

All in all, I’m very pleased with the fit and style of this coat! The A-line makes it flattering, but it’s loose enough that I feel like I can wear a few layers underneath without feeling too squishy. Hopefully winter won’t come too soon and I’ll get some wear out of it before the weather dips below zero. After planning this coat for a few months now, I’m really excited that it’s finally done and is exactly what I was looking for.

Hinterland Sew-Off and Pattern Review

Hinterland2a

Several weeks ago, when Tori of The Doing Things Blog and Sara of The Sara Project announced the Hinterland Sew-Off, honestly, I wasn’t super-pumped. I was feeling kind of overwhelmed by the projects I had lined up for the fall, and wasn’t interested in buying any new patterns. They were hosting a giveaway of the pattern (by Sew Liberated) on Instagram, so I entered, because I thought it was a pattern I would want to make at some point in time.

I forgot about the sew-off, until I won the pattern giveaway (yay!). Still, I didn’t think I’d get to be a part of the Instagram challenge, as the pattern was being mailed to me from the States and I didn’t expect it to arrive with enough time for me to meet the challenge deadline. Spoiler: It did. It arrived by courier 4 days before the challenge was scheduled to end.

Once I had that pattern in my hands, I knew I had to make one.

I am not exaggerating here – I got started immediately. Within 6 hours of opening the package, I had the fabric cut out and ready to go (luckily I had this lovely Cotton+Steel rayon in my stash already washed and it just needed a quick press). I didn’t even bother with a muslin – I did a hasty tissue fit to make sure everything seemed to be in order and moved right along.

I made a few changes to the pattern that used up more fabric than I would have normally used. It was actually very satisfying to see a small pile of cut bits remain after moving away all the pattern pieces. It was tight, fitting it all in to 3.5 yards of 44″-wide rayon. I opted for a facing rather than a bias-bound neckline, and even squeezing that out was tight. But I did it.

I followed Sara’s instructions for hacking the sleeve to make a bishop-style sleeve, but I reduced the fullness quite a bit. I wanted more of a subtle “poof” in the sleeve, since my fabric already has quite a detailed pattern. As Sara did, I also raised the neckline (by 2″) and made the bodice without a button placket. In an effort to copy the style of a RTW dress I own and love, I added a 1″ waistband along the bottom of the bodice – I sewed the waist ties into the waistband, rather than into the main bodice pieces.

Hinterland4a

I was a little concerned when I tried on the bodice (I like to try on after every step of sewing – I’m impatient to see how it’ll look before it’s finished) – the darts didn’t look right at all. I hoped the fabric print would hide it and I could still get away with wearing it. Once the skirt was sewn on, it added some weight to the dress and the darts “grew” – and they ended up looking fantastic! I do think that if I make this dress again in something stiffer like a cotton (which I already have in mind), I would have to do some sort of bust dart adjustment. Also, like some people commented on Instagram, this dress needs a major forward-shoulder adjustment for me. This is a change I always need with Big Four patterns and only with some indie patterns, so when I sew indie patterns I always wrongly assume this isn’t a change I always need to make. So next time, I definitely need to make that fix.

I honestly didn’t have high expectations for this dress. I always feel unsure about boxier dresses, and even though the Hinterland looks great on so many other sewists on Instagram, I wasn’t sure it would suit me. Once I added those waist ties and cinched everything in the back – I was in love. The bishop sleeves were the clincher for me. I am crazy about this dress. I stared at it and stared at it when I finished it.

I love how many variations of this dress can be made and the hacking possibilities it has (I’ve already considered trying a version with a gathered waist or elastic-cinched waist). I would love to make one with a button-placket when summer rolls around again. Once I get the right alterations down, oh baby, the possibilities are endless!

The Art of Taking it Slow and Vintage Patterns: Butterick 3007

Coat1c

I’ve been noticing lately, that I’ve been getting more and more impatient. It’s not a totally new flaw of mine (my Dad would tell me when I was young, “you have a lot of virtues, but patience isn’t one of them). I want things done immediately – especially if it’s me doing them. The library book I finished is due in a week? I need to return it today. The store has a 30-day exchange policy on the thing I bought yesterday? I need to exchange it tomorrow. I don’t really know where this is coming from. I’m sure someone in the psychology field would pin it on this generation’s need for instant gratification and smart phones or something like that. It’s there, though. And it’s hard to overcome.

It’s really, really starting to influence my sewing and sewing purchases. If I see fabric that I like, I don’t want to buy it immediately because “I NEED IT NOW”, but because I worry if I put off buying it, it’ll get sold out, or magically disappear, or SOMETHING will keep me from being able to buy it when I’m ready. This has been leading to several impulse fabric purchases. Even worse, though, is feeling this rush to finish my projects. My brain acts like I have a month to live and if I don’t sew all the things I had been hoping to, then it’s game over. Obviously, this isn’t rational. There’s an urge always to finish quickly, and it’s getting to the point where I don’t always feel like I’m sewing for enjoyment.

I miss when I would hem yards of skirt by hand. I miss hand-picked zippers. I miss when I would carefully fit a new pattern. Now, I try to avoid new patterns so I don’t have to make a muslin. I try to choose fabrics that don’t need a lining. I pick the easier projects. Projects that used to take me a week to finish now take me a day or two – you can call it efficiency. I call it rushing. And I don’t like it.

Butterick 3007 / Vintage 60s Sewing Pattern / Raglan Sleeve Coat Jacket / Size 14 Bust 34
Pattern from StudioGPatterns on Etsy

Along came this coat. I splurged on a crazy, carpet-y, floral fabric from The Workroom (a different colourway of one I had already used) and decided to just make a coat out of it! I chose a 60s vintage pattern on Etsy, and I put off sewing it for at least 6 months (I had been hoping to start the muslin in JULY).

It was bugging me that the fabric was just sitting there. It was getting to the point where I worried Fall would pass by and I wouldn’t have a use for the coat ’till Spring.

So I picked up the pattern, made a muslin, and just rushed through making the coat shell. I was annoyed with myself. Vintage patterns were always the ones where I would take things slow, finish seams without my serger (the old-fashioned way!), and use lots of hand-stitching. Where was the care that I used to put into my projects?

Then things had to come to a halt. I didn’t have lining yet. I had put off buying it, and shipping wasn’t instant. I had to stop working on the coat. I was like the Tasmanian Devil whirling through piles of fabric and then hitting a brick wall.

I am bad at taking breathers. I don’t like taking breathers. But I had to stop.

When the lining came, I got back to work on it right away. This time, though, I took my time. The vintage sewing instructions told me to hand-stitch the lining to the coat. I didn’t know how to attach it any other way – I had never made a coat. So I followed the instructions and spent a solid day getting the lining into the coat. By hand-stitching, I had so much more control of the fabric and the stitches. I enjoyed myself a lot more than I would have if I finished it on the machine in 20 minutes. And now I have a coat that I love. A totally impractical floral coat.

Coat1b

Two challenges are going on on Instagram right now and they couldn’t have come at a better time. One is #slowfashionoctober – which is all about wearing clothes that are the opposite of fast fashion. On a few podcasts I’ve been hearing talk of the sewing world becoming like fast fashion, in the sense that many people are going for quantity over quality, trying to churn out as many projects as possible. After my most recent Instagram post, I read my blog tagline on my profile again – “creating a wardrobe worth cherishing”. What was happening to me? How is it that I was becoming the exact opposite of what my blog is supposed to be about? I hadn’t even been posting the things I made since there seemed to be so little substance to the work I put into them. #slowfashionoctober has really had me rethinking where I am in terms of my creative output.

The second challenge is #sewfrosting – which is all about sewing things that we don’t necessarily need, that are creative and over-the-top and exciting to make (frosting) rather than always sewing practical pieces (cake). We need the “cake”, but sometimes we focus so much on making the “cake” that we don’t let ourselves let loose and make “frosting”. It is such a timely challenge, because I have been talking so much to Eitan about how I haven’t stretched my sewing skills or made something that excites me in ages, and really, I think I’ve gotten bored. I miss when I used to make extravagant projects.

Coat1a

This coat feels like a step in the right direction. It’s certainly on the over-the-top and frosting-y side of things. I honestly wondered if I’d ever wear it in public. I mean, it’s a bit…much – at least for me. But as soon as I had finished photographing it, I had to head out to an appointment, and I looked at it and thought, “Screw it. I’m going downtown in frosting.” So I did.

Here’s to creating a wardrobe worth cherishing – filled with lots of cake and loads of frosting.

Doggoandcoat

Vintage Patterns: Butterick 6796

HouseDress1web

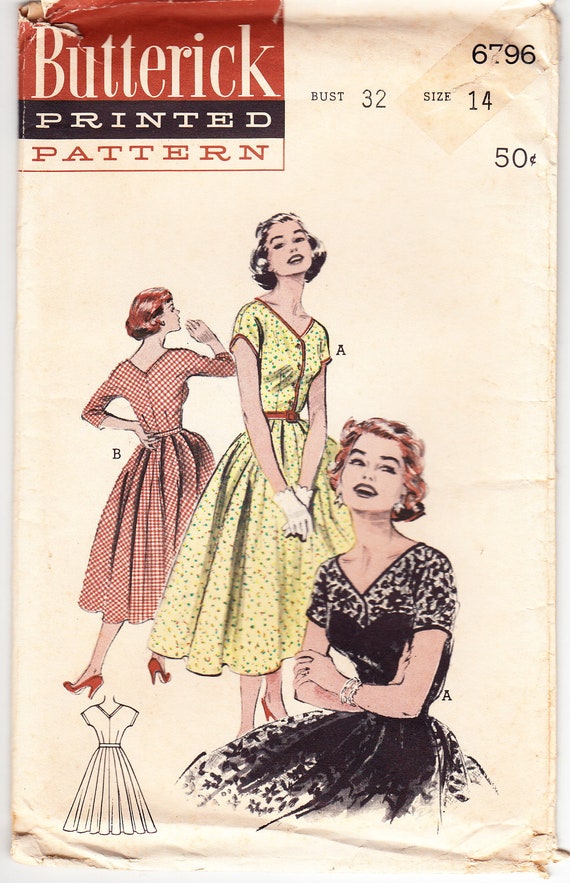
Every once in a while, I like to treat myself to vintage patterns from Etsy. I bought a couple from SewUniqueClassique a few months ago, but as is usually the case when I buy vintage patterns, I don’t have something specific in mind to make. I’m always tempted by the envelope illustrations, but I try to look past them for something I might actually make or wear, and for something that’s a bit more unique than the standard darted bodice with a gathered rectangle skirt.

Vintage 1953 Butterick 6796 Sewing Pattern Misses' One-Piece Dress - Wide V-Neckline Size 14 Bust 32

Butterick 6796 is one of those patterns. It looks relatively simple, but I loved the charming, vintage vibe it has. (I was also really pulled in by that lace version. One day.) Also, any vintage pattern I find needs to have a neckline I’m comfortable with (or seems easily adjustable), and sleeves that cover the upper arms. This pattern fit the bill.

When I was at Fancy Tiger Crafts in Denver, Colorado, I picked up the last of an incredible charming Japanese cotton lawn with little houses on it. Thinking of many vintage dresses with novelty patterns, I thought the cotton lawn would be a perfect match. The pattern is cut on the bias, and I thought the horizontal print would emphasize the bias cut nicely.

When you’re sewing a vintage pattern a muslin is pretty important – especially since my Japanese fabric was expensive, and, thanks to yours truly, sold out. I bounced back and forth between two muslins. I tried the pattern with no adjustments other than making the waist a bit bigger – even though the pattern is a size 32 (in vintage patterns, a 34 usually works perfectly for me), as when I measured the pattern piece, there seemed to be plenty of ease. So I kept the bust as-is. I raised the neckline just a bit and added a fifth button. The original pattern had a huge pleated circle skirt, and since I didn’t have loads of fabric for that, I decided to sew together a few a-line skirt pieces and gather them.

As is pretty standard with vintage patterns, the bust dart was high and pointy. When I tried lowering it, it just lowered the pointiness (not a charming look). So I decided to try using my Butterick 6318 (a vintage repro that I’ve made before), and I had the same issue, plus it was much less fitted than the original. I realized that perhaps since the fabric was cut on the bias, the dart was just coming out more pointy. I went back to the original muslin, lowered the dart, and decided to work out a solution on the real deal.

To try and “soften” the dart, I underlined the bodice with a white silk/cotton blend fabric, and then stitched the bust darts by hand. I figured the machine was stretching out the already-stretchy bias fabric, and was making the darts pointier. It was a nice little “slow sewing” project. I also used basting stitches to mark in all the other darts (two back darts, and three by each elbow – a vintage touch I really love).

I liked working on this dress because the construction was a bit different than I’m used to (which is why I usually like vintage patterns). The v-neckline is self-faced, and it all came together very neatly. It was supposed to have a side zipper, but I really hate side zippers, so I put a 14-inch zipper in the center back (I didn’t want a zipper at the top of the back ruining that lovely V shape). I sewed binding onto the sleeve hems before folding them in and hemmed them by hand. The sleeves are kimono sleeves, so I also like to stitch a small piece of seam binding along the curve for extra reinforcement. I also stitched binding along the waist seam as a sort of waist stay.

The short-sleeve version of the pattern is supposed to have bias-bound edges (around the neck and button placket edges), and I specifically hunted down some mango-coloured Robert Kaufman cotton lawn for the purpose. It was supposed to bring out the pink-y coloured houses in the fabric print, but when I sewed it on I realized it was a touch too orange. I tore it out and topstitched according to the long-sleeve version’s instructions instead.

I really didn’t feel like setting up my sewing machine for the buttonholes, so I followed the instructions that came with the pattern and sewed all five by hand (yes, my laziness has no logic). I flipped back and forth about which buttons to use (I’ve never sewn buttons on one of my own garments. Fun fact: I had a phobia of buttons when I was 5. I cried when I learned my school uniform would have buttons). I wanted to cover my own buttons, but I couldn’t find the right size button kit online, and when I tried a (non-matching) fabric-covered button from my stash, I really struggled to get it through the buttonhole. I had some vintage buttons from a Fibre Share package, and those worked perfectly.

HouseDress3web

Like many vintage dresses I’ve sewn, this dress is tough to get on and off (I have very prominent shoulder blades and it makes it hard to get the dress past my shoulders). Wearing it makes me feel very 50s house-wifey (especially if I have my crinoline on), but the fabric isn’t too retro-looking for real life and it makes a pretty spiffy semi-casual-dressy dress (does that make sense? No?). I’m not sure the skirt I made up really works for it – a plain ol’ gathered rectangle would probably work better. I do have some real vintage fabric that I think would be perfect for the dress – so I would like to make it again. It’s a light, yellow floral fabric, so it’ll have to wait for the spring. Oh, and I’ll have to make that lace version too…

The Siri Pullover: Review and Real Talk

SiriB4

This year hasn’t been incredibly easy for me. I spent last summer going crazy with all the free time I had on my hands, and ended up knitting about 12 hours a day. Knitting is a wonderful thing, but there’s such a thing as overdoing it.

In November 2017, I started noticing my fingers going numb – not just when I was knitting, but when I was doing any other sort of task that required hands. I had been experiencing arm pain, mainly in my left arm, but I ignored it. When I noticed numbness, I regretfully put away my knitting and called my chiropractor.

SiriB2

I spent several weeks going to many sessions of treatment, and completely avoiding knitting. I noticed that both my arms were starting to hurt more, and I hadn’t been knitting at all. I told my chiropractor this, and he ignored it, saying my body was just overcompensating. Frustrated, I stopped going to him. My mom (she’s a doctor so she knows some things) told me I may be in pain from a lack of exercise (I believe it’s called deconditioning, in technical speak) – so as the new year came in, I got a gym membership. At first it felt like a relief to give my arms some real exercise, but as my workout class got tougher, I noticed I was in pain all the time. Alarm bells in my head were ringing, and I decided to go to a physiotherapist my friend had recommended.

Before I started going to her, I cast on my Siri pullover, just to squeeze in some knitting before I was banned from it by a professional. The physiotherapist at first told me to hold off knitting for three weeks, but soon weeks became months, and she wasn’t seeing the progress we had hoped for. I was in a lot of pain. Some days I couldn’t even hold a book – I had to lie on the couch and do nothing. My physiotherapist was amazing, and she was honest with me, and told me that she wasn’t accomplishing what she had hoped to, and that until I could get more of a diagnosis, she didn’t need me to come in for sessions. I went to a neurologist who found nothing wrong. I have gotten multiple blood tests. And the pain continued to exist whether I was knitting or not.

SiriB1

It was when I realized this that I felt I could start knitting again. I am waiting for my MRI appointment in the fall, which is about 6 months after I booked it in April. It doesn’t feel like there’s much else to be done. And knitting makes me incredibly happy. So I knit.

I don’t knit if it hurts too much. I don’t knit 12 hours a day. I don’t think I ever should again. I knit between one to three hours a day, and that’s plenty to feel like I make significant progress on my projects.

I picked up my cast on Siri again in June, and I finished it in August. Since November, I never thought I would finish a sweater within a year, let alone 3 months. I thought it was no longer possible.

I wish I could say I knit because everything is better now. I wish I wasn’t always in pain. I’ve been learning to cope, though. I’ve been learning what my limits are. I’ve been learning what I can and can’t do. Some days, I’ll be honest, I break down and feel hopeless, because I feel sure that I’ll feel this way the rest of my life. Other days, like today, I feel good knowing what I can accomplish despite the pain. I can still sew. I can still bake. I can still go for long walks. And some of the time, I can still knit.

So this sweater isn’t just a sweater for me – it’s a symbol of what I’m still capable of. I still have my hands and arms and fingersI can walk and run and sit and stand. I can make something beautiful.

SiriB3

The Siri pattern is a wonderful knit. It looks incredibly complex, but is actually relatively quick and easy (assuming you’ve had knitting experience). I adjusted the pattern to be knit as a pullover rather than a cardigan (a pretty popular adjustment). I used Julie Asselin Leizu DK yarn, which twisted quite a bit and made the stitching sort of bumpy in places, but it all pretty much balanced out with blocking. I thought it was more flattering before blocking, but before blocking the armholes were also a bit snug, so the extra ease is a good thing in terms of comfort (isn’t it always?). I also shortened the sleeves, because I find a 3/4 sleeve more flattering on me. It’s an incredibly cozy knit and I’m so eager to wear it, but the forecast shows more 40 degree heat in the coming week. Luckily it was beautifully cool this morning when I modelled it.

I don’t know about you, but I can’t wait for fall. And I’ve already got something new on my needles.

Adventures in Shoemaking: Desert Boots at Art & Sole Academy

DesertBoots1

I haven’t been sewing much over the last month – between travelling to Prince Edward Island and Boulder, Colorado, I’ve really only had time to work on some gifts I had put off making. I did get in some great shoemaking, though – and it was the real deal this time.

For a long time, I had been wanting to take a class at the Art and Sole Academy in East Toronto. Eitan and I started by taking the Shoemaking 101 class, a quick 2-hour intro to the process of making shoes. It isn’t a class where you get to make anything, but you learn all about the materials and tools that make a shoe. I knew during that class that I HAD to take a proper workshop and make something. After a bit of nudging, Eitan agreed to take the Intermediate class with me starting at the end of June.

At Art & Sole, the classes are pretty small, and each student works on their desired “intermediate level” shoe – we had one student working on heels, three working on Oxfords, and I was working on desert boots. Jen, our wonderful instructor, would spend the class guiding each of us along individually, depending on what we were working on. The class was 5 sessions, but all but one of us needed to come back for several hours (fortunately, Jen includes this time in the tuition). That leaves you with a total of 35+ hours of shoemaking. Phew!

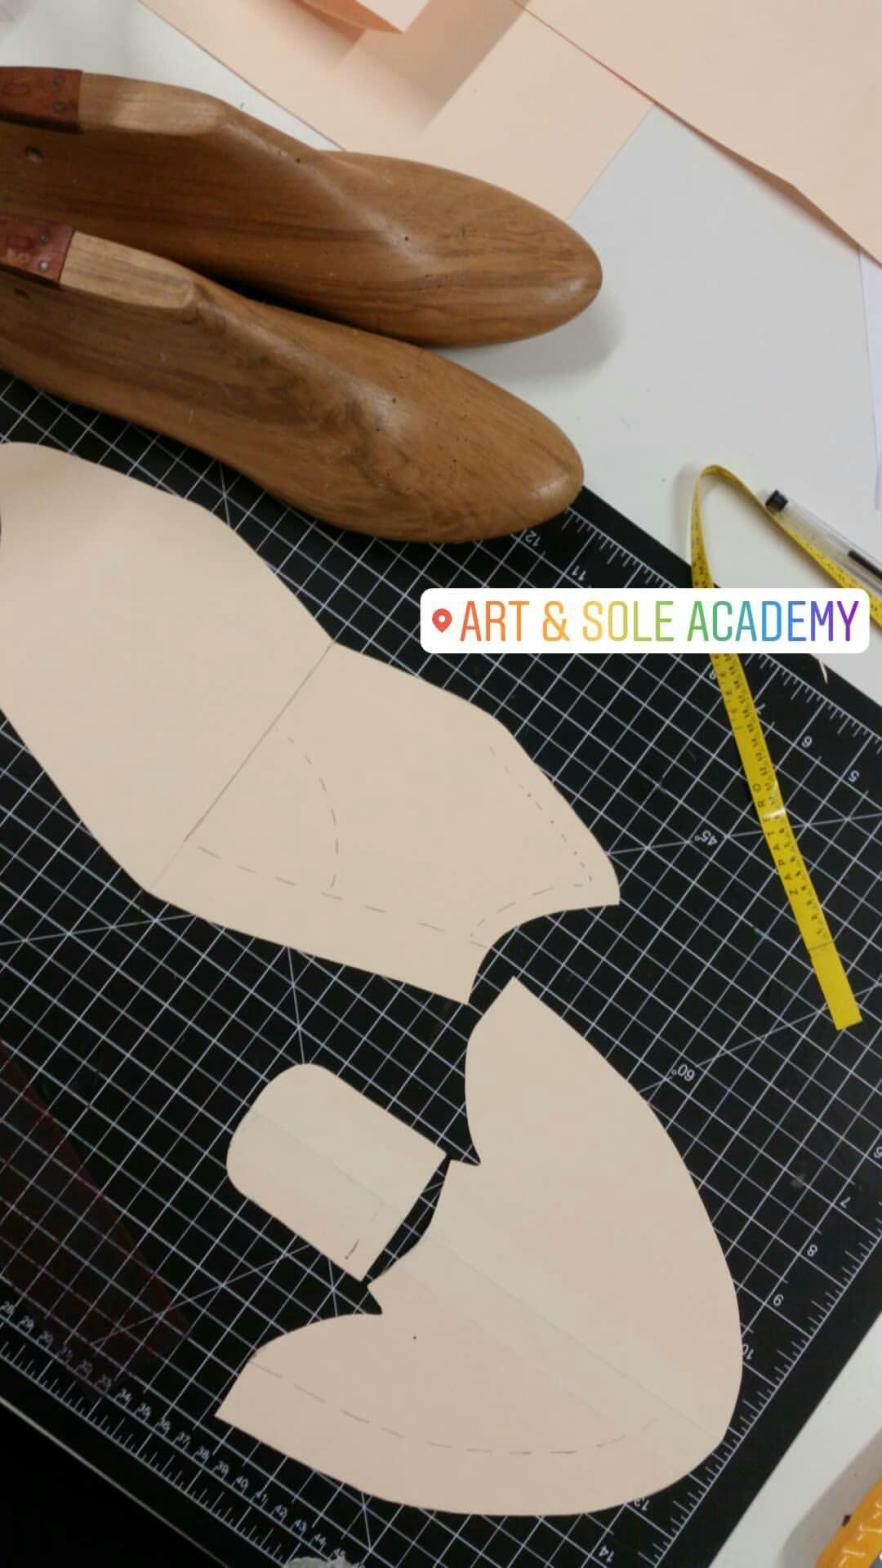
We all started off the same way – by making our pattern. This process actually took almost two sessions. You tape up your last (the wooden form on which the shoe is built) with masking tape, and then peel it all off and put it on card stock. You divide that into pattern pieces, and those are the pieces you use to cut out your leather.

IMG-20180629-WA0000 (1)

IMG_20180705_221018_747 (1)

I bought some lovely kid suede at Perfect Leather on King St., and lovely magenta lamb skin for a contrast lining. I had to cut pattern pieces from both of these, and then sew them together on the sewing machine.

DesertBoots3

Then came a process called lasting, which is basically stretching the leather over the last, and hammering it down on the bottom. Then you glue it all down where you nailed it (shoemaking involves a LOT of glue). Since all the leather gets built up and lumpy on the bottom, you have to do something called skiving. This involves taking a knife and shaving away the leather so the bottom is nice and flat. I struggled with this a bit, and my knife slipped and made a nice little slice in my arm. Luckily Jen had a first aid kit on hand, and she and Eitan bandaged me up.

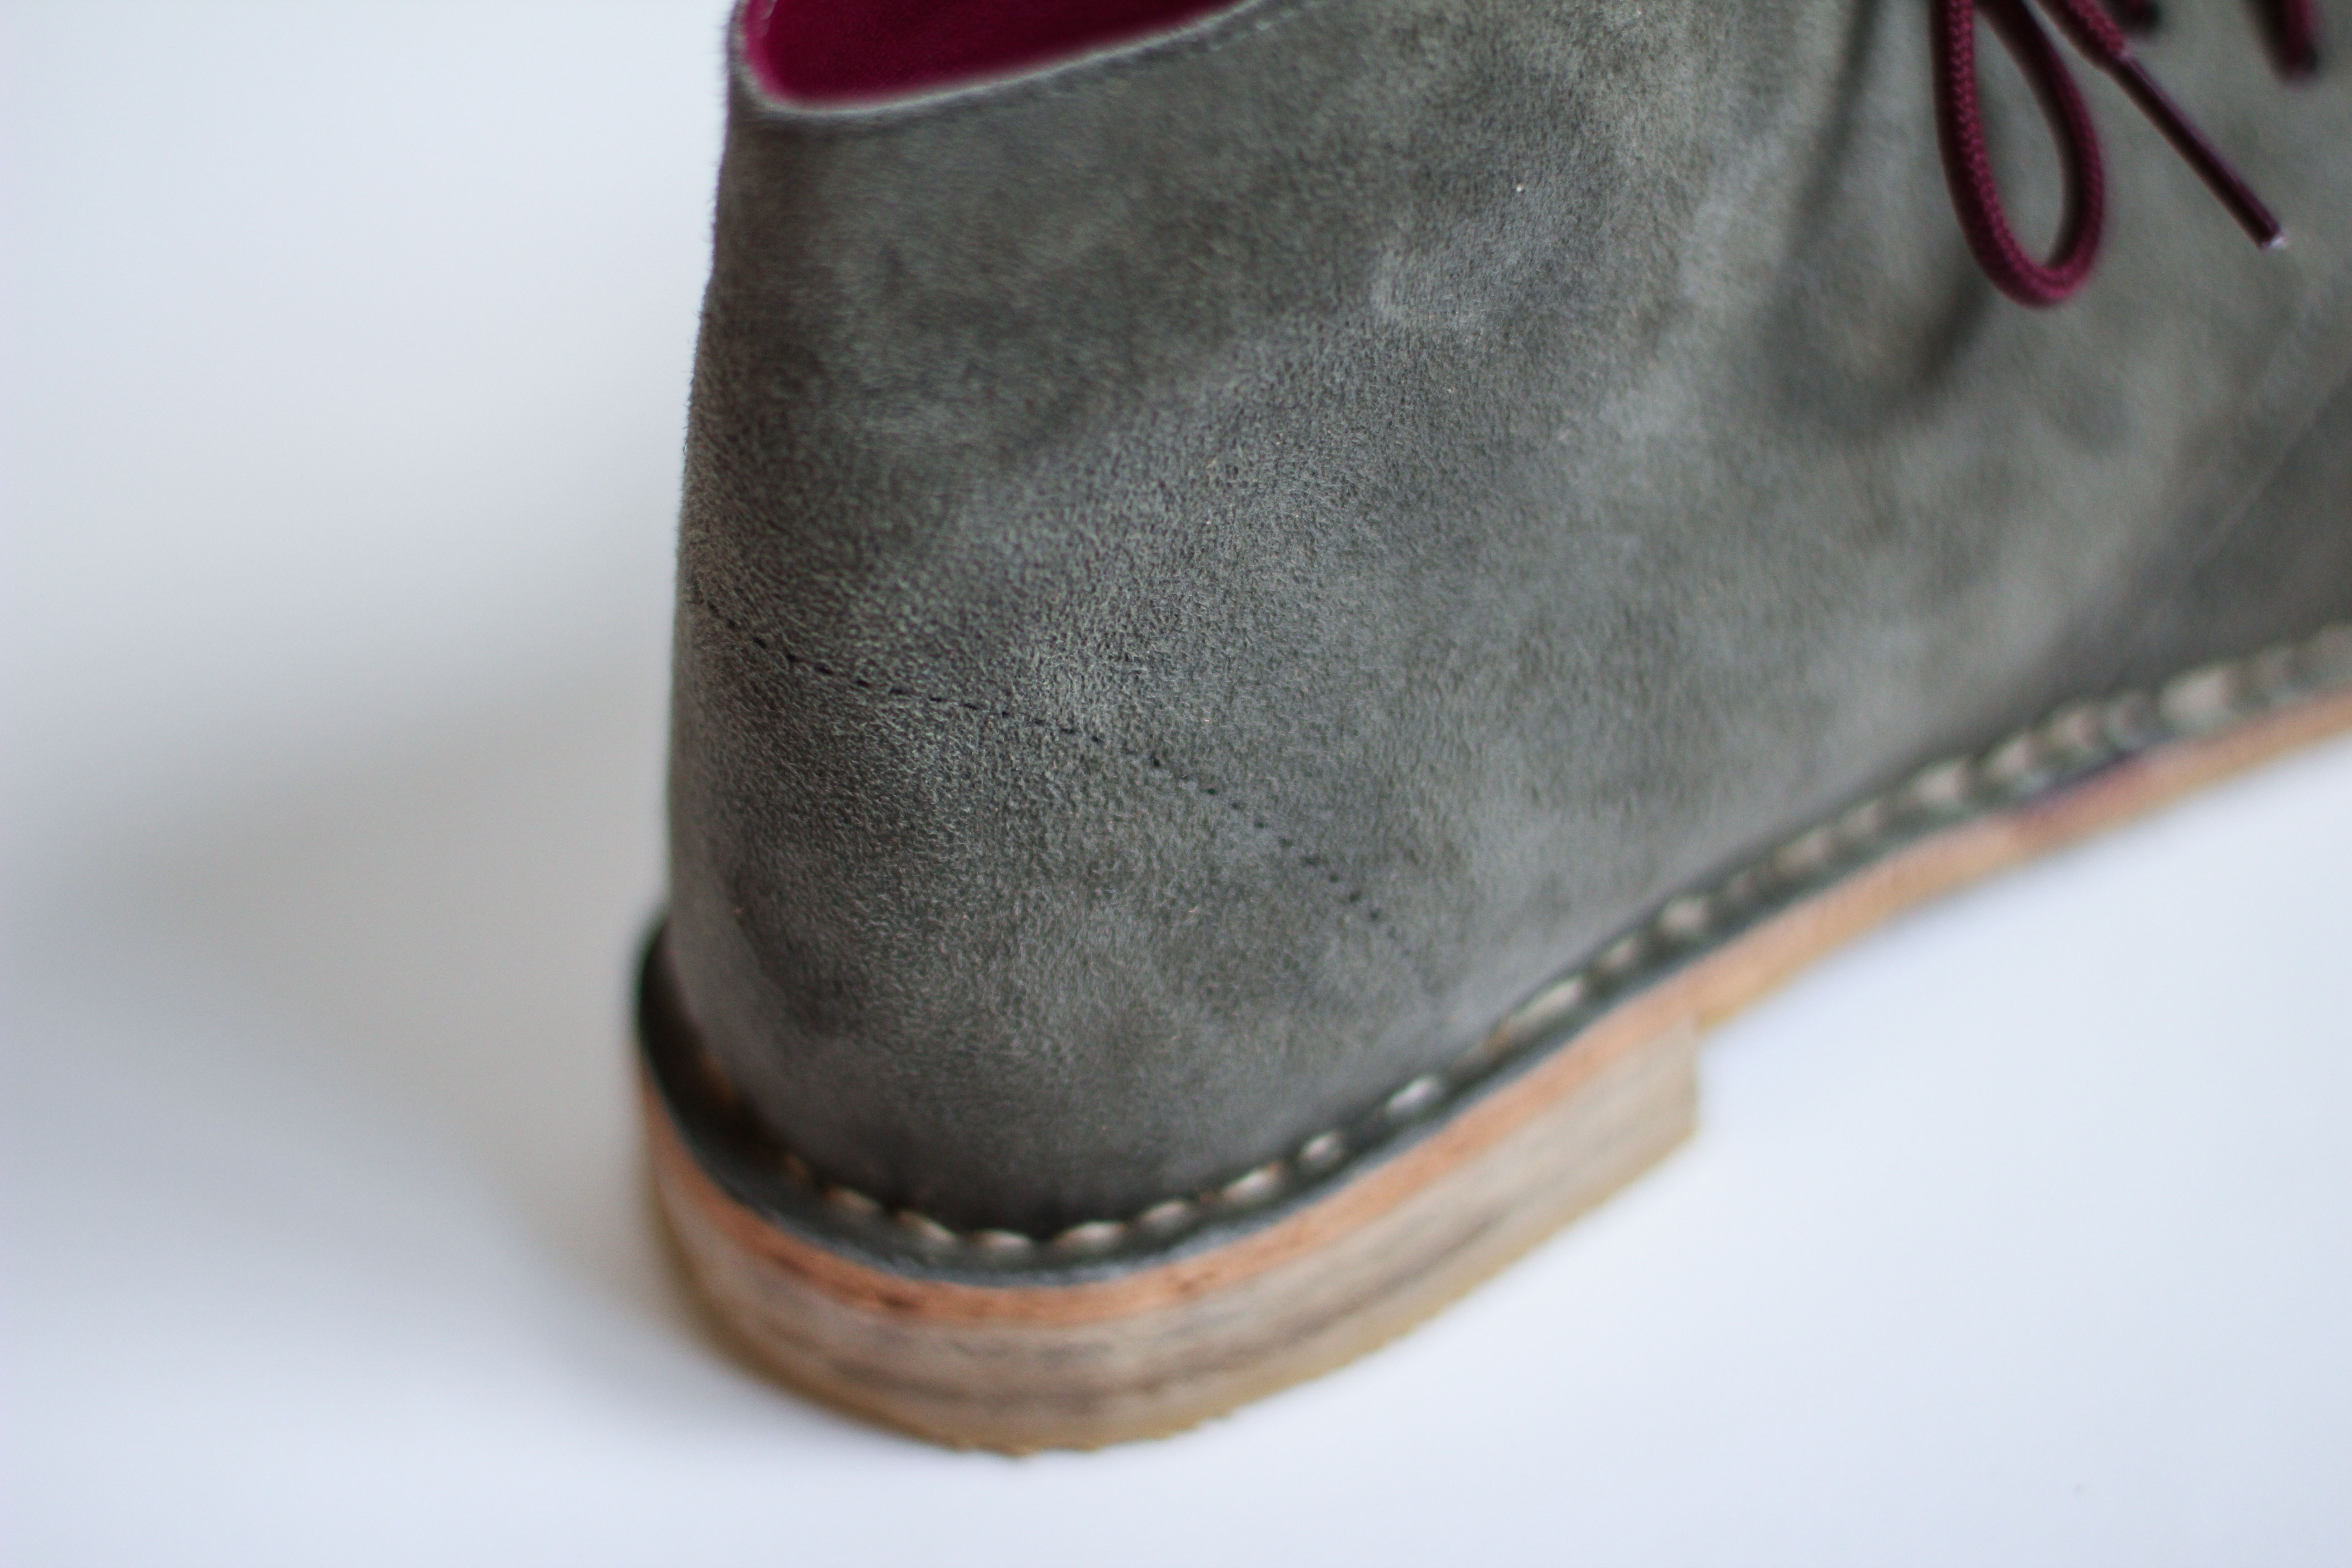
Anyways, I wasn’t letting a cut stop me! After lasting the lining and a layer of toe and heel stiffeners (a small piece of vegetable-tanned leather that helps keep the toe and heel of the shoe nice and strong), I had to glue on the midsole, which for a desert boot, you cut out extra large and cut away the excess after stitching is done. After glueing on the midsole, I had to glue the upper leather (the suede) to the midsole, and then I had to stitch it down. I did this stitching by hand, using a handy little stitching tool and waxed thread.

Then I had to glue on the heel and the rubber treads. Using a belt sander, I sanded all the edges of the sole smooth, did a little cleaning up, added foam insoles, and they were done!

DesertBoots2

I tried them on, and they were a touch snug, but Jen told me that an easy solution is lightly wetting the insides and walking around in them for a bit. Leather becomes very malleable when wet, and will mould to the shape of your foot quite nicely! The only thing I don’t love about my new shoes is that the soles are a bit thin – I think just one more layer of leather would’ve made them perfect. As is, I can feel the heel through the bottom of the shoe. Still, pretty impressive for a first time shoe-maker!

DesertBoots4

I am already thinking about which classes to take at Art & Sole next! I would love to make sandals some day (which is easier than making shoes), and I’d also love to make ballet flats. I have the knowledge now to make shoes again on my own, but the tricky thing is that shoemaking involves a lot of tools (I may have a sewing machine and x-acto knife, but I don’t have a belt sander…). Lasts are also pretty tricky to find, and are integral to making structured shoes. But, maybe one day I’ll invest in a pair of lasts and sort out some way to make some shoes at home. Until then, I’ll have to stick to Sneaker Kit or going back to Art & Sole Academy!