Welcome to part two of my Japanese crafting adventures! If you haven’t read part one yet, which is all about the crafty places I visited in Tokyo, you can read it here.
Today I’m excited to share all the crafty sights we saw while visiting Kyoto, a city that is renowned for its traditional craft industries.
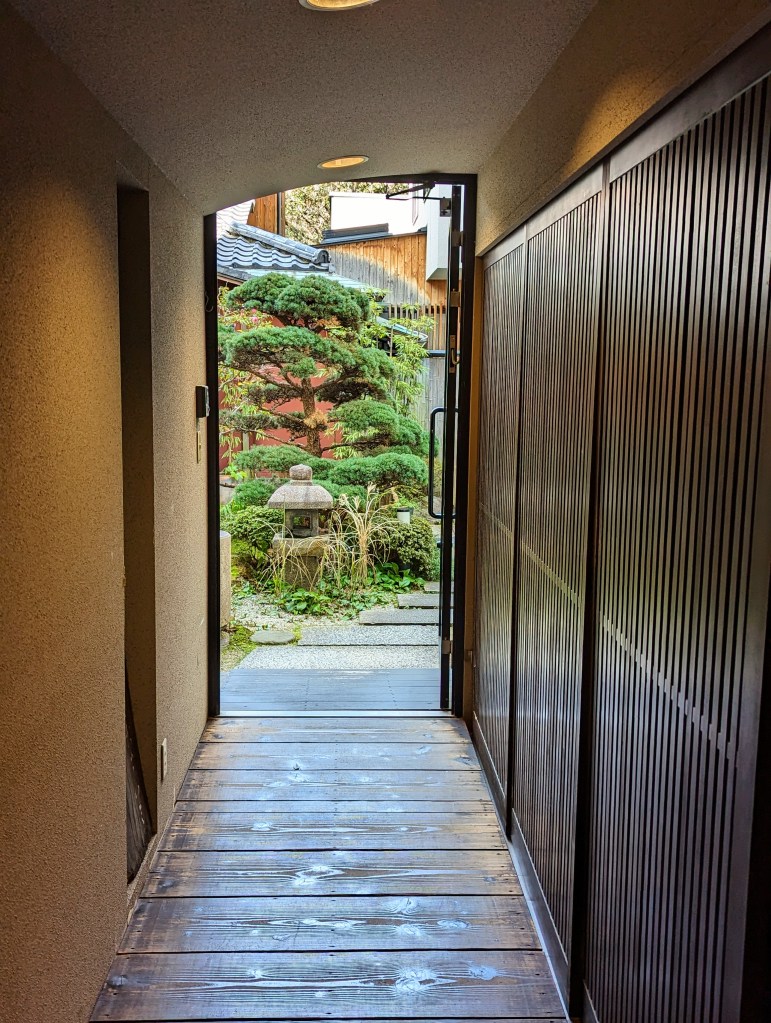
The magical little alleyway leading to the Misuyabari Needle shop – more on that below!
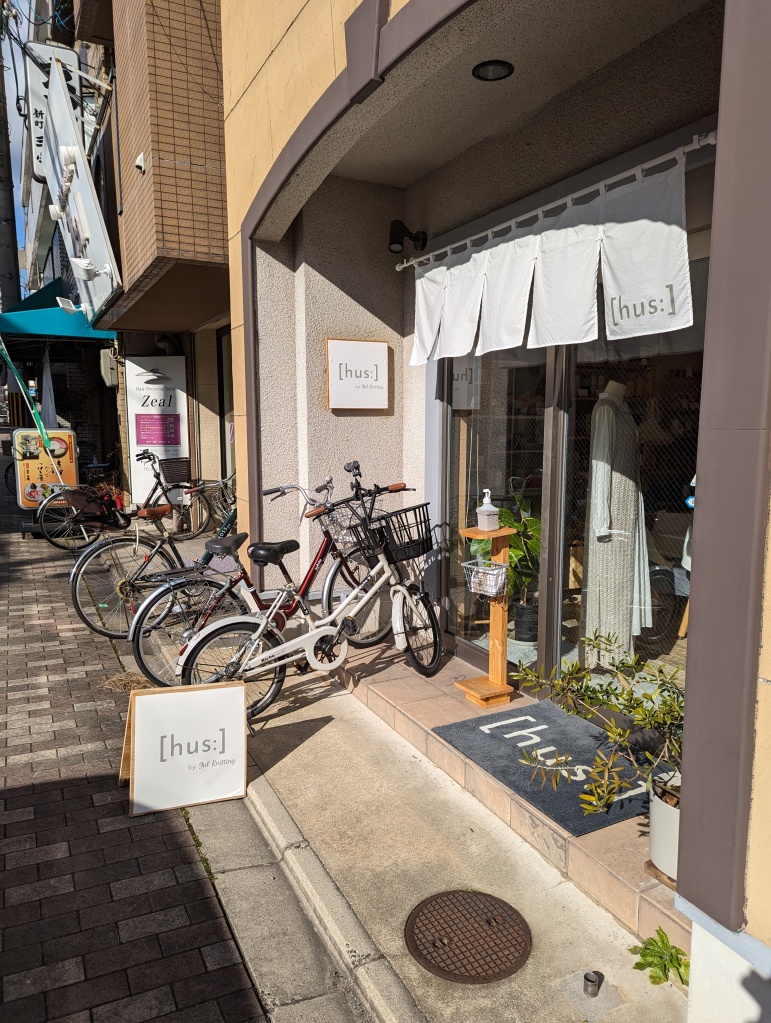
On our first day in the ancient capital, we arrived via bullet train and were fortunately permitted to check in to our AirBnB early (lugging your luggage around on public transit in Kyoto is a huge no-no, so we were grateful to be able to unload it so we could see the city!). We dropped off our things and went straight to [hus:], a small yarn store I had stumbled across thanks to the YouTube algorithm. They were only open on Saturday and Sunday, and considering we didn’t have a full weekend in Kyoto, I wasn’t expecting to be able to make it there, so I was glad we were able to drop by!
[hus:] was a sweet little store with a nice, clean aesthetic and kind staff. This is a great place to go if you like to make amigurumi or other small crochet items, as they have lots of neat yarns and kits suitable for those sorts of things. I fell in love with a very soft tweedy yarn, sold in cones, and bought a sweater quantity which will eventually become a cardigan for Eitan.
The next day we went to a large number of shops mostly in central Kyoto.
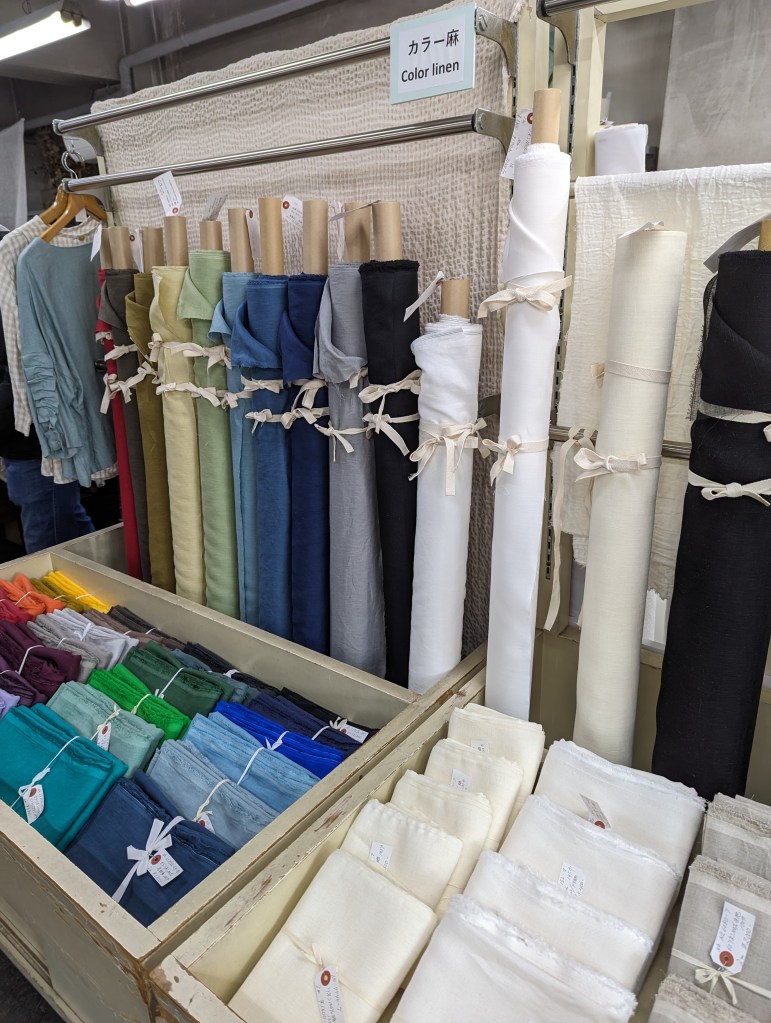
Our first stop was Linnet, a real teeny tiny little fabric shop that specializes in linens. It’s worth noting that (I’m pretty sure) the fabric is on display as fat-quarter-type pieces, and you select what you want and they cut the yardage you need from stock in the back. I didn’t actually end up buying anything, so I’m not sure this is actually how it works, but it’s something I saw in a review of the shop, and I saw very few actual bolts in the store, so I’m guessing this is the case. No staff offered to help me, but I was happy to browse and just didn’t find anything that really pulled to me.
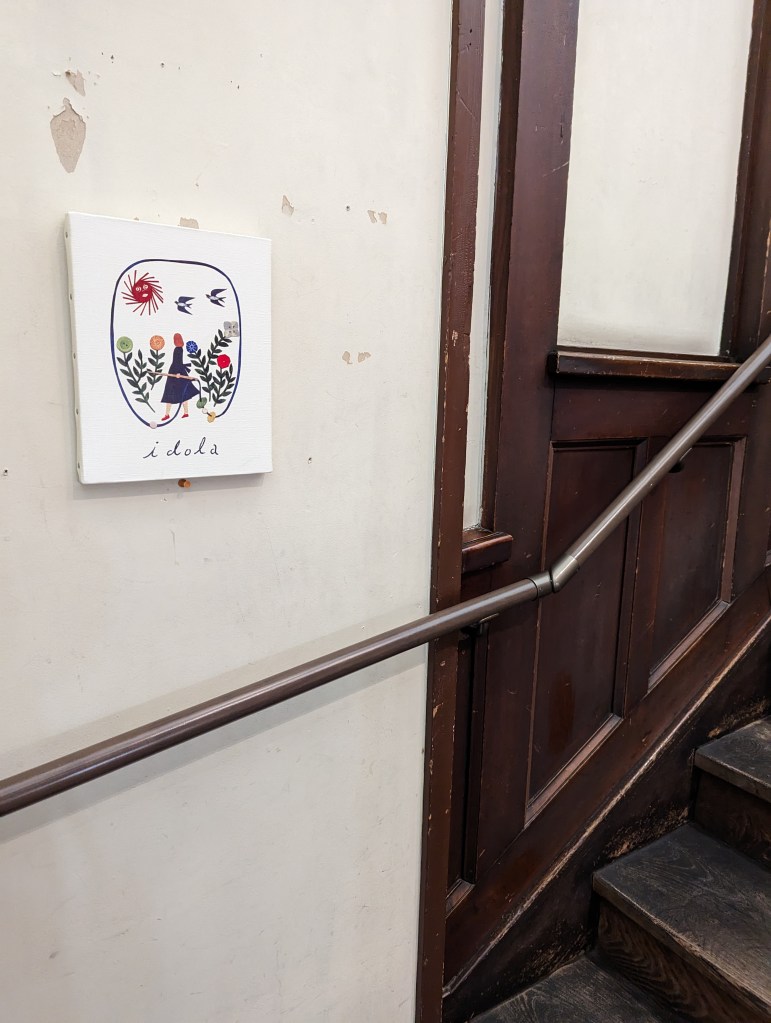
After that we went to Idola, which was an incredible button store on the third floor of this beautiful old building with a lovely wooden staircase. When you reach the landing where the store is located, they have little lockers where you can store your personal items and grab a tiny shopping basket to do your button shopping.
Idola had lots of great vintage buttons (as well as beads and sequins) but I was so smitten with the ceramic buttons by nonomura minami – they were incredible works of art and I just couldn’t resist getting a few.
After that we went to Misuyabari Needles, which I had seen on a few other sewing blog posts about Japan. Apparently it’s a very old shop – from what I’ve heard at least a hundred years old. It’s very much tucked away, and it’s very tiny (only a few people can fit in the shop at a time) and it’s surrounded by a beautiful traditional Japanese garden. The staff there were very welcoming and friendly. They really just sell one thing – needles and pins – as well as decorative storage boxes for them. They sell pins with tiny handcrafted heads shaped into different animals (think dogs and cats!) or objects (like teeny sewing machines) – there are many to choose from! I asked the man working there what you’re meant to do with them, and he told me they’re decorative; I think the Dalmatian puppy pin I chose will be an adorable addition to one of my more decorative pin cushions! I also bought a very cute felt needle book, which I was actually in need of and very happy to find.
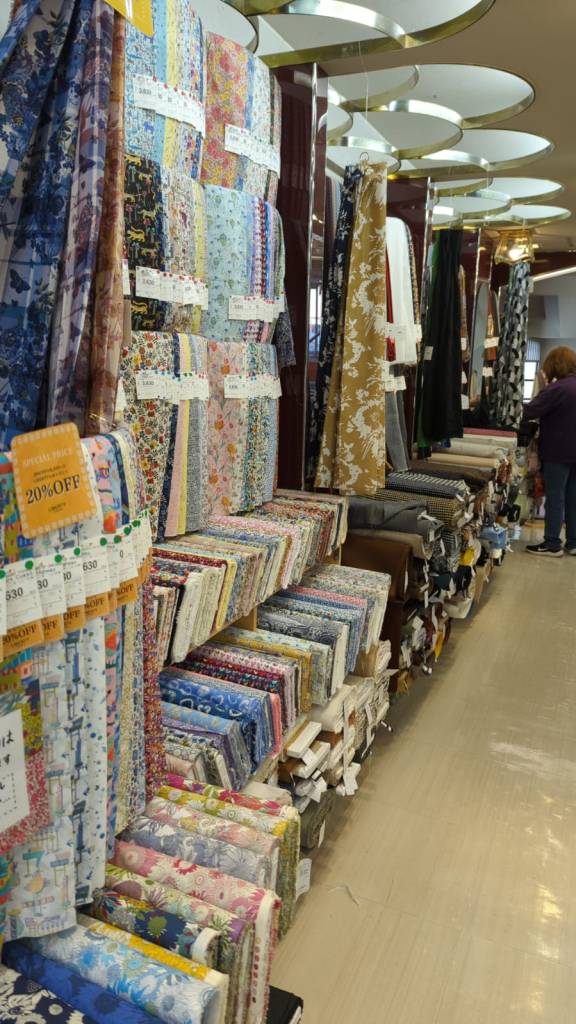
We then made our way to Nomura Tailor. This was my favourite fabric shop on the whole trip – I probably could have spent all day in there (I was in there for at least an hour before I even realized there was a third floor, where they have loads of books, notions, and kits). This was the Japanese fabric store of my dreams – interesting prints, luxurious Liberty fabrics, and beautiful linens. I enjoyed myself so much walking around and came home with some beautiful fabrics, including some Liberty prints I’ve always loved and never got around to buying.
Sorry for the blurry cell-phone image of this one!
I actually went back to Nomura Tailor the next day for another round of shopping, and to check out Nomura Tailor House, which I hadn’t known existed until after I went to Nomura Tailor (I think it’s because I realized that I had seen a different shop sign in some photos online?). It’s just a few minutes’ walk away in the nearby covered shopping arcade. I’m still not really sure what the difference was between the two shops, but Nomura Tailor House was smaller and seemed to have more quilting fabrics and pre-cut fabric pieces. Either way – don’t miss it like I almost did!
One last fabric stop we made was mina perhonen, which was an incredibly beautiful store, however it was also (at least for us) incredibly expensive (think over $100 CAD per metre…). I should have known when the employee there gave us a look, but gosh, their fabrics were indeed lovely! The fabrics there felt like they were very high quality, but there was nothing I loved so much that I was willing to splurge.
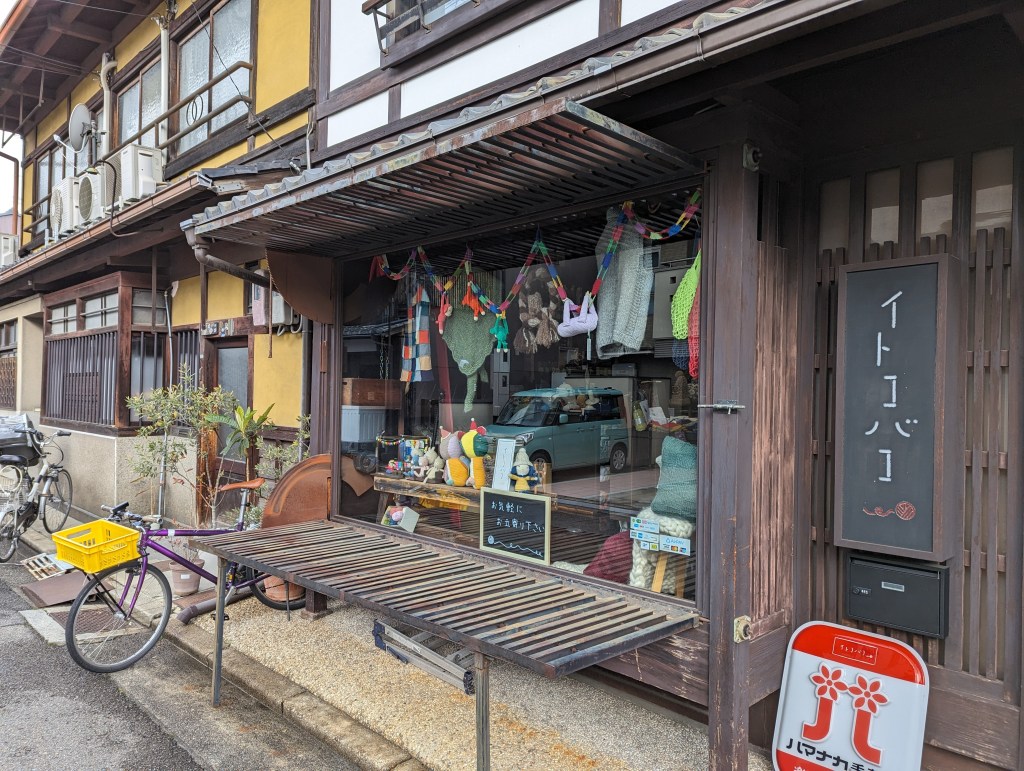
My last crafty store stop in Kyoto was Itokobaco, which is in a beautiful old house (make sure you take off your shoes before you go in!) with a very cozy vibe. It’s a good place to get solid colour yarns in many colours, or pick up some cute crochet kits. They have a nice selection of books too!
Other crafty things of note:
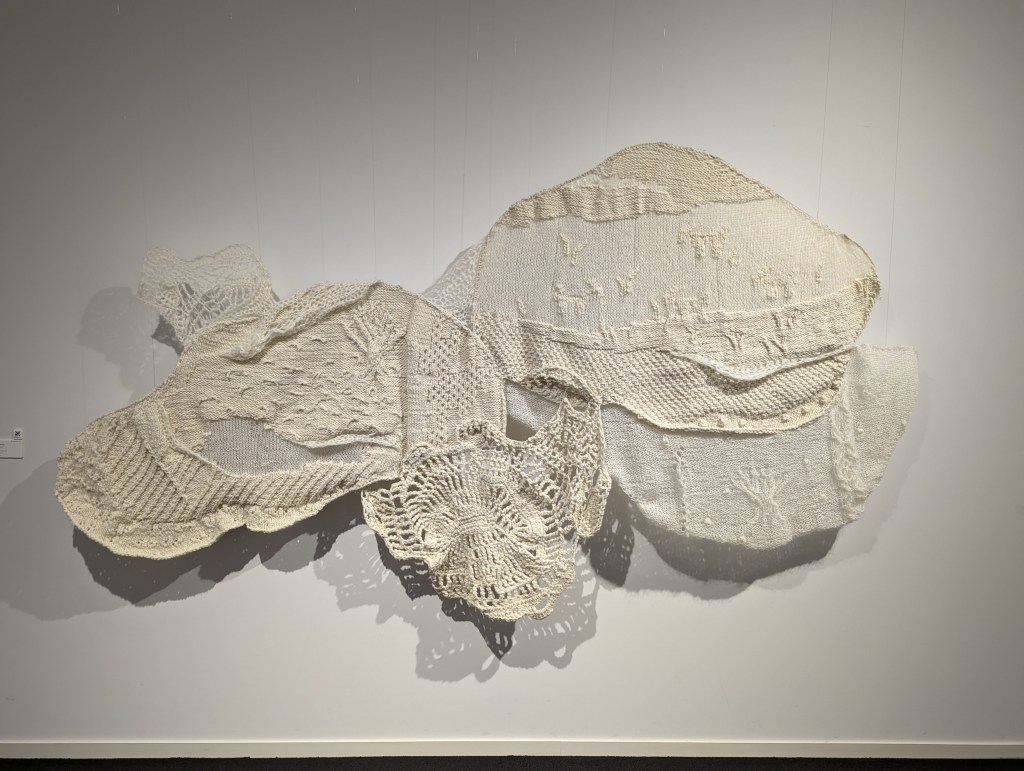
The Kyoto Museum of Crafts and Design is a great place to spend a rainy afternoon. You don’t need much more than an hour or two there, but it’s worth the stop. They have a great permanent exhibit on the traditional crafts of Kyoto, with demonstrative displays of how they are done (including some where you can try it yourself!). The temporary exhibit on while we were there was of the works of craft students (I believe from the Kyoto Arts & Crafts University), which, as graduates of an art and design university, was very interesting to look through and took us back to our art school days!
Another stop we loved was Suzuki Shofudo – if you love Japanese paper products, definitely check it out – they have incredible washi paper by the metre, but it was also a great place to load up on special Japanese souvenirs. We stocked up on lots of goodies for ourselves and family there!
That’s all, folks!
We had such an amazing time on our trip to Japan. After all that planning, it’s hard to believe the trip has come and gone!
Japan certainly is a wonderland for crafters or anyone who appreciates great craftsmanship. Which of these places would you love to visit most? Is there anywhere I missed that you’d recommend to others planning their trip?
I hope you enjoyed reading and please let me know your thoughts, questions, and comments!
Last month, I was lucky enough to finally make it to Japan for the first time ever. My husband and I initially booked a trip to go in March of 2020, and I think it’s safe to say we all know what happened to world travel then. I had created a full itinerary for that trip, and I built off of it a bit when planning it the second time around. While the wait was hard (and that initial cancellation painful), I’m glad that I had more time to do research on all the crafty places I could potentially visit on our trip.
Here, I will share that research, and where I ended up going – as well as what I discovered along the way – with you.
FABRIC & TRIM:
Our first day in Japan, we took it easy on our jetlagged selves and walked around in the Ueno Park and Tanaka neighbourhoods, which weren’t too far from where we were staying in Arakawa-ku. It was a beautiful day and the streets were quiet, and we walked by a store called Biscuit – I was very intrigued, but the lights were all off and the door shut. The sign on the door translated roughly to, “I will be opening late today”, but with no indication of when “late” would be. We decided to continue walking around the area and went back about half an hour later. I was disappointed to see the store still dark, until Eitan pointed out the shopkeeper making her way down the street to open up shop.
I had so much fun browsing Biscuit – it was full of fun little vintage knickknacks, as well as vintage fabrics, buttons, and a wall filled with spools of vintage ribbons. Unfortunately I didn’t find any vintage fabrics I liked that were in a large enough piece for me to make use of, but it was still fun to look through and see what was there. I couldn’t help walking out with a few yards of vintage ribbon, which was, in typical Japanese fashion, perfectly wrapped up for me to take home.
Now, I’m sure that if you’re into textiles and you’ve looked into or gone fabric shopping in Tokyo, you’ve heard of Nippori Fabric Town. Well, you should know that I take my fabric shopping very seriously – so much so that I booked our Air BnB about a 12-minute walk away from Nippori. I imagined carrying so many loads of fabric that I would want to easily return to the Air BnB to unload and have a snack before heading back for another round.
In truth – and maybe this is a very unpopular opinion – I actually was very underwhelmed. Sorry, I know. Nippori Fabric Town is like a mecca for textile lovers visiting Tokyo. Maybe that’s the thing – maybe it was so hyped up that my expectations were just too high. I didn’t find all that much that I didn’t feel like I could find at home (maybe I’m just spoiled with Toronto’s fashion district?). I had visions of incredible printed linens and exclusive Nani Iro prints… and, well there were cute quilting cotton prints and lots of cute canvas prints, but not the kinds of things that got me excited. Maybe this was for the best, as I didn’t feel overwhelmed and as though there was too much pressure to choose.
The star of Nippori Fabric Town is Tomato. There are a few locations, all specializing in different types of fabric. My favourite location was the “fancy” store (Tomato SELECT-KAN), where I saw some of those beautiful linens and wools I had dreamed of, and purchased what was left on a bolt of dark green floral linen. I was tempted by some fabrics in their “interiors” store (I always have been drawn in by curtain-y type fabrics for garments, à la Maria from Sound of Music), but the thought of fitting bulkier fabrics in my suitcase, and right at the beginning of the trip, had me nixing that idea.
One of the reasons I’m glad I was staying nearby was that I had a chance for a second round. When I got home that first night, feeling underwhelmed by my first experience of Nippori Fabric Town, I checked out their official website to see if there was something I had missed. Turns out, I had missed l. musee buttons, which I had had on my list of places I wanted to visit. They have a location on the main street that’s focused on beads, and I was so disappointed not to have found any buttons there. It was only after I checked out the website map again that I realized the button shop was a separate shop on one of the side streets.
Nanwa Sangyo – a beautiful linen shop. I didn’t buy anything but it was beautifully organized
I also learned from a second look at the website and map that there were more stores east of the main “strip”. My favourite of these was Humongous, a store specializing in block prints. The store is small, but very beautifully organized (photos were not allowed). The fabrics were expensive, but beautiful, and I felt they had that charming and unique Japanese quality I was after. The staff member working there was also kind and incredibly helpful, and more than willing to communicate using the translation apps on our phones.
So aside from stopping in at Humongous on our second visit to Nippori, I picked up some vintage buttons at l. musee (embarrassingly enough, I didn’t realize that the price listed was per button and not per card…) and some stunning woven ribbon from E & Son Fabric’s trim shop (which also did not allow photos – trust me, though, it was a beautiful shop). The trouble I have with trims is I love them, but have no clue what to do with them. I have a drawer full of beautiful trims…and yet, I can’t resist buying more. If you’re a fan of special trims and ribbons, you’ll have fun exploring the little trim shops in Nippori.
I think what was a little overwhelming about Nippori Fabric Town, and about Tokyo in general, is you kind of don’t know what’s down the little side streets or in the teeny tucked-away shops or in second-floor shops (many multi-storied buildings in Tokyo have shops and businesses beyond the first level!). I started to feel like there just wasn’t time to look at everything, so I tried to be selective so I could actually enjoy my time there. I’m the kind of person who doesn’t enjoy bargain hunting, or digging through dusty bolts of fabric that have been haphazardly stacked all over the place. If a store didn’t fit the sort of shopping vibe I wanted to be in, I skipped it, and spent more time perusing the stores that excited me. It almost felt like a relief not coming away with piles of fabric, especially since I knew it was just the start of our trip. What’s nice about a neighbourhood with such a large number of fabric and sewing shops, though, is that there’s a bit of something for everyone – whether you like high-end vintage buttons, or searching for that special fabric you managed to get at a steal.
Have you been to Nippori Fabric Town? And if so, did it meet your expectations?
YARN:
My yarn shopping adventures in Japan were hit by a bit of disappointing news early on in the trip. At the very end of February and just a few days into our trip, the famous AVRIL Kyoto (as of writing this their website is still up, though online shopping is no longer available), which I had been very excited to visit since first planning our trip in 2019, announced their store’s permanent closure. It seemed to be very out of the blue (one of my Japanese colleagues said she was so surprised she was convinced I had just misunderstood the Instagram post when I told her!). Comments on the announcement post on Instagram seemed to imply that customers were totally caught unaware by the news. I was pretty upset, and had been planning to visit their Kyoto flagship location just a few days after the announcement was made.
The Kichijoji (Tokyo) location was to remain open. Eitan and I had just been near Kichijoji to visit the Ghibli Museum, but AVRIL was closed that day – I wasn’t bothered about missing the Kichijoji location at the time, because the Kyoto location was on the itinerary for later in the trip. Kichijoji isn’t exactly in the city centre, but when I heard the news I managed to convince Eitan to make the trip back there so I wouldn’t have to leave Japan without having made a stop at AVRIL (there may have been coffee bribery involved…) I also visited l.musee’s second store location which is in Kichijoji as well and just minutes away from AVRIL. And yes, I did buy more buttons.
The majority of yarn at AVRIL is sold off of spools by weight, so I picked up a few grams of a fun pom pom yarn that they seem to be famous for.
On our day in Shibuya, we made stops at a few different yarn stores in that area.
First up was Daruma, which actually only just opened up late this past Autumn. I was really excited to hear that they were opening up a physical location that I would be able to visit on my trip, as I’ve always been a fan of their yarns and their patterns. I was even more excited to learn that one of their kits that I had been eyeing would be a part of this year’s Spring/Summer kit release, and that that kit would become available for sale on the same day that I was planning on visiting.
I did end up getting the kit (in blue, of course), but I also ended up getting one of their books and the yarn to make these cute sewing-themed mittens. The staff there were really nice and helpful too and I really enjoyed shopping there!
Next up was Amimono SPIN, which I think is also a relatively new shop as it didn’t come up in my initial 2019/2020 Japan research. Amimono SPIN was somewhat small, with all their yarn sold in pretty cakes (however, the labels don’t have any information about the yarn on them – I found most of what I needed on their website, though). I ended up buying some solid blue-green Aran-weight yarn to hold with the pom pom yarn I bought at AVRIL (I think that’s going to make some very cute mittens). The main highlight of Amimono SPIN was meeting some expats sitting and knitting in the lounge area of the shop, and sitting with them and chatting about knitting for a little while while we rested our weary feet.
Next up was WALNUT Tokyo, which felt a bit obligatory to stop at as a knitter visiting Japan. It was a lovely shop, however maybe I’m a bit spoiled, as I found that the majority of the stock they carried I could find at The Knitting Loft back at home. I did treat myself to two skeins of their house brand yarn, because it’s nice to pick up some souvenirs, and it was pretty lovely!
The next day we visited Itoricot, which to me was an incredible and new concept for a yarn store (maybe you know of other places like it where you are – please comment below!). How it works is that they sell yarn off of cones of factory leftovers (kind of like deadstock fabric?), and you purchase the quantity you need, which is then wound off onto a new cone for you. Since a lot of the yarns were for use on industrial knitting machines, many of them are very thin (about thread weight), but you can mix and match them and the store will wind them together for you onto a new cone (for a small fee). At first I was incredibly overwhelmed by the options and possible combinations. Fortunately, I did come in with a project in mind, and the staff there were incredibly patient working with me to get the thickness and colour of yarn and quantities I needed. Honestly it was a little stressful at times, since I had trouble gauging how many strands of very thin yarn I needed to get more to a “hand knitting” weight that I’m used to, as well as trying to envision how the colours would look once “plied” together. It was a very unique experience and in the end I’m really glad I made a stop there.
Here’s a video of them winding up my “custom blend” for me!
Other crafty things of note:
I follow Yumiko Higuchi on Instagram and have been a huge fan of her embroidery work for years, so I was thrilled that during my time in Tokyo she shared on Instagram that she would have kits for sale as part of a handcraft pop-up shop at the Japanese department store giant, Isetan. The pop-up was being hosted at the Shinjuku location, and I was almost jumping for joy at the beautiful tables of artisans we found when we arrived. I bought the sought-after kit from Yumiko Higuchi, but I also treated myself to a skein of naturally-dyed yarn from NONA Temari. I had heard of NONA Temari before, but didn’t know that she dyed yarn, and I just couldn’t resist getting a skein. Also, after all the research I had done, I didn’t know she had a brick-and-mortar location. I felt like I got my fill at the pop-up, though, so I didn’t go out of my way to visit the store.
The pop-up also featured COHANA, a brand I am familiar with as they carry a few of their products at The Knitting Loft, and it was nice to see all their goodies in one place and in the country where they’re made.
Other places on the list were Yuzawaya and Okadaya, which we unfortunately just didn’t end up having time for. I had visited so many crafty places in Tokyo that I wasn’t feeling too bummed out about it, but I would still like to visit if we ever go back to Japan. The Bunka Gakuen Shop was also on the list, but it wasn’t really near any of the other places we were planning to go, and I didn’t feel a need to go out of our way to visit. We also didn’t make it to chocoshoe as the store hours didn’t line up with when we were already in the area – but again, I didn’t feel like I was missing out because I had already come away with so much great yarn.
On a little visit out to Jiyugaoka we came across a cute little shop called Hobbyra Hobbyre which had a lot of cutesy Liberty fabrics and cross-stitching kits. The store had a very feminine and clean aesthetic.
In Kuramae, Maito Design Works is a lovely shop to pick up naturally dyed threads, as well as naturally dyed garments and accessories.
Finally, one of my favourite stores that wasn’t initially on our list was Tokyu Hands. We went to the Shinjuku location and wow, I felt like I was in a crafter’s paradise – it was just floor after floor of amazing DIY products. One of the floors does have some yarns and embroidery items, but my favourite section was all the miniatures kits. Definitely check out Tokyu Hands if you can. We picked up a lot of our souvenirs for friends and family there too!
That’s all for our visit to Tokyo! Coming up next will be all about our crafty stops in Kyoto.
Have you visited Tokyo? If so, which crafty shops did you visit? If you haven’t made it there yet, what’s on your list?
Unlike on Prince Edward Island (my latest vacation locale), there are a good number of fabric shops in Amsterdam, along with a good number of blog posts on fabric shops in Amsterdam. The one I used was the Seamwork Guide to Amsterdam, but of course this is my own take on it.
Ever since I’ve started travelling without my family and their itineraries, I’ve started to make my trips revolve aroundfabric and yarn shops. I always feel slightly guilty that I didn’t go to more museums instead, but at the end of the day fabric shops are how I see new places and what they have to offer. In Amsterdam, just walking to the fabric shops I got to see so much of the city.
Anyways, on this trip I really spent most of my time in fabric and yarn shops, and I have no regrets. Here’s where I went and what I thought:
The first place we visited was the very well-known yarn shop, Stephen & Penelope, made famous by owner and knitwear designer/celebrity, Stephen West. I went in knowing that their yarns are pricey (around 30 euro a skein on average), but I couldn’t go to Amsterdam and not check it out. Many of the yarns there were imports that I can get in various Canadian yarn shops, and I didn’t feel the need to pay in Euros + 21% VAT for something I could get at home. The only yarn I was tempted by was Stephen & Penelope’s in-house yarn brand which was just recently released, and pretty well priced at 20 euro a skein – but I didn’t have any projects in mind for it, so I passed it by.
Right next door is A. Boeken, a small but impressive fabric shop. I went there twice, since the notions section was so impressive that I needed one trip for fabric and another trip for trims and buttons. It was pretty busy and hard to look around with a lot of focus, so I only got two fabrics there. I didn’t find anything there that was really extraordinary, but their prices are reasonable and they have every trim and button you can imagine. I bought loads of trims as well as some metal eyelets for some sneakers I plan to make (I had SneakerKit ship me another kit while I was there). They seemed a bit understaffed and it was a bit hard to find someone to cut yardage for me but I otherwise found the staff nice and helpful.
Right down the nearest side street to A. Boeken is Tinctoria. I didn’t plan on buying anything there but I did a lot of natural dyeing in school and had to check it out. The fabrics there were beautiful, but quite expensive (I can imagine the work that went into them, so they were priced fairly, just out of my price range). The owner had a huge basket filled with off-cuts and pieces with mistakes on them, and she said I could dig through the basket and she would price the pieces by weight. I found some beautiful velvet scraps, but then realized I had enough scraps at home and didn’t need to buy more.
Across the little canal bridge from A. Boeken, Stephen & Penelope, and Tinctoria, is Capsicum Naturstoffen– I went in because A) it was raining, and B) I felt like I needed to visit all the fabric stores in the city. I wasn’t really expecting to find the most exciting fabric I would find on my trip. The store itself is lovely – beautiful textile homewares (pillows, tableclothes, etc) and scarfs, as well as some garments. The fabric they have is folded up, rather than on bolds, and just kinda looks like giant pillows on a shelf. The woman working there was incredibly helpful and explained the pricing and manufacturing processes of the fabrics. I chose a beautiful double ikat cotton with colourful squares on a cream background and I love it so much. It was pricey (and on the lower end of the range in the store – the hand-woven jacquard silks were 110 euro a metre), but it was a really lovely “treat” to bring back from my visit to Amsterdam.
One morning we hopped over to De Steek, which was close to our Air BnB in the Jordaan neighbourhood. I hadn’t seen De Steek on any blogs or guides, but it was on the list of stockists for Papercut Patterns, and I was in search of a Meridian Dress pattern in print (spoiler – De Steek doesn’t actually carry Papercut Patterns). De Steek is focused on sustainability, and a lot of their fabrics are deadstock or ecologically made. I bought some nice cotton seersucker and a neat “eyelet” knit. They also carry lovely lingerie and legging kits, as well as Merchant and Mills and Named patterns. They have a sewing studio so if you need to get your sewing fix on while abroad, that’s the place to go.
We spent a morning checking out Albert Cuypstraat market, an outdoor market which I think is open 7 days a week. I didn’t take any photos because I was kind of overwhelmed by how much stuff was there. The market has food and weird off-brand socks and stuff, but they also have fabric booths that sit outside actual fabric stores. There are quite a few along Albert Cuypstraat, but the ones I went to were Kniphal and N&N Stoffen. I really liked Kniphal (they have amazing upholstery fabric if you’re looking for any) and they had lovely garment fabrics, but none that I especially wanted. I couldn’t quite tell how they were organized but it was fun to just browse around. N&N Stoffen had a lot of knits and baby fabrics (like double gauze with little whales on them and whatnot) and no fabric that really interested me, but I did like their selection of books and magazines. I ended up going home with a La Maison Victor book of dresses (called Jurken 2) as it had loads of dress patterns I think I’d like to use.
Another amazing shop I visited was actually in The Hague (or Den Haag as the Dutch call it), called Cross and Woods. I went there with my friend Priscilla who I met through Fibreshare, and it reminded me a lot of The Workroom and EweKnit here in Toronto (especially since EweKnit is also a sewing/knitting shop). A lot of their fabrics were Merchant and Mills, Nani Iro, and Liberty, all of which I can get at EweKnit, so I didn’t do any fabric shopping there. They had gorgeous yarns that I couldn’t get at home, and I had a lovely time picking out some skeins with the help of the very kind store owners.
And that’s it! Please comment if you think I missed any shops worth a visit. If you haven’t been to Amsterdam, I hope this helps in planning your textile-y trip!
So as you may or may not know, we just got back from a trip to the little island province of Prince Edward Island (aka, PEI). It was our first time there, and I was especially excited about the PEI Fibre Trail, which is pretty much a map of textile-related producers and artisans around the island. There are quite a few stops, and we were only on the Island for a week, so I had to narrow it down to a select few places.
Our first day in PEI was pretty windy and rainy, so it was a perfect day for yarn shopping, in my opinion. We drove out to Belfast, which is conveniently home to both Fleece and Harmony and Belfast Mini-Mills. I follow Fleece and Harmony on Instagram (I love their branding), and I’ve squished a few skeins of their yarn over at The Purple Purl in Toronto, so I was really excited to visit their shop and sheep (hehe). They have a lovely shop, with windows that look into their processing facility. It was really difficult not being able to buy huge sweater quantities of yarn, and it was heartbreaking knowing it might be a while until I get around to knitting what I did end up buying.
Still, though my stash output is slow, I couldn’t leave Fleece and Harmony without a skein (or three).
Then we drove over to Belfast Mini-Mills, which is only about a 5-minute drive away. We parked by a little flock of shy and surprised sheep (and a donkey), which we later learned are more for show (not used for wool or meat). There are also some funny looking chickens (that run around loose), bunnies, and dogs on the property. Linda, one of the owners and our guide, also introduced us to their crow (whose name escapes me), who they had rescued and has become their pet. He likes hamburger meat and shiny things, as I assume all crows do.
We also had a tour of the facility where all the magic happens, and got to see all the wonderful things that go into making wool products (including their industrial felter!). I was too excited about the dogs saying hello to me during the tour, and failed to get photos of the machinery.
The shop at Belfast Mini-Mills is amazing. They stock a great selection of yarn and roving milled on-site, including exotic varieties such as qiviut (a type of yak, I believe), samoyed (the dog breed), angora, and more. Their superwash merino comes in beautiful colours and is very reasonably priced. I didn’t buy any yarn, as last year my FibreShare partner visited Belfast Mini-Mills and mailed me a skein as part of my package. I loved it so much that I called up Belfast Mini-Mills and ordered 4 more skeins, and made a Rock Creek pullover out of it. They also have all sorts of wonderful gifts – sheepskin rugs, mittens, slippers, children’s books and toys, even jewelry. I didn’t walk out of there empty-handed – I bought a sweet little felted sheep made in Peru, and some sheepskin teddy bears as baby gifts for my future nieces/nephews.
Our next stop was in Montague, where we visited Artisans on Main, which was a lovely gift shop in the small town of Montague. It’s stocked with beautiful items all made by artisans local to the island. While it was a lovely shop, I’m not sure it warranted a trip to Montague, as in the rainy weather we couldn’t walk around and find much else to do there. We did drop in Stitches & Crafts, which was just up the road, but as it stocked the same sort of things you might find at a Michaels, we didn’t find much reason to stick around.
The next day we visited Green Gable Alpacas, because I love alpacas and just had to see some up close. At Belfast Mini-Mills our tour of the place was free, so I kind of assumed Green Gable Alpacas was as well (I guess I didn’t quite do my research, because rates are on the website). The owner kind of mumbled something about taking care of admission when we went back to the shop, and then brought us inside the pen.
We visited the pregnant female alpacas, who had been sheared just days before, and were showing off their new haircuts. To my disappointment, we were told that alpacas like their personal space, and we didn’t get to touch them much. We learned about the alpacas for about 10 minutes, and then we were brought to the pen where the males were kept, and we got to feed an apple to the one llama, and that was our tour. Both Eitan and I were both kind of surprised to be charged for it, but we didn’t mind supporting a Canadian farm. I didn’t buy any yarn, as, like I mentioned earlier, my yarn stash isn’t moving very quickly these days, and truth be told, I don’t especially love alpaca yarn. I was drawn to a skein that was made to match the incredible rusty red earth of the island, but when I learned it would cost about $60 I decided against it. $60 just isn’t worth the cost of a mere yarn squoosh, so I settled on a sweet little felted alpaca to go with my little felted sheep.
We also stopped at MacAusland’s Woolen Mill, though I didn’t really feel it was worth the stop for us. We had visited the Potato Museum, which is nearby, so I thought we might as well drop by, but it’s quite far from central PEI where we were staying. It must be worth the trip to some people, though, because it was quite busy, even though we only got there an hour before closing.
I think MacAusland’s is famous for their woolen blankets (which I’m not especially in need of), and their yarn was being sold at Belfast Mini-Mills, so there wasn’t much to see. I was hoping to see all the production and machinery at work, but when you walk in you’re brought right into it without any real explanation of guidance (the shop is up the stairs). It’s very dusty and noisy, and I kept worrying I would walk into some dangerous machine by accident. Upstairs they have piles of their woven blankets, and huge white sacks of their yarn. Their yarn could best be described as “woolly wool”, and is the sort of wool that makes you think of itchy wool sweaters you hated as a kid. One of the folks we met earlier on the Fibre Trail told us that they don’t use any “special” sort of sheep for their wool (pretty much the sheep used mostly for their meat).
An unplanned stop on the Fibre Trail that we made was at Ewe and Dye Weavery, and we popped in for just a second. We hadn’t intended to go, but we had some spare time on our last touring day on the Island, and decided to drive down to Victoria-by-the-Sea. It was an absolutely lovely little town – very picturesque – and we saw Ewe and Dye Weavery on the main street, so we popped in. It’s a sweet, tiny little shop (much like the town it’s in), but didn’t find that much caught our eye.
One of my FAVOURITE stops actually wasn’t “on” the Fibre Trail. I found Five Arrows Fabrics on Instagram months ago, and got in touch with owner Natasha just before our trip. I had assumed Five Arrows was a bricks-and-mortar store, but Natasha actually sells fabric from her own home to garment sewists on the island (as well as online). She began selling fabric because there was a real lack of garment fabric for sale on the island (though there are a few quilting fabric stores). There isn’t even a Fabricland/Fabricville, which you can find pretty much anywhere else in Canada. Anyways, I just HAD to go to the only garment fabric shop on the Island! Thing is, Natasha didn’t treat me like a customer, she treated me like a guest, and welcomed me and my husband into her home. She offered us tea and introduced us to her husband and boys, and we had a really lovely chat about sewing and life on the island. While she told me there was no expectation to buy anything, I knew that once I had seen the Nani Iro she had in stock, I wasn’t leaving without it (I bought some lovely blush pink bamboo french terry as well). Natasha is starting small, she says, but I definitely think it’s worth checking her out 🙂
Are you hoping to visit PEI soon? If so, I would be happy to share tips and must-see places that really made our time on the Island special.
When I was a teenager, I pretty much only ever sewed one skirt pattern – a rectangle with a ruched elastic waistband. I made a version in cotton voile, which I wore on my first date with my husband. I made a version in flannel, before I knew how to choose appropriate fabrics for projects. I made a very bulky one out of cotton sateen, and one out of cheap cotton/poly batiste (which I am embarrassed to say, I still wear at home). It was just an incredibly versatile pattern.
I made all those skirts using instructions from Anna Maria Horner’s blog, where you can still find a PDF of the pattern for a lined skirt. I’ve since developed my own method of making this skirt, which I find quicker and uses less fabric (I found that most fabrics I used had no need for the lining). AMH’s pattern will work great for you if you’re using a very lightweight or sheer fabric.
Anyways, if you’d like to learn how I do it, please follow along! If you can sew a straight line on a sewing machine, you can make this super-easy skirt! The hardest part is inserting the elastic.
What You’ll Need:
1.5-2 yds fabric of your choice (I like flowy fabrics like rayon, you can use any lightweight fabric such as cotton voile/lawn. You could probably use silk, but it’ll be a bit trickier to sew the elastic channels).
Matching thread
Safety pins (I like to have both regular ones and the tiny ones on hand)
1/4″ wide elastic – enough for 3 times your waist measurement
Seam ripper
Measuring and Cutting:
The only piece you’ll need to cut for this skirt is essentially a large rectangle.
For the width, you’ll want to measure at least 10″ more than your HIP measurement. I recommend cutting more than that, though, because it will give you more gathers at the waist. I went with the width of my fabric from selvedge to selvedge – 60″.
If your fabric isn’t very wide (44″ for example), fold the fabric in half and cut two rectangles at HALF your desired width.
The width you choose doesn’t need to be precise – just choose less width for less gathers (just make sure it is bigger than your hip measurement), and more width for more gathers (I find between 60-80″ total width is ideal).
For the length, determine your preferred skirt length, and add 2 3/8″ (for the waistband) and 1″ (for the hem). For example, if you want a 25″ long skirt, your rectangle will need to be 28 3/8″ tall.
Sewing:
Start by sewing the side seams, right sides together (1 seam if you only cut one rectangle, 2 seams if you cut two rectangles). Finish the seam and press open (I like to serge the edges first, before sewing, using a 3-thread overlock stitch).
Then, you’ll want to fold over the top edge of your skirt 1/2″ and press. Then fold again 2″ in, and press well. You can pin the fold in place if you want, but if your folds are crisp I don’t find it necessary. Make sure to keep the fold the same width all the way around.
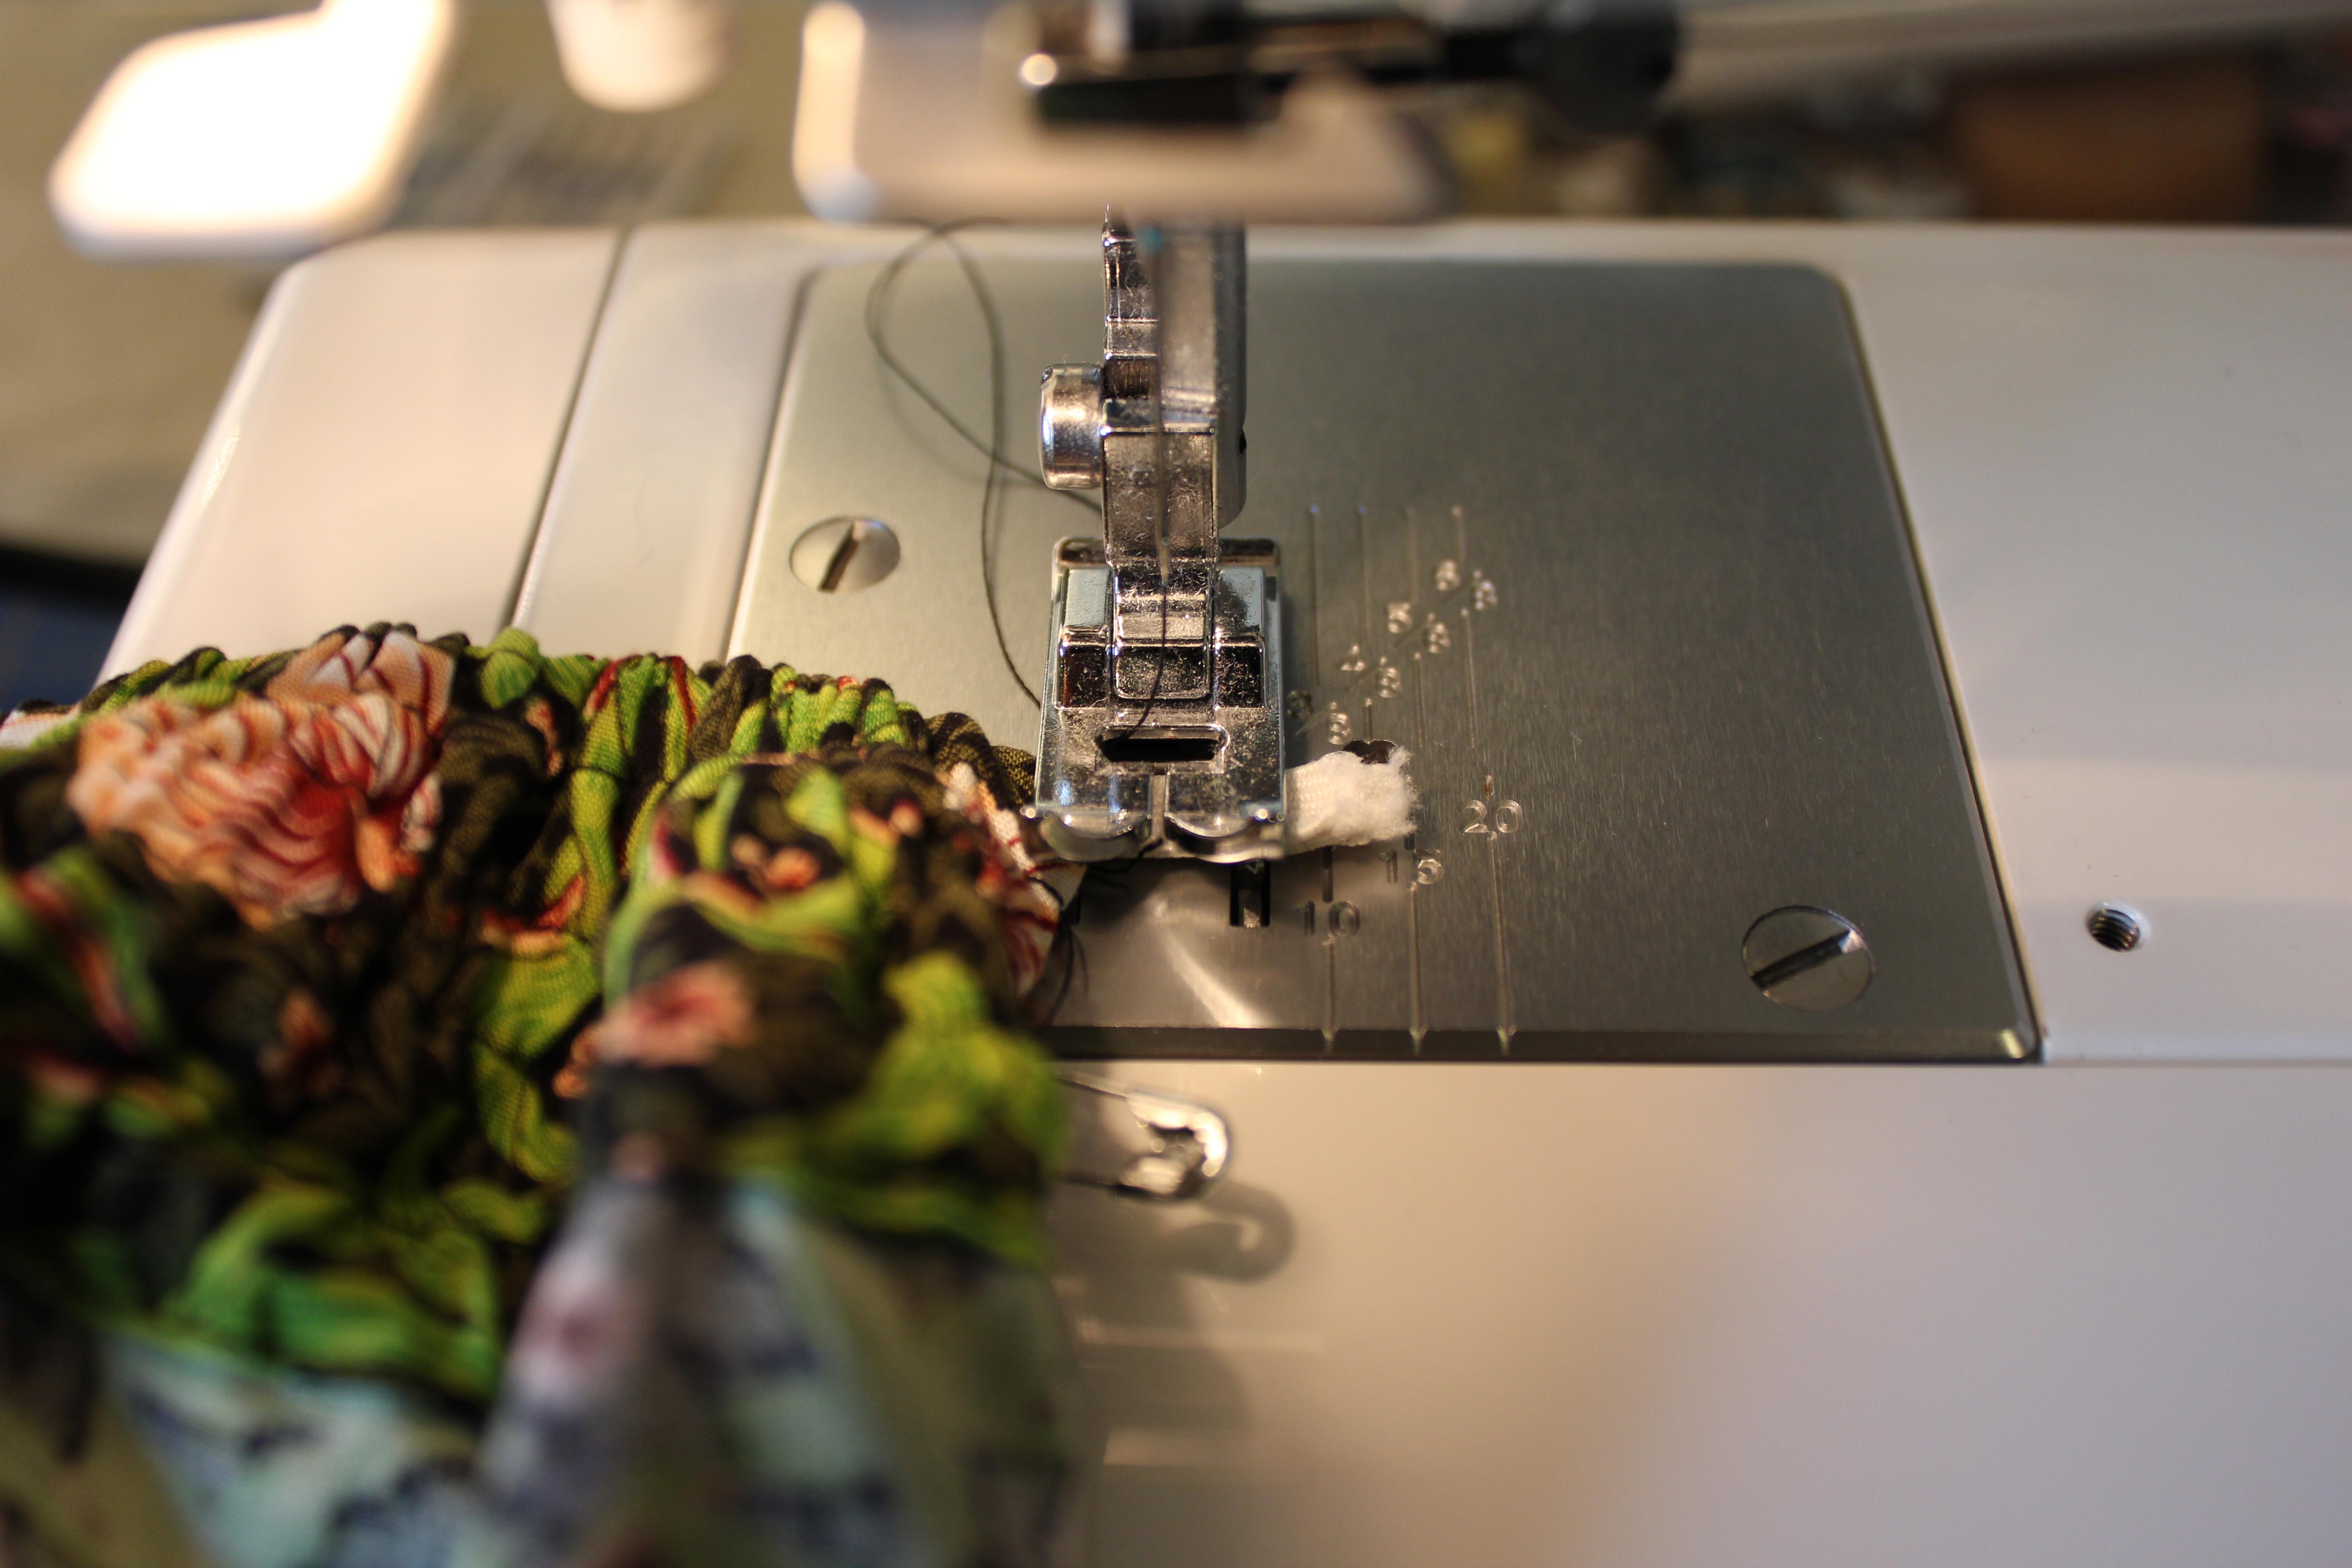
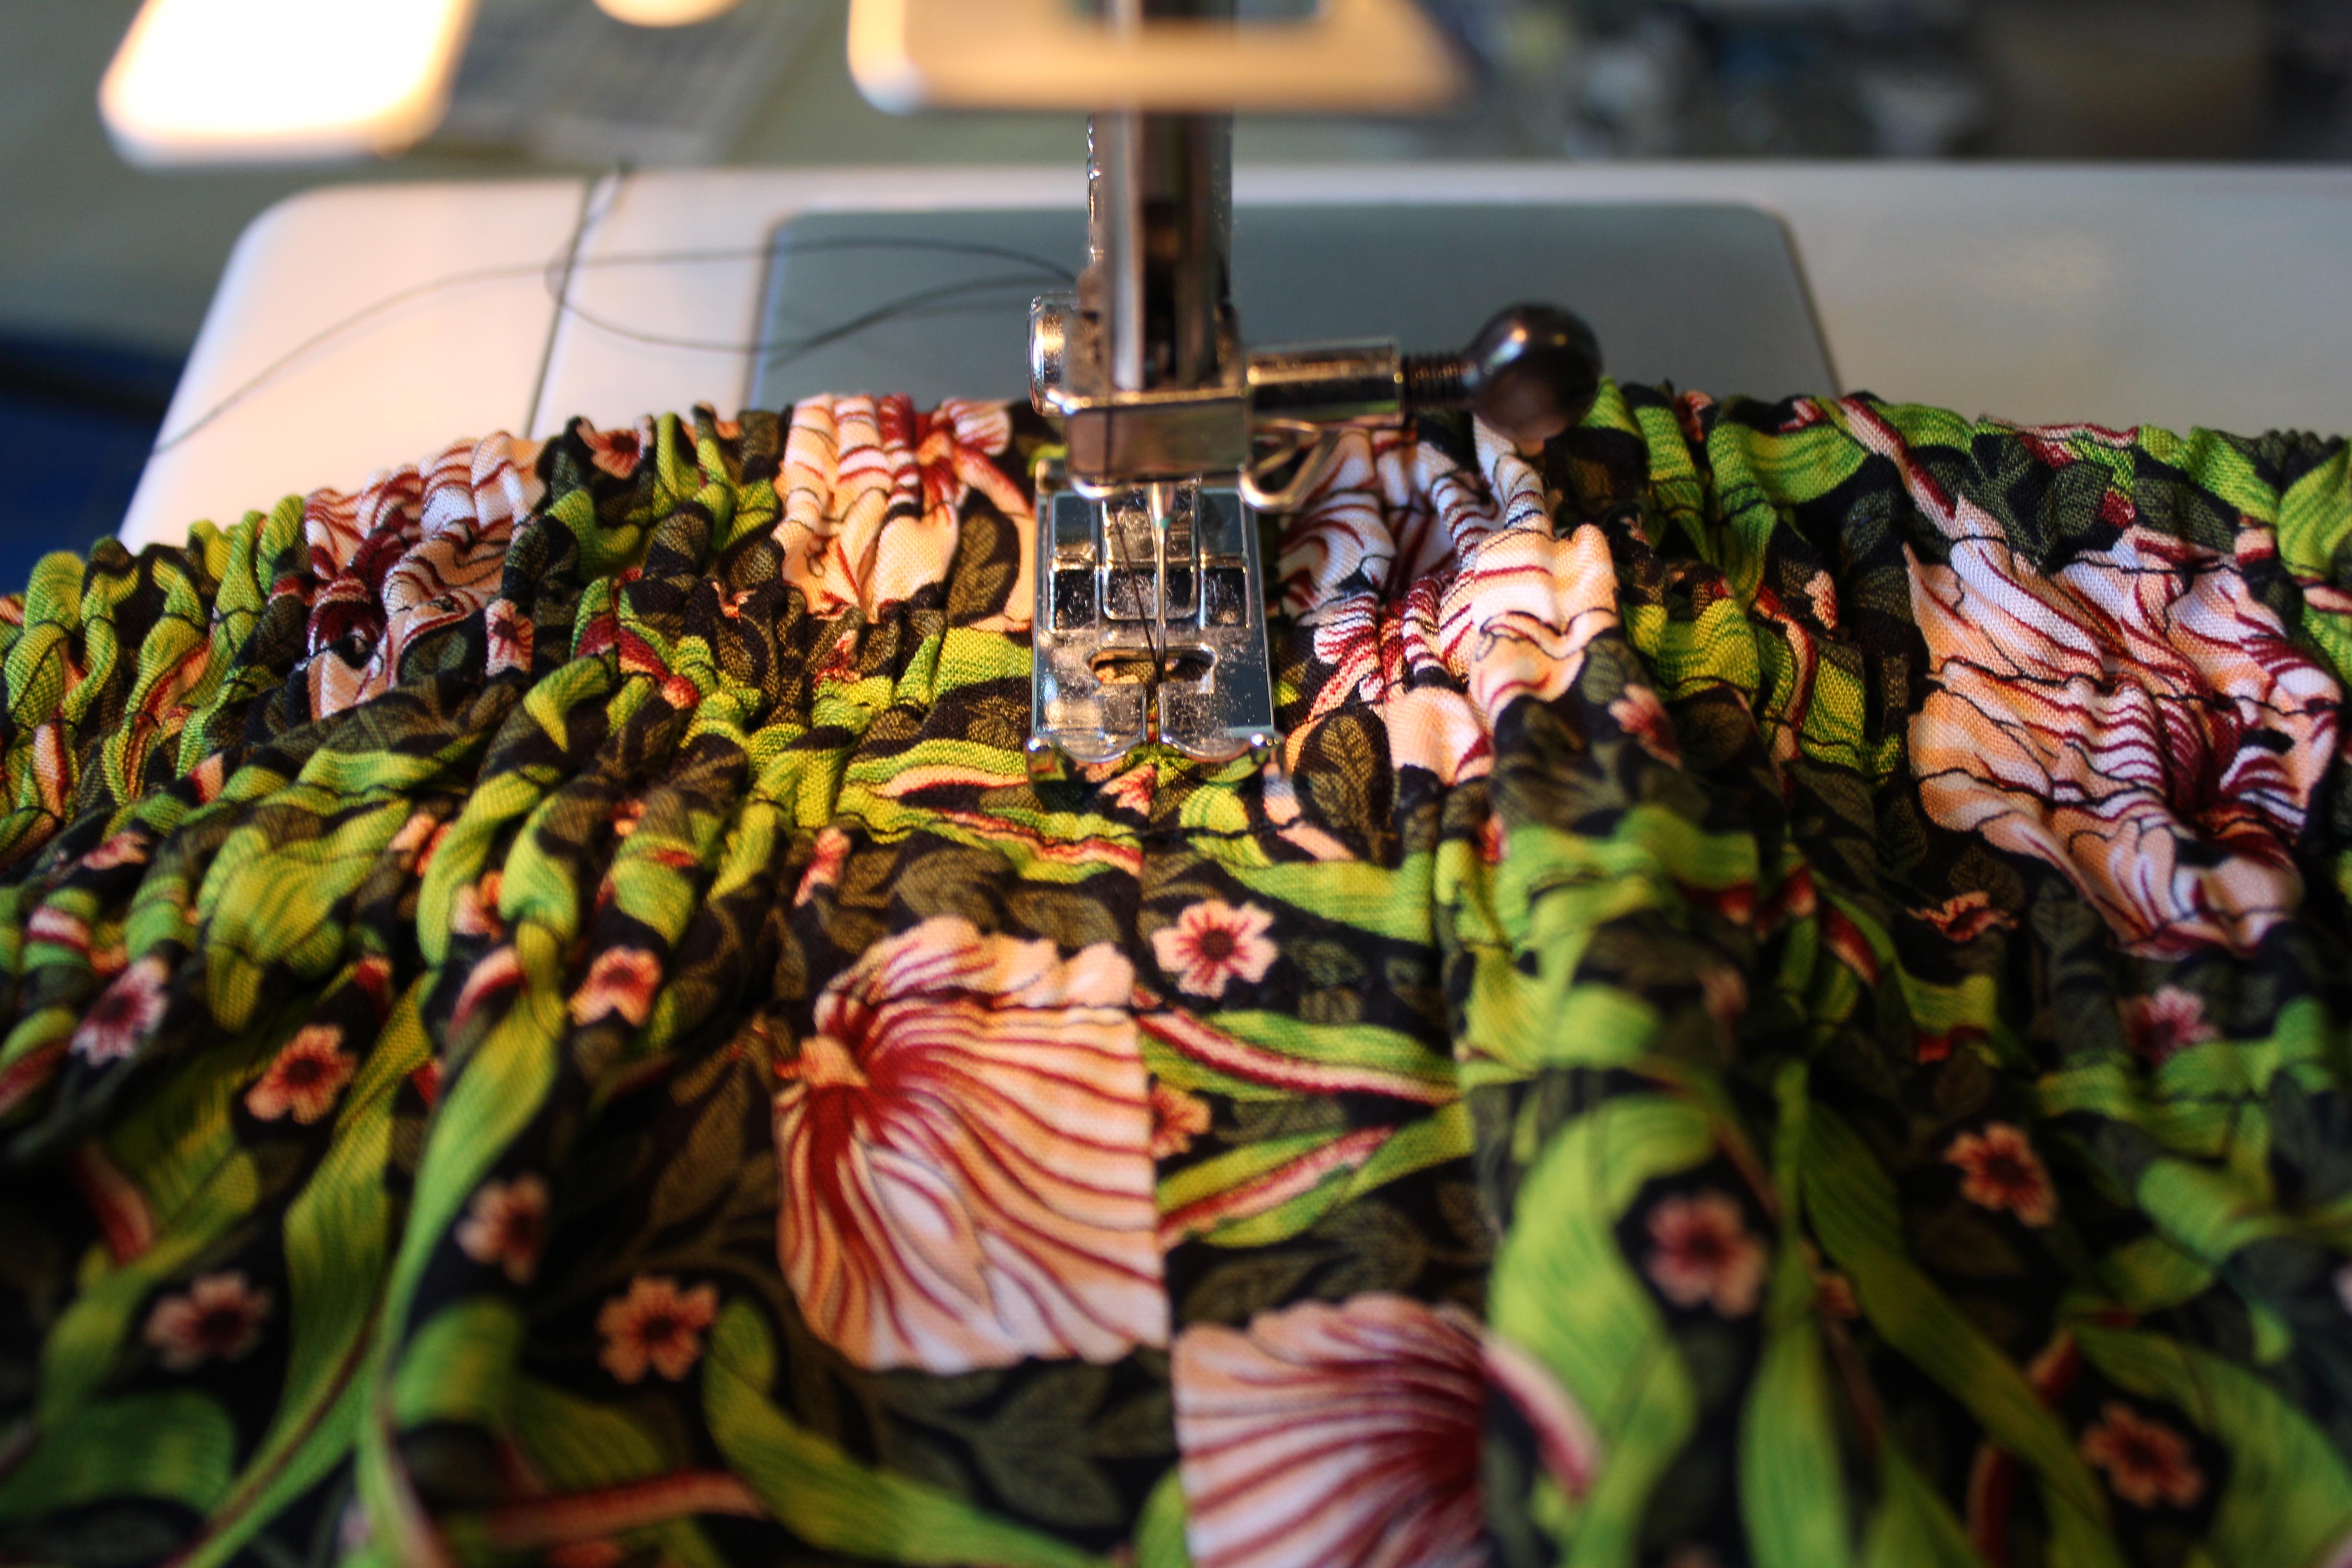
Now we’re going to stitch the elastic channels. Make sure the folded edge of your skirt is lined up with the 3/8″ mark on your sewing machine. You want to make sure that you stay at (or slightly, slightly past) that line – if you go below it, your elastic may not fit through. Stitch all the way around until you meet back up with the beginning.
Move the edge of the skirt to the 6/8″ mark, and stitch around like you did before. We will be creating a gap between the first elastic channel and the second one.
Repeat this step one more time to create the second elastic channel. At this point, I’ll have run out of lines on my machine to measure by. You can either mark your machine with a line of tape, or do what I do, and keep a careful eye on the distance between the presser foot and the previous line of sewing (for me there is a 1/8″ gap between the edge of the foot and the stitch line).
Then, flip your skirt over so that you can see the bottom fold of the waistband. Carefully stitch right along the folded edge.
Now for the final row of stitches. Line up your needle between the last two rows you stitched, and sew all the way around. I flipped the skirt back to the right side, but you can do this from whichever side you prefer.
The elastic channels are now finished! Your waistband should look like this.
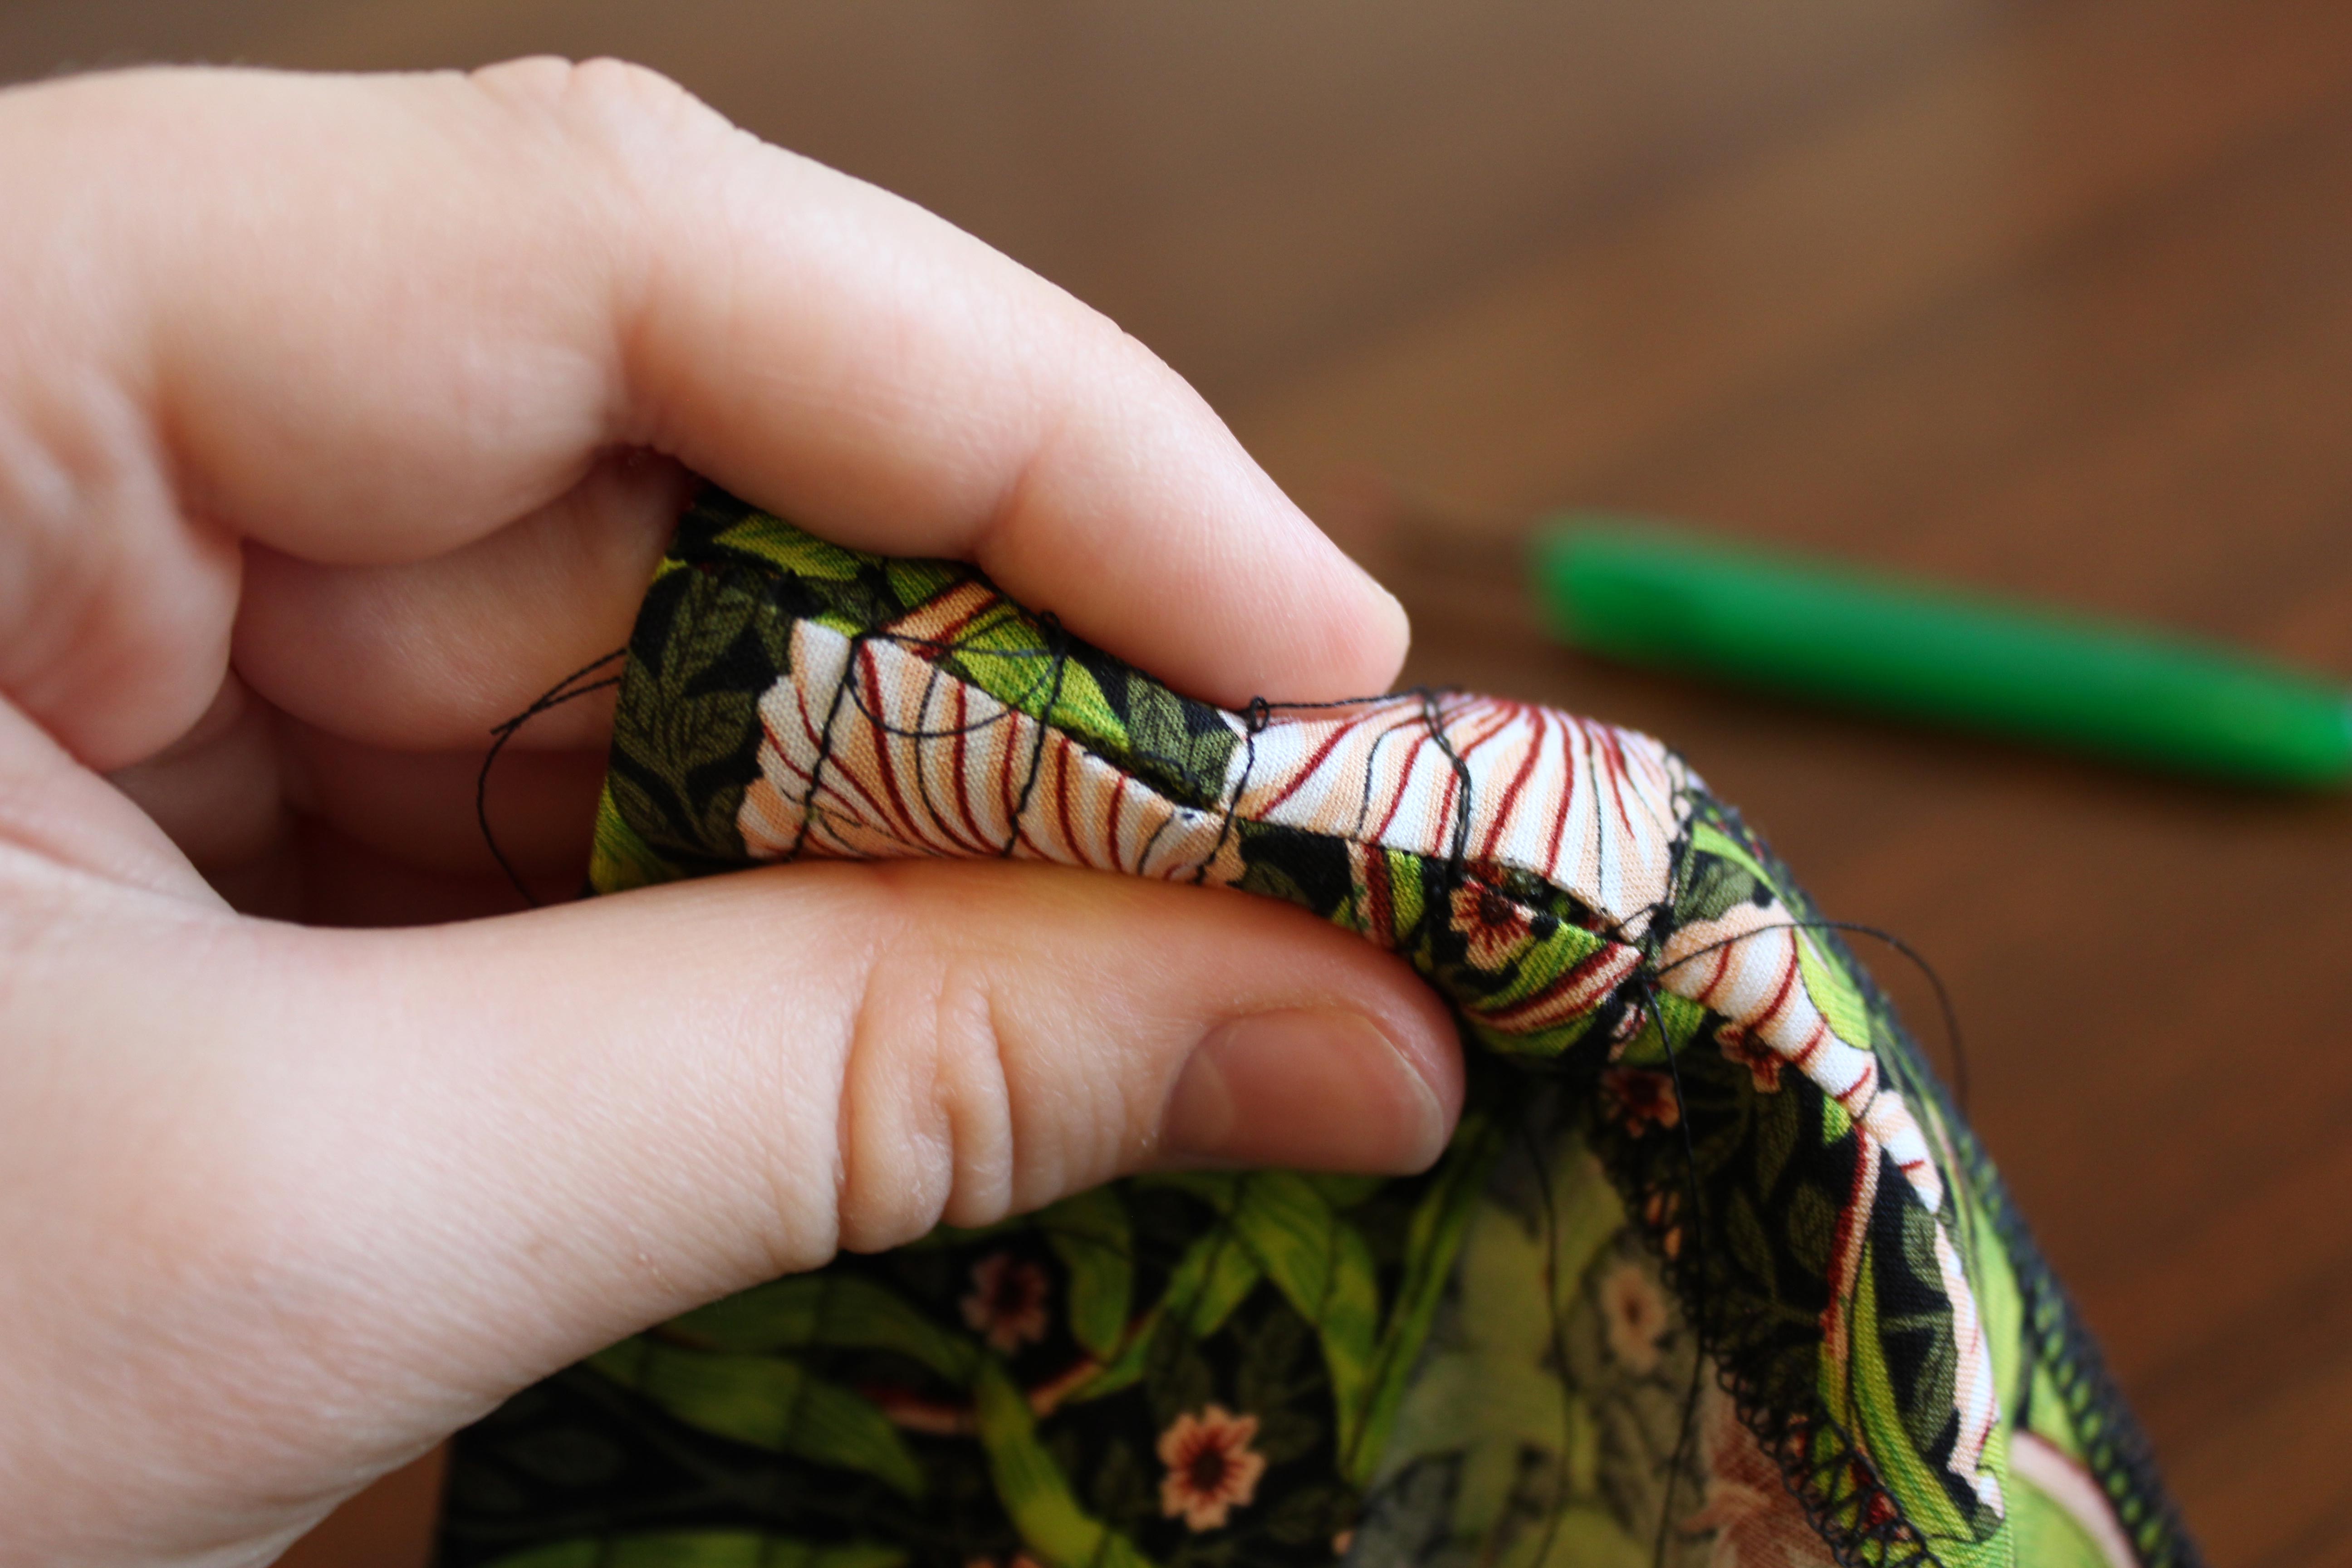
Now we can actually insert the elastics. At the back/side seam, on the INSIDE, carefully seam rip the first, third, and fifth channels. Make sure you don’t seam rip the seam at the right side of the skirt.
You’ll have three little holes through which to thread your elastic.
Now, cut off three lengths of elastic, each the length of your waist measurement (you can subtract 1-2″ if you want a tighter waistband. You can also tighten the elastics before sewing up the casing).
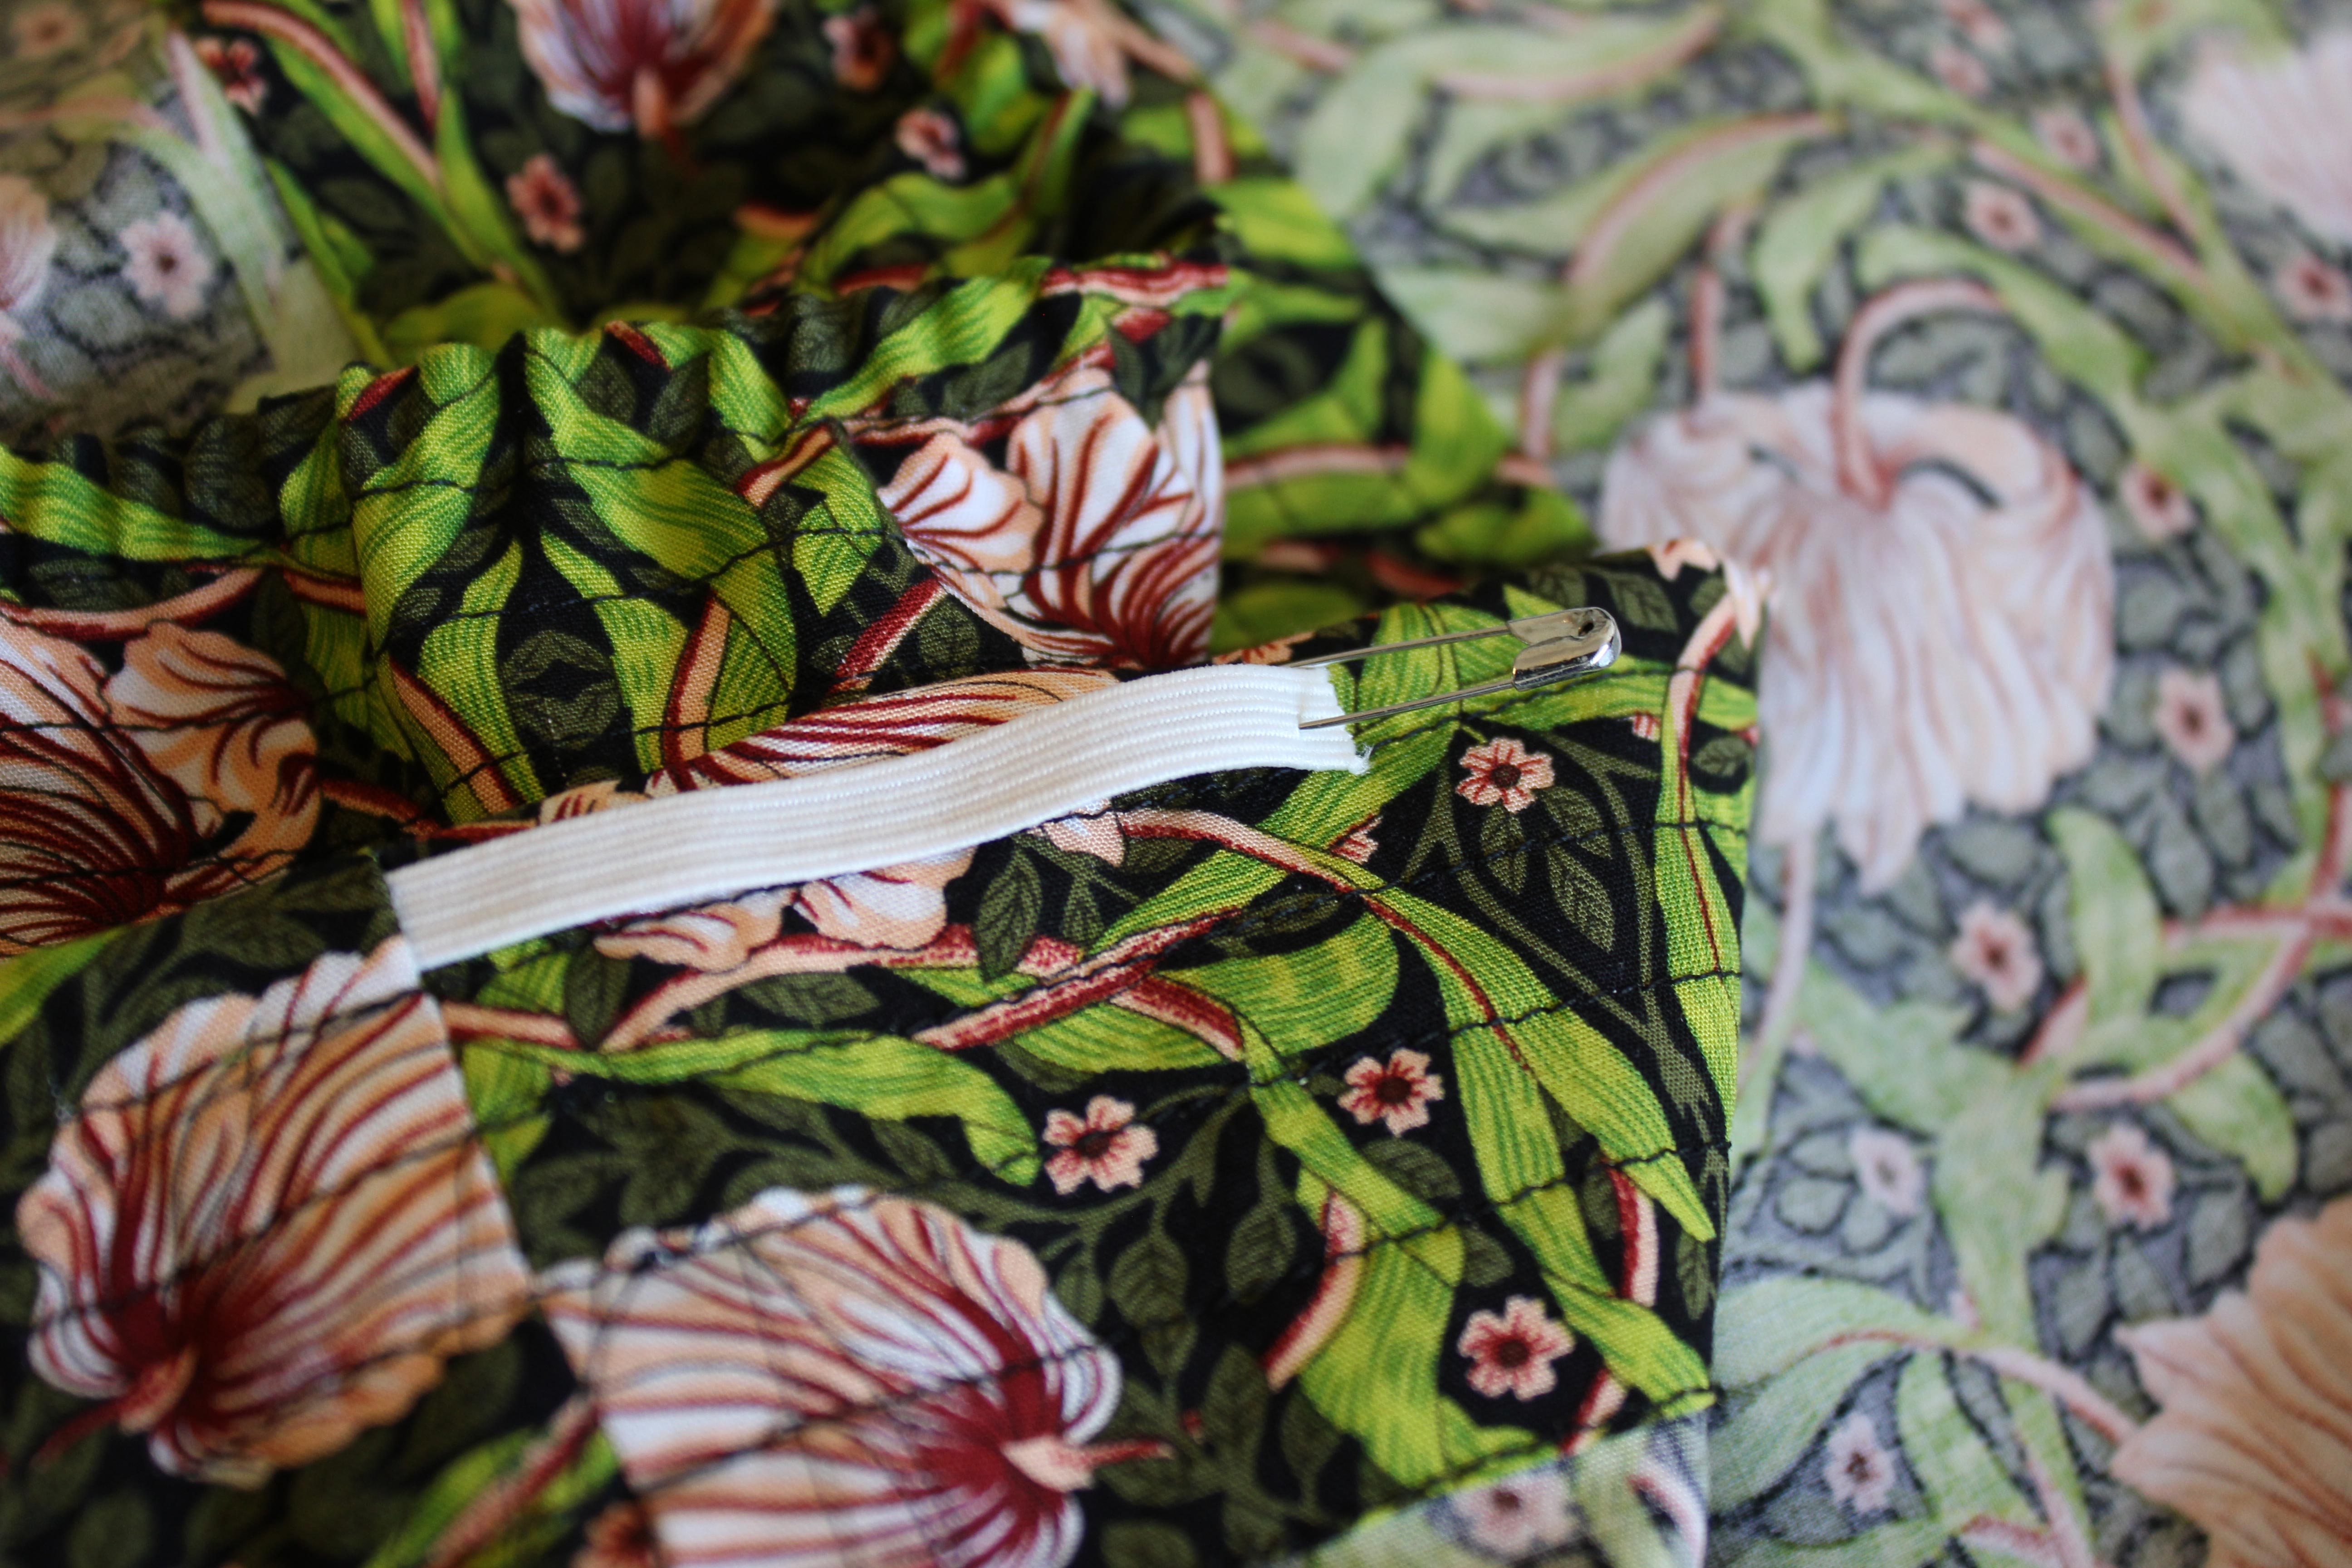
Attach a small safety pin to one end and a large one at the other. Make sure the pins aren’t pinned too close to the edge of the elastic, otherwise they might tear off in the middle of the channel, which is pretty frustrating – trust me.
Insert the end with the small pin into the first open channel, and use the pin to inch the elastic through.
Push the elastic all the way around the skirt, until you reach the opening again. The large safety pin should act as a “stopper” and keep the elastic from being pulled all the way through.
Once the elastic has been pulled all the way back to the beginning, pin the elastic ends together so they don’t slide into the skirt.
Repeat this process for the other two pieces of elastic. Your waistband should look like this.
Make sure the elastics aren’t twisted, and sew the pinned ends together. I like to sew back and forth several times to make sure it’s secure. Trim the elastic ends about 1/8″ from the stitching.
Pull the waistband to help ease the elastic ends inside the channels. Try on the skirt and make sure you’re happy with the snugness, and make sure the gathers are evenly distributed.
Use a ladder stitch or whip stitch to stitch up the channel openings. I find that after all the stretching, the gaps between the channels have opened up a bit as well, so I stitch the whole seam closed to make sure everything is secure. Sometimes the first channel opens up on the right side as well, so stitch that closed if you have to.
Then, lay your waistband flat and stitch in the ditch at the seam to secure the elastics and keep them from twisting around too much in their channels.
To finish, turn up and press the hem 1/2″ twice, and sew. You’re done! Try on your new skirt and give it a twirl!
If you have any questions, please let me know in the comments below!
I think something a lot of us Canadian makers struggle with is online fabric shopping. There always seems to be such a great selection of fabric available online on American or European-based websites, but it never seems worth it to pay high shipping fees or risk hefty duties. Also, isn’t it nice to support Canadian businesses?
Over the past year, I’ve been doing a lot of research on fabric shopping in Canada. There’s actually more out there than you’d think. There are many, manyshops that sell quilting fabric, and some of them sell garment fabrics such as rayon, knits, linen, and flannel.
There does exist a similar list on The Finished Garment, (do check it out, as it is more extensive than what I have here – I just found it difficult to remember which shop sells what, and I wanted a list more specific to the types of fabric I find myself looking for), as well as a Pinterest board, but I wanted to provide more of a guide than a list, with a bit more information about individual shops, to help you find what you’re looking for. Also, this list includes primarily apparel fabric stores, as well as a few quilting shops that stock some great apparel-friendly fabrics (which isn’t to say you can’t make great garments out of quilting fabric!).
Do you know some great apparel-fabric websites? Please let me know, and I’d love to add them to the list!
DISCLAIMER: I’d like to note that this list is not sponsored in any way. I simply wish to share these great shops with you, so you don’t have to do the research yourself! I’d also like to point out that I haven’t shopped from all these stores, so I can’t speak for the service/shopping experience for all of them.
My Favourite All-Around Amazing Fabric Shops:
Blackbird Fabrics – knits, twills, printed viscose and cotton, etc. This shop is amazingly well curated. When I order from Blackbird, I know that whatever I’m getting will be of amazing quality. They also sells patterns and notions.
Riverside Textiles – knits, double gauze, tencel twills. Riverside Textiles is Toronto-based online shop, and they carry a nice selection of printed jersey knits, tencel twills in a range of weights, and even some silk! Also. ZIPPERS. And thread! I look forward to seeing what else comes to this nice little local shop.
Online-Only:
Fine Fabrics Canada – rayons, garment cottons, bamboo, sewing patterns. This shop carries a nice selection of garment fabrics (including Atelier Brunette and Lady McElroy), as well as printed sewing patterns that can be hard to find elsewhere, such as Sew Over It and Nina Lee patterns.
Sitka Fabrics – I originally had Sitka Fabrics in the knits/jerseys category, but I’ve recently learned that they now also sell some really gorgeous wovens! I’ve found beautiful linens and Atelier Brunette fabrics on their new site, and I have to say, I’m impressed with the new selection (especially as someone who doesn’t sew with jersey a whole lot)!
Mimi Fabrics – European knits, pointelle knits, french terrys, and some wovens. Mimi Fabrics specializes mostly in knits but they also carry some really lovely woven fabrics (including stretch woven viscose) and tulles. A different selection than I’ve seen anywhere else, but really worth a look!
Les Tissées – a bit of everything! Bengaline, cotton poplin, denims, viscose and tencel, stretch lace, wools, rib knits, sweatshirt knits, jerseys, polyester crepes and satins. A nice selection of “RTW”-type fabrics I’m not usually able to find online.
Core Fabrics – deadstock garment fabrics, denim, thread, hardware, zippers. Core Fabrics is the sister company of Closet Core Patterns (formerly Closet Case Patterns) and they supply a curated collection of beautiful deadstock fabrics, and they provide recommendations for ideal fabrics for their patterns.
Baudekin Studio – silks, linens, high-quality cottons, and incredible buttons. I first heard about Baudekin Studio on Love to Sew Podcast on their episode about silk. Not a ton of online shops here have silks so it’s exciting when you find a place that does!
Pure Linen Envy – linen, linen, linen! Pure Linen Envy was suggested by a reader, and they seem to have really beautiful quality linens. It looks really great if you’re looking for a specific colour and weight and need a lot to choose from!
Two O Nine Fabric – linens, cottons, jerseys. This BC-based shop has very light and airy fabrics and delicate prints, including some Korean-import fabrics.
Rives Compagnie – cotton, linen, knits, as well as yarn for knitting/crocheting. This lovely Quebec-based shop has a curated selection of lovely and high-quality fabrics such as Atelier Brunette and Liberty of London. They also sell kits and lovely haberdashery items (such as buttons)! Knitters and crocheters can check out their yarn selection too.
The Maker Studio – prints, knits, deadstock. The Maker Studio carries a really nice selection of deadstock fabrics and they always carry some gorgeous printed cottons and rayons. They also carry patterns and extra tools and notions.
Earth Indigo – organic cottons, hemp, knits made in natural fibres. Earth Indigo is based out of Markham, ON. I think I may have stumbled onto their website once or twice before, but I never realized how amazing their selection is of natural-fibre fabrics. They have beautiful Japanese import prints (which I’m always a sucker for) that I haven’t seen anywhere else. They also carry a really nice selection of bamboo, linen, and hemp jerseys.
Le Comptoir de Pauline – viscose, jerseys, linen, and swimsuit fabric. This shop has a nice curated collection of mostly European fabric brands such as Cousette, Mind the Maker, Lise Tailor, and See You at Six.
Cafe Couture Montreal – linen, viscose, prints, jerseys. This shop carries some of my favourite French fabric brands such as Atelier Brunette, Cousette, Eglantine et Zoe, and Lise Tailor. They also carry buttons, zippers, and thread, and printed patterns from French pattern brands such as Maison Fauve.
Brick-and-Mortar Shops with Online Ordering:
The Workroom – quilting cottons, lawn, rayon, knits, notions, books. The store itself is gorgeous, and they stock a lot of “designer” fabrics (Robert Kaufman, Nani Iro, Cotton + Steel, Liberty of London, etc.). They also sell Bernina machines and accessories, lots of books and magazines (such as Japanese sewing books and Making magazine), tons of indie and vintage patterns, and amazing notions and tools.
Needlework Hamilton – quilting cottons, knits, rayon, lawn, etc. Needlework is a great little shop based in – you guessed it – Hamilton, Ontario. They sell a lot of great apparel fabrics such as Robert Kaufman and Nani Iro. I always like to keep an eye on them and see what they get in stock (for example, they just got in tons of colours of raw silk noil!).
Fabrications – quilting cottons, rayon, knits, lawn/chambray, etc. Fabrications, based in Ottawa, has a pretty solid stock of apparel fabrics. They stock lots of knits (solid and print), Nani Iro, double gauze, chambray, and more.
Threadcount Fabrics – quilting cottons, rayon, canvas, knits, lawn, double gauze, etc. Threadcount was originally online-only, and only just recently opened up a bricks-and-mortar store based in Souris, Manitoba! I am always tempted by the prints sold by Threadcount – lots of Cotton + Steel, Dear Stella, and Art Gallery Fabrics!
European Textiles – various apparel fabrics (cotton, knits, lace), quilting cotton, upholstery fabrics. European Textiles is based in Hamilton, Ontario. It’s one of the few online shops I’ve found that sells stuff like satin, silk, lace, etc. If you need something a lil’ fancy, this might be the place to check out!
Patch Halifax – quilting cottons, rayons, knits, etc. Patch Halifax has lots of great “designer” fabrics from companies that produce garment fabrics as well as quilting fabrics, such as Cotton + Steel, as well as Nani Iro and various knits.
Fabric Spark – quilting cottons, lawn, rayon, knits, yarn-dyed, etc. Fabric Spark is based in east Toronto. They primarily stock quilting cotton, but have a handy little section of garment fabrics that includes Robert Kaufman Essex Linen, Nani Iro, knits, and boiled wool.
Five Arrows Fabrics – knits, cottons, linens. Five Arrows is a PEI-based fabric shop, and Natasha is always bringing in new and lovely things.
Maiwa – handprinted/dyed cottons and linens. You may already know Maiwa, which is based in Vancouver, BC, for their natural dyestuffs. But they have some incredible vibrant handwoven and block-printed fabrics, as well as white/undyed natural fabrics for dyeing.
Spool of Thread – cotton chambray & lawn, rayon & bamboo, knits. Based in Vancouver, Spool of Thread is a sewing studio with a small but lovely stock of fabrics and patterns online. They stock Lady McElroy fabrics, as well as Atelier Brunette, which can be tricky to find in Canada.
Darrell Thomas Textiles – cottons, wools, linens. This shop stocks fabric very conventionally used for garments – high quality cotton/silk blends and designer-style prints. Reminds me of an online shopping version of visiting the stores in the fashion district downtown.
Rick Rack Textiles – knits, cottons, rayons, linens. Rick Rack recently opened up an online shop for their brick-and-mortar store in Calgary. They have a really nice and expansive selection, including Liberty of London Tana Lawns and cotton sateens.
The Maker Studio – viscose/tencel twills, jersey, french terry. The Maker Studio looks like a relatively new shop that already has some really lovely garment fabrics. I’m definitely gonna keep my eye on them, as they already have some gorgeous stuff I haven’t seen anywhere else!
Winnipeg Sews – tencel, linen, denim, jersey. This Winnipeg shop has a small but beautifully-curated stock of garment fabrics, as well as kits and patterns. They also offer a pattern printing service. EDIT: It looks like Winnipeg Sews now focuses on selling pre-owned fabric and promoting “a more circular fabric economy”. They still sell and print patterns though, and their fabric selection is still worth checking out!
Former + Latter Fabrics – cotton bottomweights and denims, viscose, cotton lawn, ponte, scuba, and sweat knits. They have high-quality options and carry brands such as Atelier Brunette, Mind the Maker, and Lady McElroy. Former + Latter is based in Edmonton.
Fabricana – all sorts of stuff! Denim, suiting, shirting, athletic knits, flannel, and more. I’d heard about Fabricana for a long time but I think only recently they went online. I find their website a little finicky to use but they have a large variety of fabrics, as well as interfacing, patterns, and notions.
G & S Dyes – undyed silks, silk and cotton blends, Chinese silk brocades. When I was in school I went to G & S for supplies almost weekly. They stock really high-quality fabrics for dyeing, as well as a fantastic selection of dyes if that’s something you want to try.
Dressew – a huge variety of garment fabrics plus cottons and flannelettes. This is one of the few online shops where I’ve been able to find fabrics for fancier occasions such as sequin and lace fabrics. They carry a wide selection of other garments as well!
GK Fashion Fabrics – double gauze, linen blends, corduroy, rayons and cottons. This shop based out of North York has a really nice selection and really great prices. I recently visited the brick-and-mortar store, which kind of feels like a warehouse, but was surprisingly well organized! Prices and fabric content were clearly labeled, and fabric was sorted by type. There were all sorts of notions and trims too!
Heirloom Bohemia – linens, cottons, prints. Heirloom Bohemia is a BC-based shop that carries a carefully curated selection of fabrics from brands such as Merchant & Mills and Ruby Star Society, as well as other goodies you’d love to have for your sewing room. If you’re in the Kelowna area, they also host workshops!
Nelson Stitch Lab – rayon/lyocell, knits, cottons, double gauze, canvas, linen. Nelson Stitch Lab is based in Nelson, BC. They carry some really nice solid-coloured fabrics such as corduroy, cotton, linen, canvas, and lyocell twills. I’m particularly excited about their selection of fabrics from Japanese fabric brand Kokka – this is definitely a shop worth checking out!
Piece Fabric Co. – knits, linen, flannel, cottons. Piece Fabric Co. based out of Alberta has a lovely selection of natural-fibre fabrics for your everyday garment needs. They also carry thread, scissors, and a nice variety of patterns.
Atelier Espace Fabrik – knits, cottons, lining, tencel, linen. This Montreal-based shop carries a nicely curated selection of garment fabrics as well as a collection of French-language sewing books and magazines. They also carry notions such as snaps, zips, and elastic.
Specializing in Knits/Jerseys and Activewear:
Prairie Love Knits – jersey, sweater knits, quilted knits, European knits. Another stumble-upon, Prairie Love Knits has a nice variety of knits, including stretch lace and notions.
Simplifi Fabric – organic fabrics; jersey, terry, fleece, athletic knits, thermal knits, wovens. Simplifi is a bit pricey because they stock organic fabrics, but they have a lovely selection and stock knits you might have trouble finding elsewhere.
L’Oiseau – sweatshirt knits, bamboo, jersey, wovens. L’Oiseau stocks some great prints that I haven’t seen elsewhere, as well swimsuit knits, bamboo, and merino. They also stock some great wovens, including poplin and eyelet.
West Coast Fabric Boutique – jersey, double brushed poly, swim knits. West Coast Fabric Boutique has a lovely selection of knits and jerseys, with lovely prints and sweatshirt knits to choose from!
Fringe Fabrics – jersey, sweater knits, quilted knits, ribbing. Fringe Fabrics has an amazing selection of knits – there are some great jacquard knits, legging knits, and cuffing, as well as a huge range of solid basics. I particularly love the Hamburger Liebe brand for something a little different!
Non Non Oui – jersey, french terry, ribbing, as well as a selection of woven fabrics. Non Non Oui is based out of Quebec and specializes in OEKO-TEX certified fabrics. They carry a large variety of European-import knits and jerseys.
Bibs & Boots Fabrics – tons of European knits and jerseys, organic knits, as well as some woven double gauze. This online-only shop based out of Saskatchewan has a huge selection of knit and jersey fabrics.
Brightside Fabric Co. – deadstock, jersey, rib, french terry. Brightside Fabric Co. has some really beautiful solid and printed knit fabrics. They even carry fabric bundles and a few woven fabrics.
Shear Perfection Fabrics – french terry, athletic fabrics, sherpa. In addition to carrying a nice variety of knit fabrics, this shop also offers small batch custom fabric printing services. It’s also one of the first places where I’ve seen board short fabric!
Discovery Fabrics – activewear, fleece, outerwear, technical, swimwear fabrics. This shop will be your go-to if you’re sewing activewear, outerwear, or garments for hiking, camping or skiing. They’re based in Campbell River, BC, if you want to shop in person as well.
“Chain” Stores/Brands:
Club Tissus – various garment fabrics (silks, lace, cottons), upholstery fabric, quilting cotton, notions. Club Tissus is only in Quebec, but they ship all over Canada. It’s another one of the few websites that stocks “fancy” fabrics, and they have quite a nice selection and a beautiful website. They also have all the notions and tools that you’ll likely need for your sewing project (like I said, I like a one-stop-shop). My main issue is that they don’t have free shipping deals like most online shops do, and prices are presented with the member discount (the “regular” price is in small), which you have to pay for. Also, only members get to take part in sales.
Fabricville (Fabricland) – pretty much everything sewing-related. Just about anyone who lives in a Canadian city knows Fabricville (or Fabricland outside of Quebec). They stock all sorts of fabric, but I’m not a fan of their selection. I often buy notions or tools here, since few other shops sell zippers, thread, etc. Like with Club Tissus, they offer no free shipping deal – in fact, the more you spend, the more your shipping costs.
DailyLike – oxford cottons, sheeting, canvas, knits. DailyLike is a Korean lifestyle brand, and DailyLike.ca is based out of Richmond BC. This is the website to check out if you love cute floral or animal-print cottons. They also have notions, stationery, and washi tape! How can you resist?
Shirting/Suiting Fabric & Menswear:
Sultan’s Fine Fabrics – wool, suiting, shirting cottons, linings. Sultan’s is a brick-and-mortar store in North York/Toronto, and he stocks stacks on stacks of high quality fabric. I have yet to find true dressmaking fabrics here, but doesn’t mean it’s not there. I recommend checking out the store in person, as the online selection isn’t anywhere near as impressive.
Thread Theory – jerseys, linings, some wovens. You may know Thread Theory for their patterns, but they also sell a small number of fabrics and notions in their online store.
Liberty of London Stockists:
Dinky Doo – quilting cottons, linen, lawn. Don’t let the cutesy name fool you – Dinky Doo sells a great variety of the classy Liberty Tana Lawns. They also stock tons of Robert Kaufman Essex Linen and Cotton + Steel rayons.
Weave & Woven – quilting cottons, knits, oxford cotton, faux fur. Weave & Woven is based in Dundas, Ontario. I often find myself drooling over their selection of adorable oxford cottons and Nani Iro fabrics. They carry very fun printed knits and some rayons as well.
The Fabric Snob – quilting cottons, knits, fleece, flannel. The Fabric Snob has a lovely selection of knits, fleece, and flannel. I can also tell you from experience that Lindsey will package your order very lovingly!
Pins and Needles Fabric – quilting cottons, knits, corduroy, double gauze, rayon. Pins and Needles has a nice selection of prints (including Art Gallery Fabrics and Cotton + Steel), as well as notions such as Aurifil thread, ribbon, and print bias binding. They also sell patterns and adorable doll clothing kits!
The Cloth Castle – Quilting cottons, denim, flannel, knits, sherpa. While this BC-based shop has loads of quilting cottons, they also have a great variety of garment fabrics, especially for activewear.
Make1 Guelph – quilting cottons, linen, knits. Make1 will appeal to every side of crafter in you, as they carry fabric suitable for quilting and garment sewing, as well as beautiful indie-dyed yarn.
Notions & Tools:
Sussman’s Supply Co. – zippers, ribbons, gemstones, feathers, etc. Based in Hamilton, Sussman’s is the place to find any trims and notions you’re missing. I happen to love them for their selection of invisible zippers, which can be hard to find online elsewhere.
Bra-makers Supply – pretty much speaks for itself! Based in Hamilton, this is the place to stock up for your bra- or corset-making endeavors.
Leather and Sewing Supply – the famous notions and supply shop in downtown Toronto has an online presence! I like to shop them in person because there is just so much to choose from, but if that’s not an option for you, give their online shop a go.
Used/Vintage Fabric:
Ian Drummond Stash – assorted vintage/rare fabrics. Ian Drummond has a vintage clothing shop, but he also collects and sells an amazing selection of vintage fabrics. I love to follow his Etsy shop and see any new finds that have been added. Also, if you’re based in Toronto, you can choose local pick-up and save on shipping!
The Old White Cupboard – vintage fabrics, linens, and trims. A lovely selection of vintage fabrics, mostly cottons, but you can find some quilts and linens as well.
Lush Vintage – an Etsy shop with a really nice selection of vintage fabrics, based in BC! Really well priced and some really beautiful finds.
Antiquaire Supply – another fabulous Etsy shop stocking some really beautiful vintage yardage and sewing patterns.
Fabrique Fantastique – this Etsy shop is based out of Toronto, and Jan seems to have an endless collection of fabrics. Just when I think she’s cleared everything out, something new pops up. Definitely check her out – you don’t want to miss her large selection of vintage yardage and quilts!
Deadstock/Repurposed Fabric:
Our Social Fabric – a non-profit fabric store that works to keep textiles out of the landfills. They sell all sorts of fabrics as well as patterns and notions.
FABCYCLE – another great shop/service working to divert fabric waste. They have loads of deadstock fabrics – some available as yardage, some available as bundles, as well as patterns and some notions.
Custom Fabric Printing:
Art Fabrics – cotton, silk, hemp, and polyester. I haven’t tried custom fabric printing with Art Fabrics, but their website looks really nice and I’d love to give them a try next time I want to print a custom design. Unlike Spoonflower there’s no marketplace of other designers’ work to choose from, so this is an option if you already have your own design that needs to be printed.
If you’re like me, you hate making muslins and just want to get on with making an actual garment. I have little patience for muslins, and I always want them to magically work on the first try. Though we all know this is rarely the case, I always get frustrated when something needs to be fixed – especially if it’s complex enough that I’ll need to make another muslin after making the adjustments. Since I have many upcoming projects that require muslins (all of them are from either Japanese pattern books or vintage patterns – both of which aren’t tailored for the average 21st-century American figure), I decided to just do all my muslins at the same time, and then have them out of the way for a while.
I have been most excited about my vintage McCall’s 5142, which was a bit expensive for a vintage pattern, but I couldn’t stop thinking about it and had to have it. I’m lucky, with vintage patterns, because I have a B-cup (in patterns but not really in retail size, meaning the measurement taken above the bust, just under my armpits, has a 2″ difference from my full bust) and if I buy a pattern marked with a 34 bust, the only adjustment I have to make is for the waist (because vintage patterns seem to always have impossibly tiny waists).
With most patterns, my bust tends to be a bit lower than on the pattern. Usually this is fine, and worst case I just have to lower the darts. With my vintage McCall’s, since it has an empire waist that is cinched just under the bust, my muslin was not looking good (the midriff “band” wrinkled upward toward my bust). In my internet research I couldn’t find much on a low-bust adjustment (LBA from here on out) for an empire waist dress – so here’s how I managed to do it. I’ve seen a lot of vintage patterns in a similar style, so this probably won’t be the only time I have to make this adjustment.
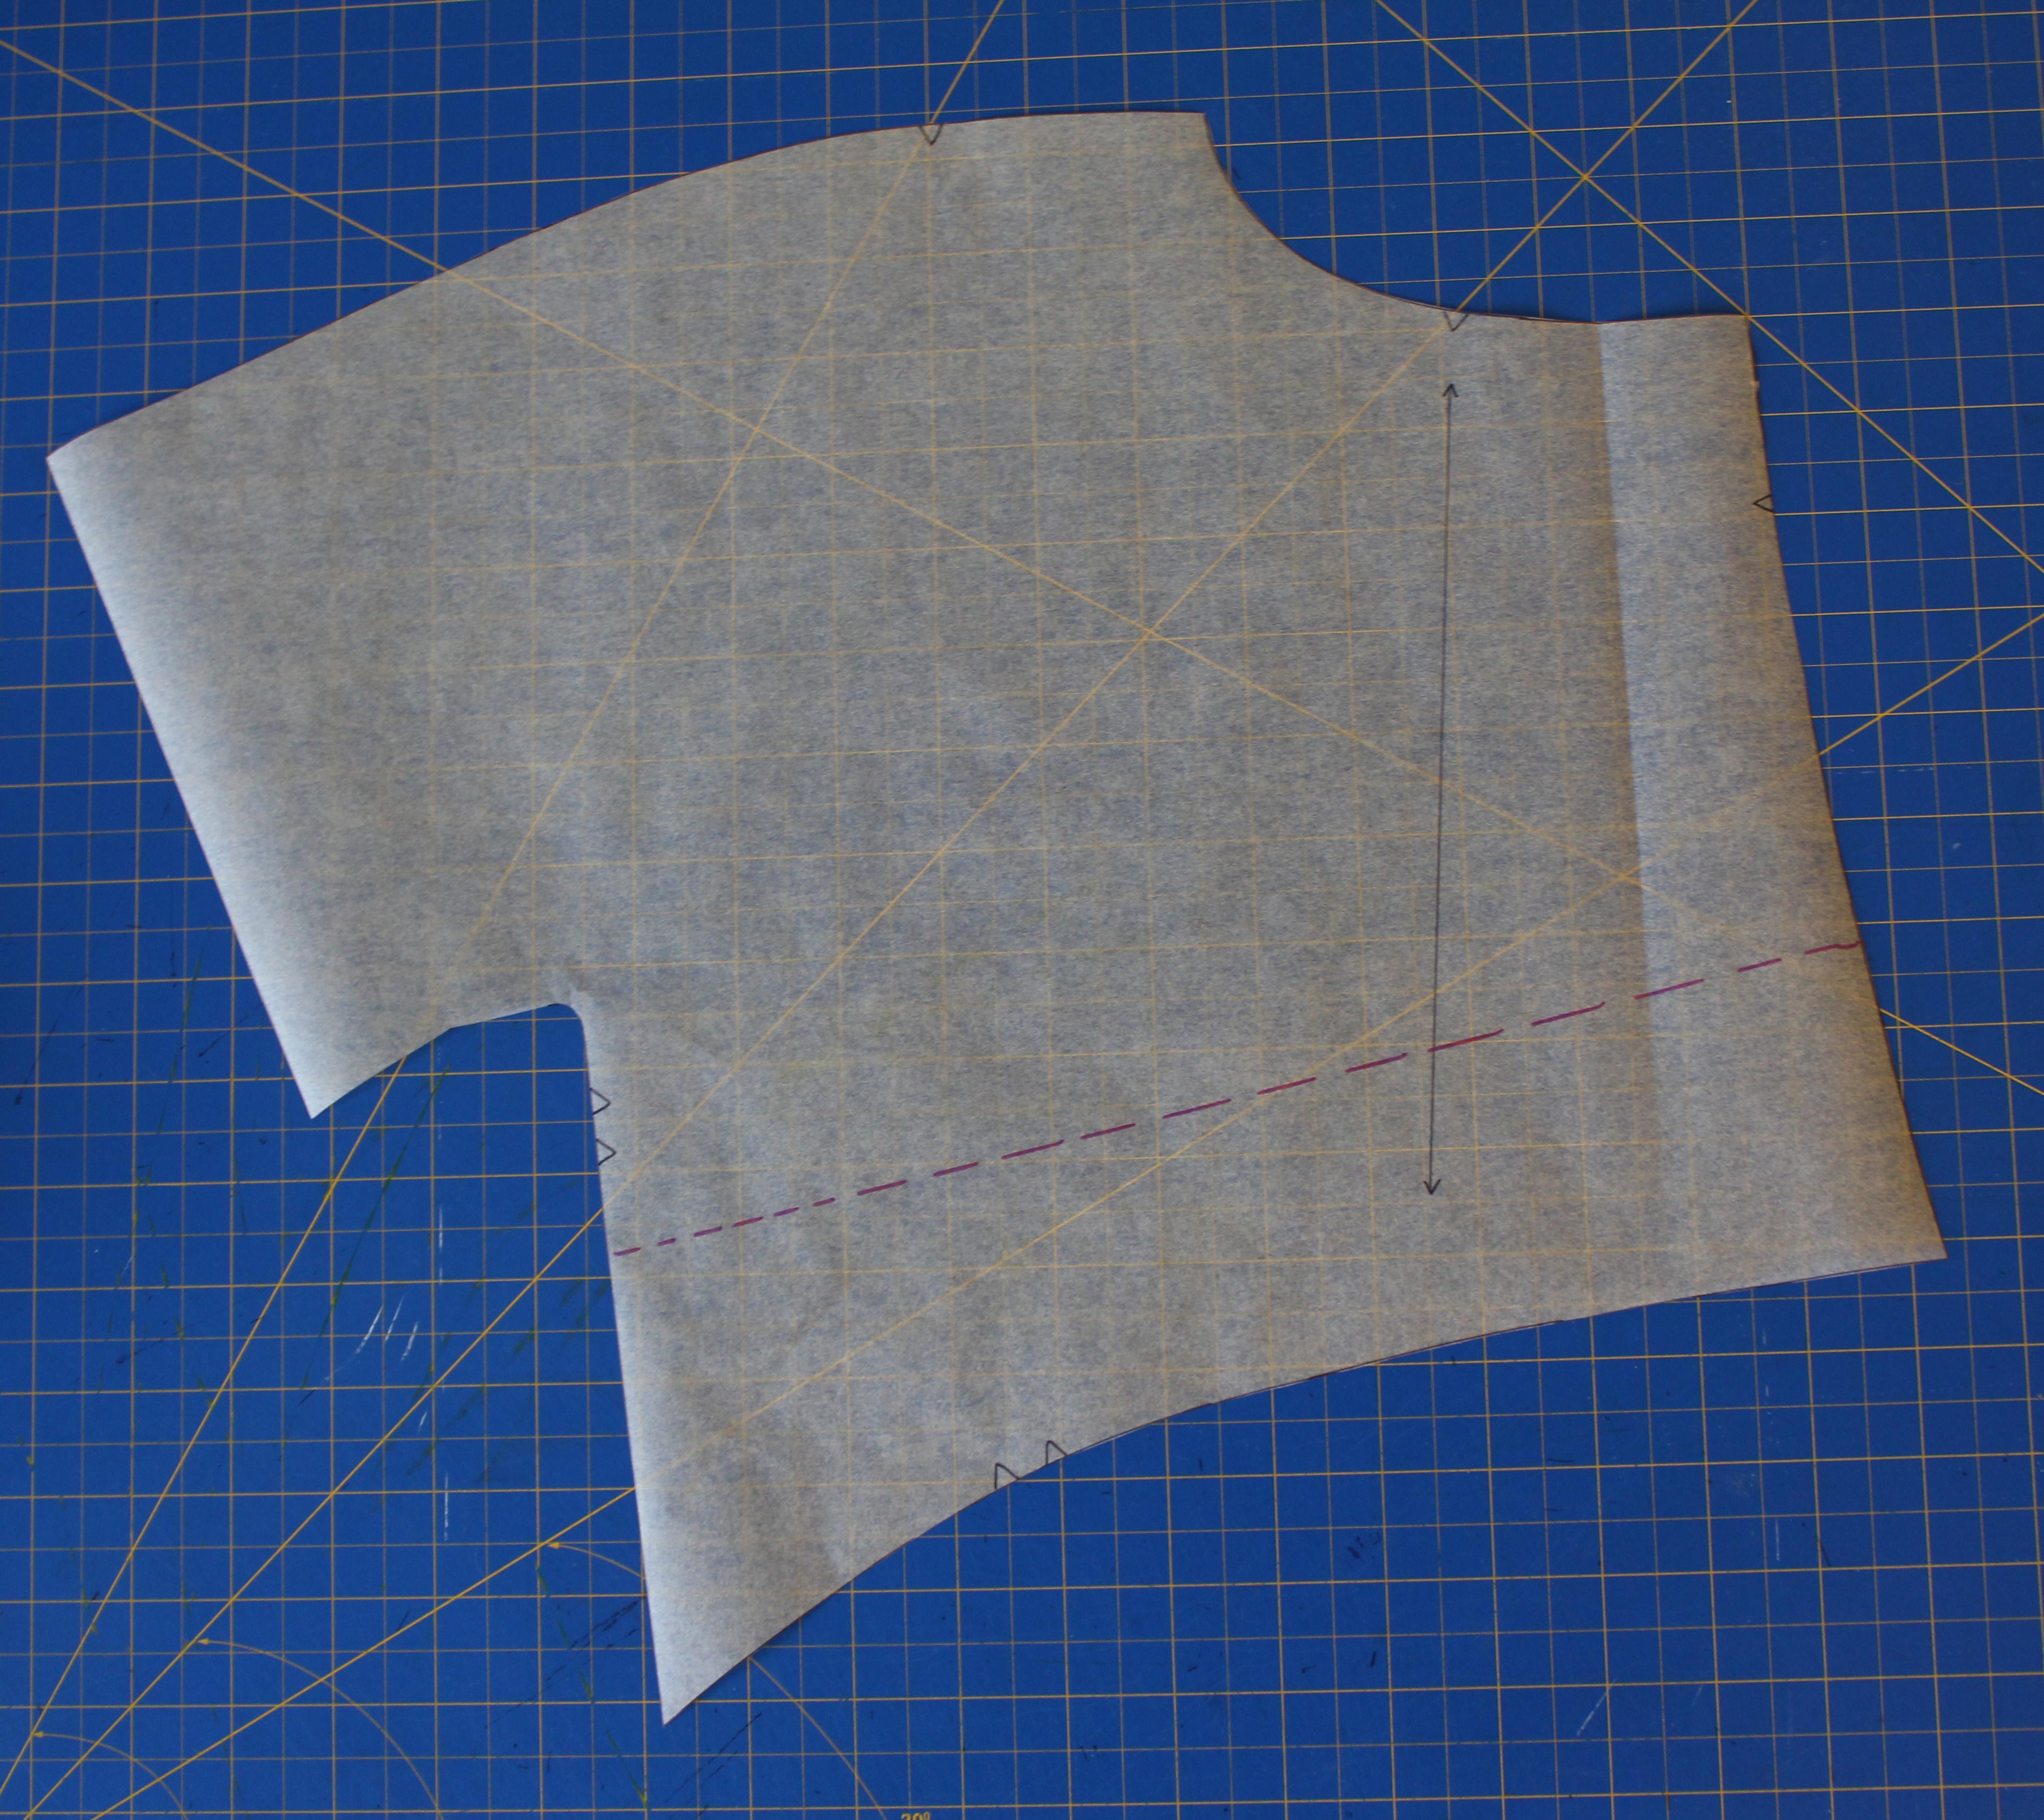
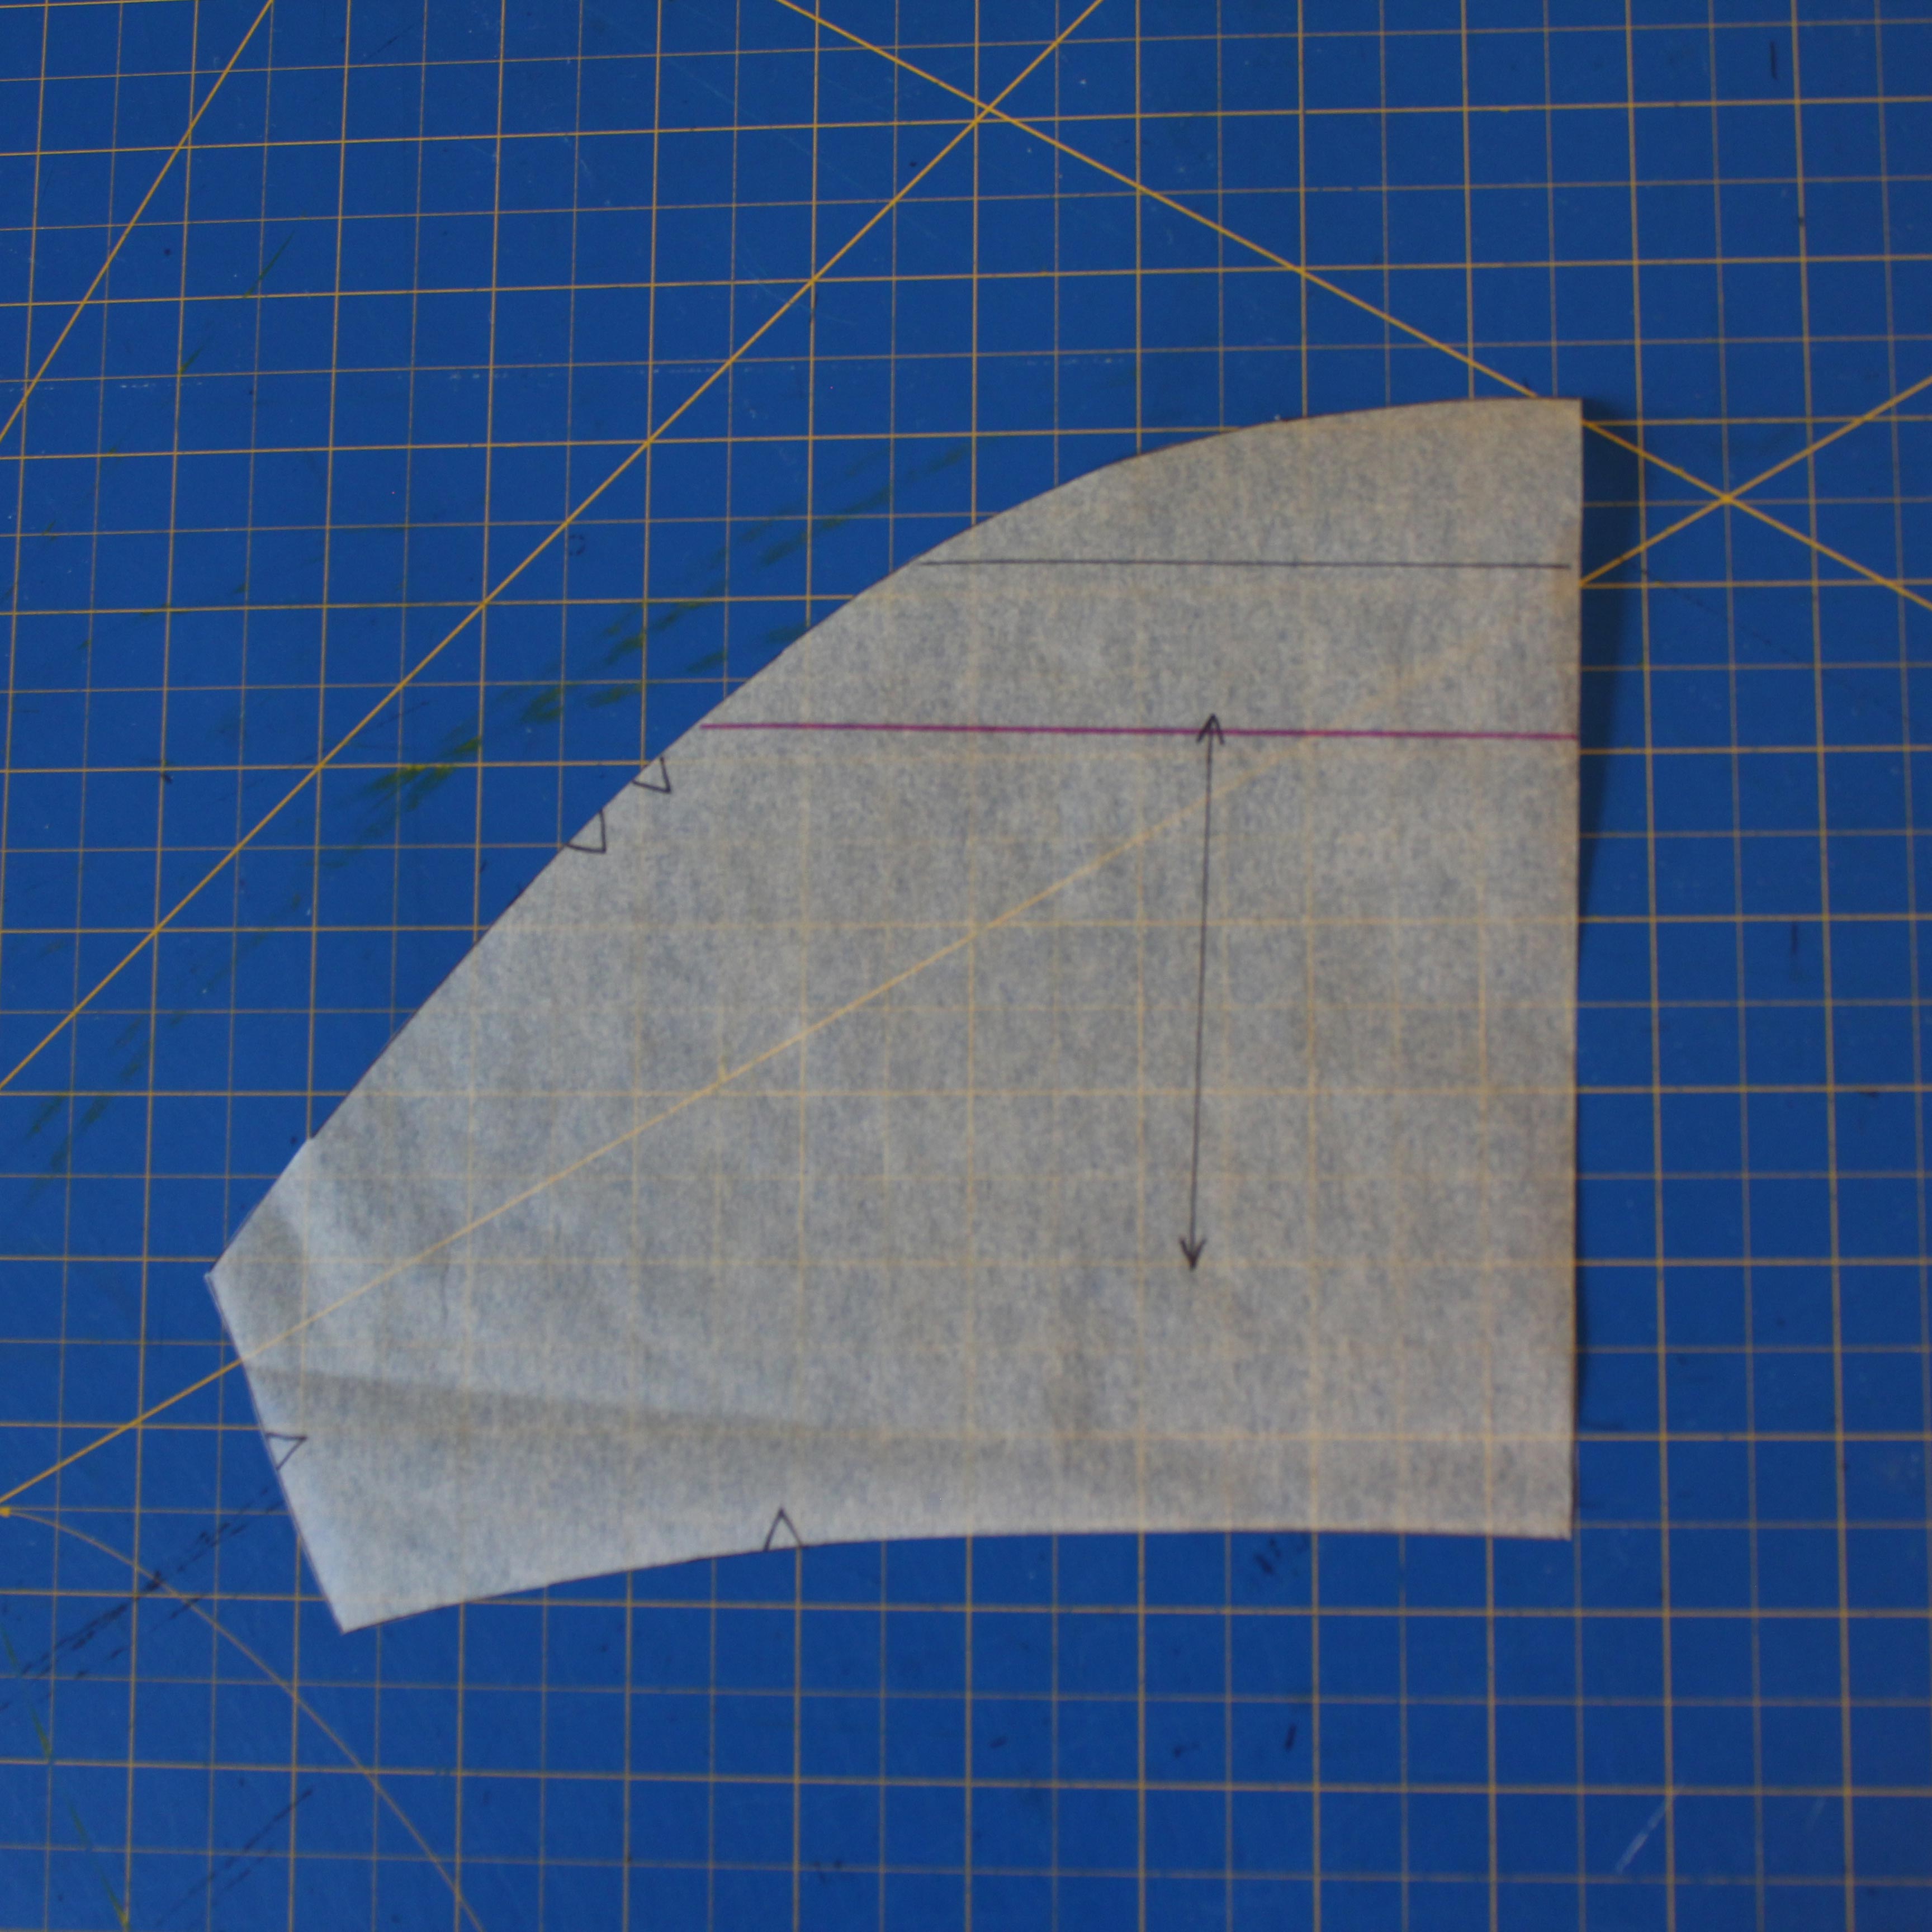
Start by tracing off your pattern pieces (ESPECIALLY if you’re working with a vintage pattern). Make sure to mark the grainlines on both pieces, and if it’s marked on your pattern, trace off the lengthen/shorten line as well (marked in pink). If this line isn’t marked already, you can approximate it somewhere between the armscye/armpit and the bottom of the pattern piece. Note that the marking is perpendicular to the centre front, not the grainline.
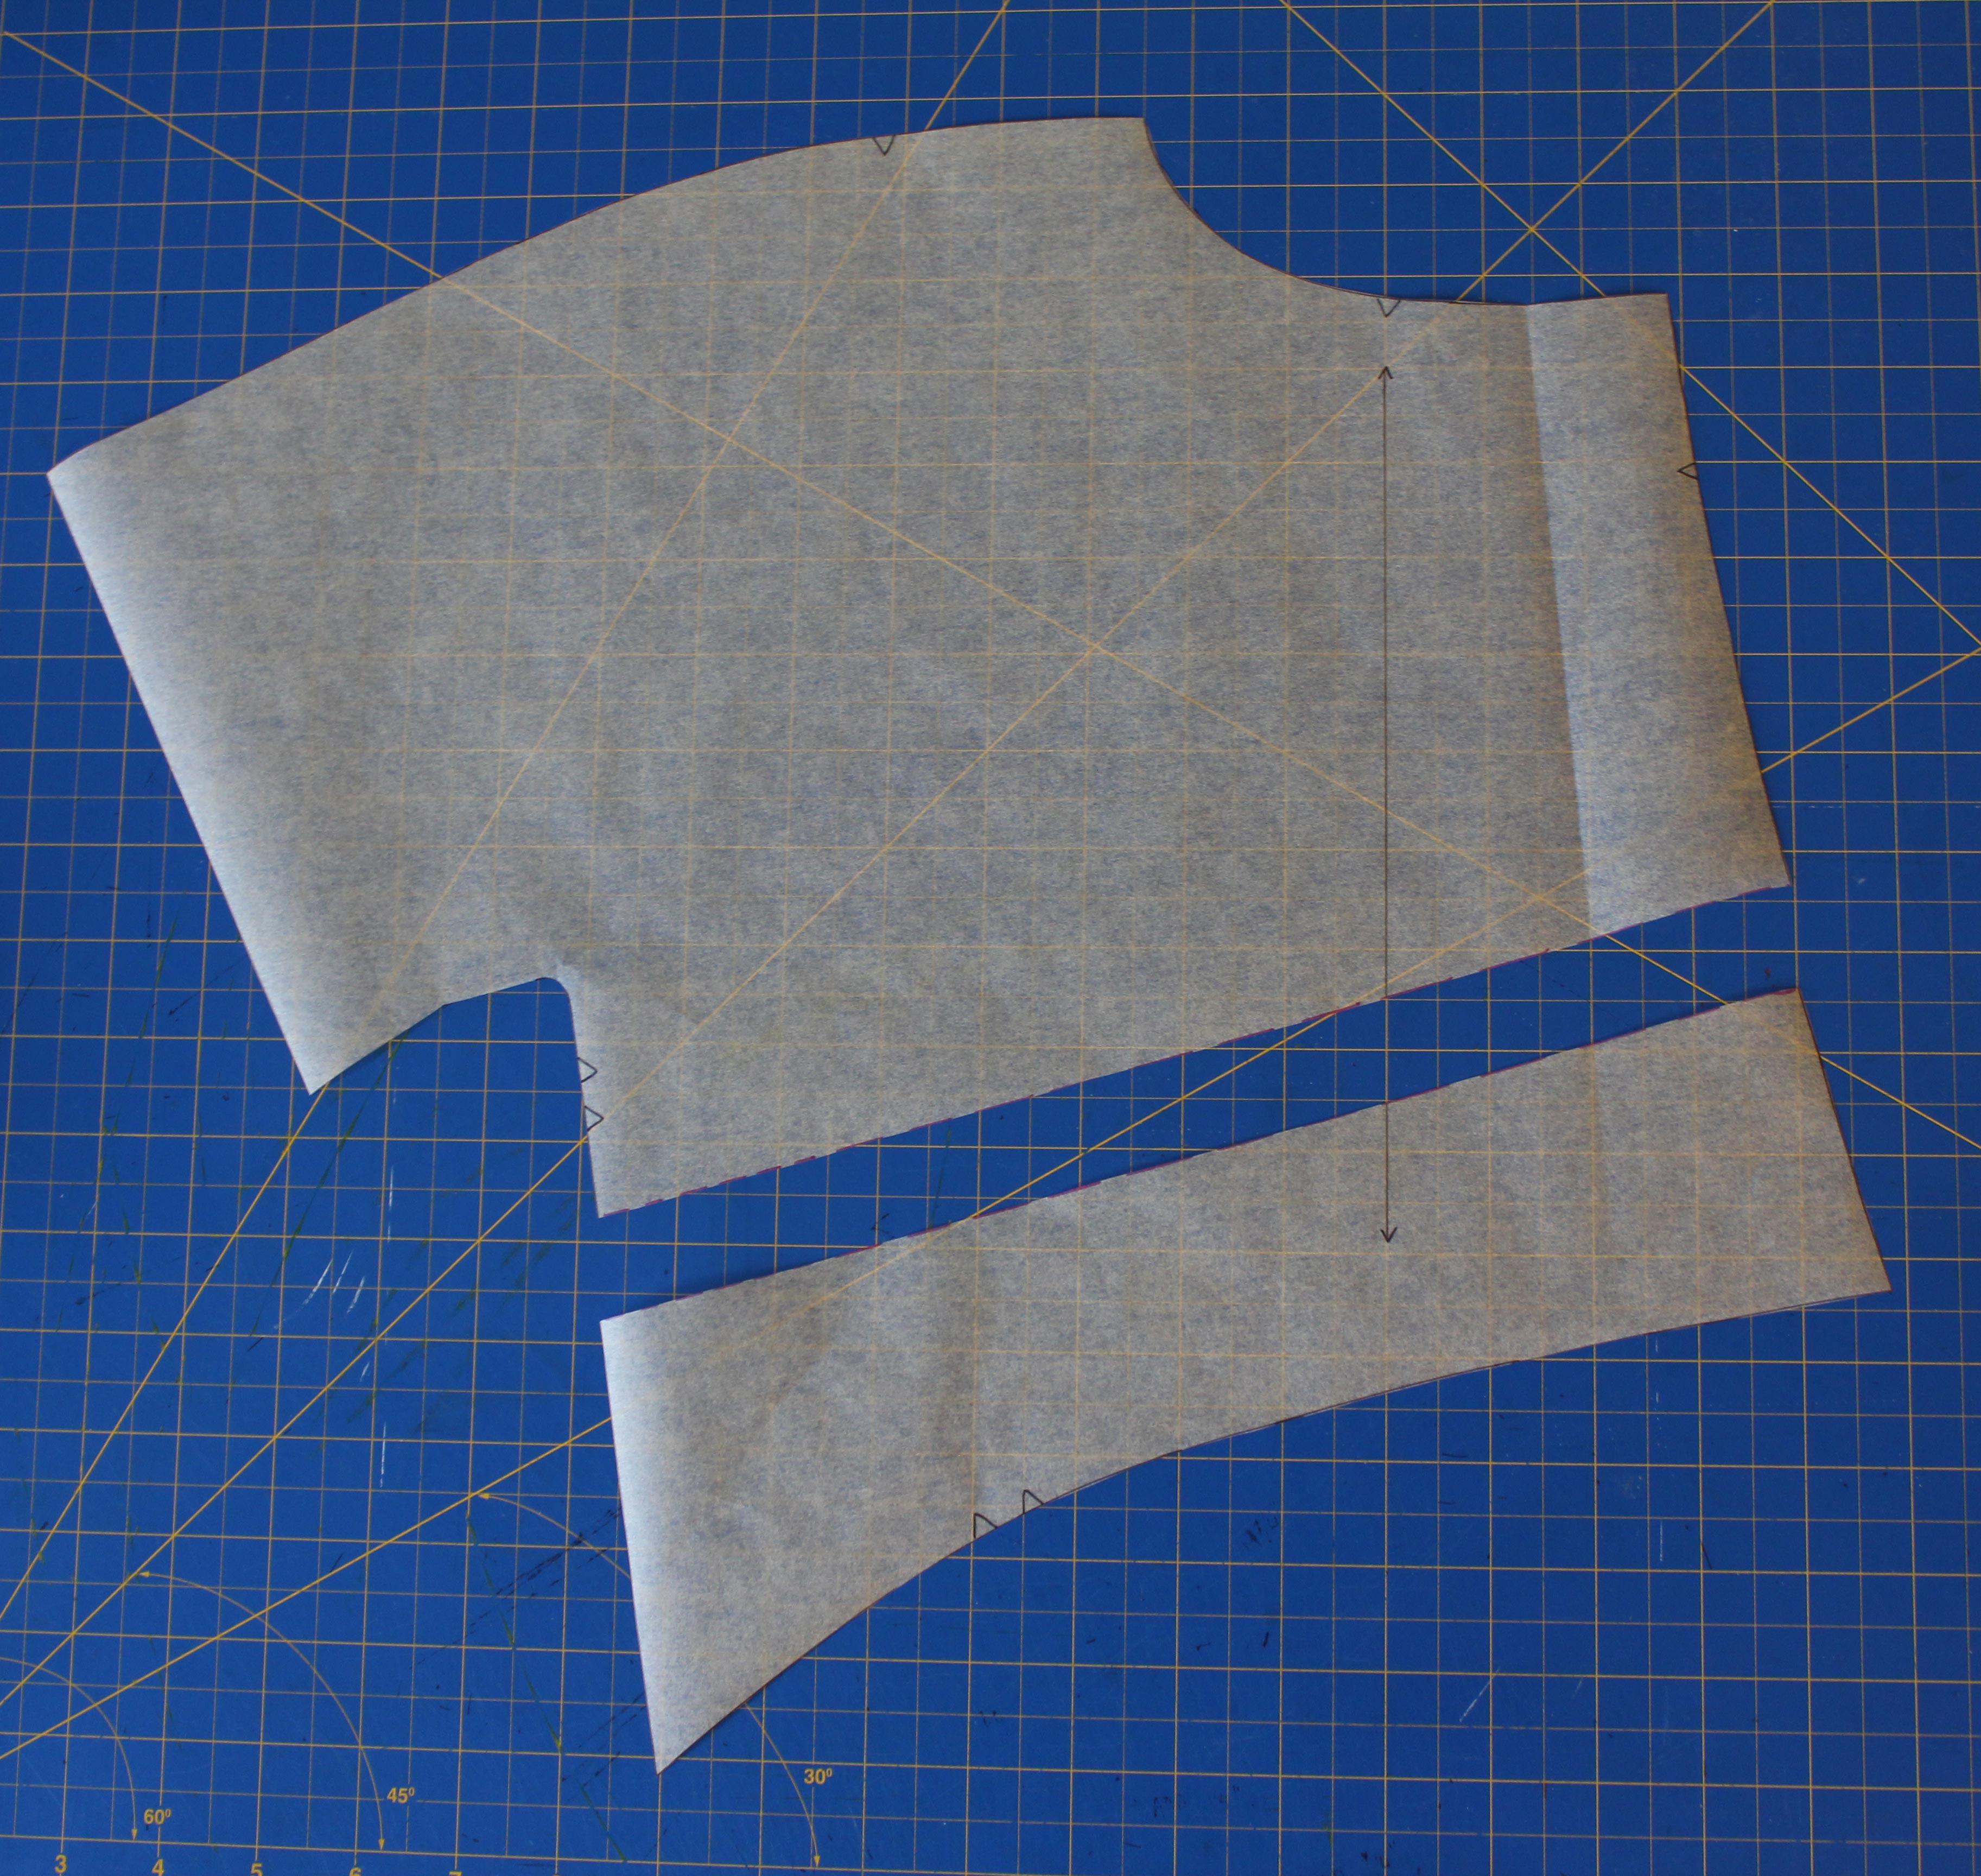
Cut along the lengthen/shorten line.
Next you’ll have to lower the bottom half of the pattern piece by the amount you need to lengthen the bust. Ideally, the bust point would be labelled with a + with a circle around it, but my pattern didn’t include it. If the bust point IS labelled on your pattern, determine your bust point by measuring from the top of your shoulder to highest bust point (the nipple in more common terms). Now measure from the shoulder to the + on the pattern (don’t include the shoulder seam allowance) – the difference between your body measurement and the pattern measurement is how much you’ll need to add.
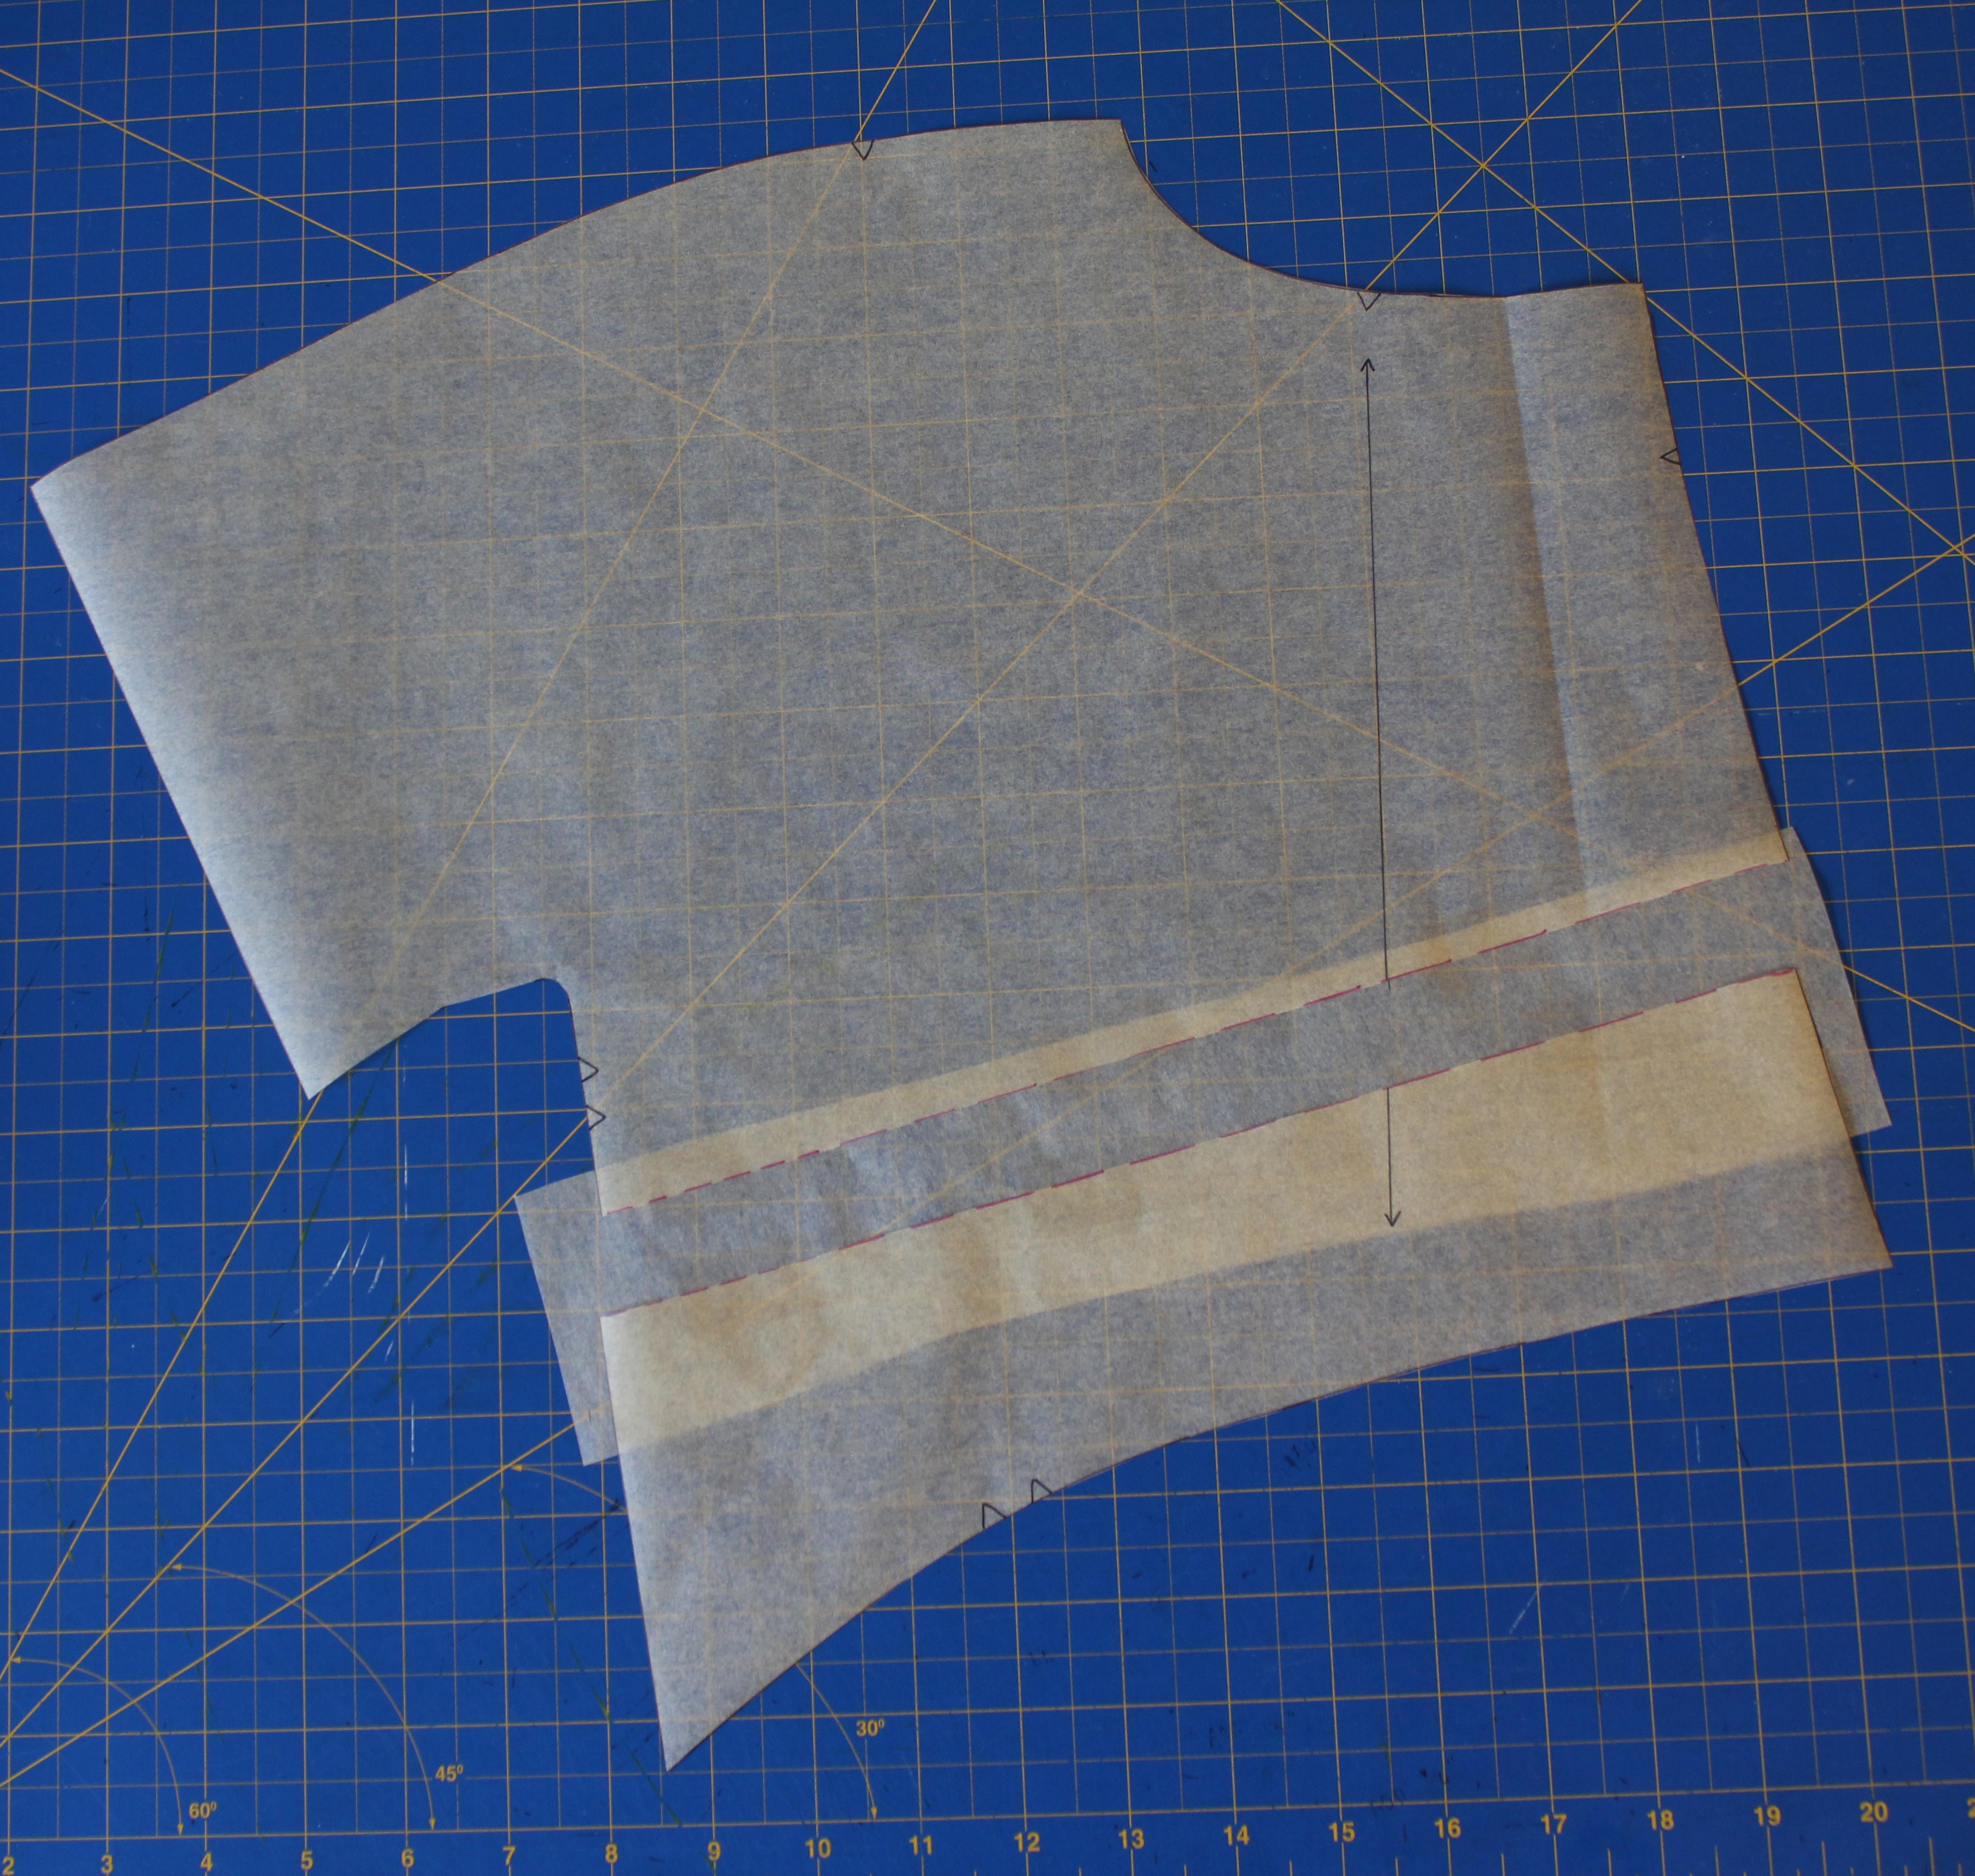
If you don’t have the + mark on your pattern, you can do what I did. I slashed my original muslin horizontally across the bust, and pull the midriff band down to fall under my bust (just warning you that this will look a bit funny). I measured the gap created where I slashed, and used that measurement (for me it was 1.5″).
For our example, I’ll use 1″.
Make sure the grainline stays lined up. Place a piece of scrap paper underneath and tape it down.
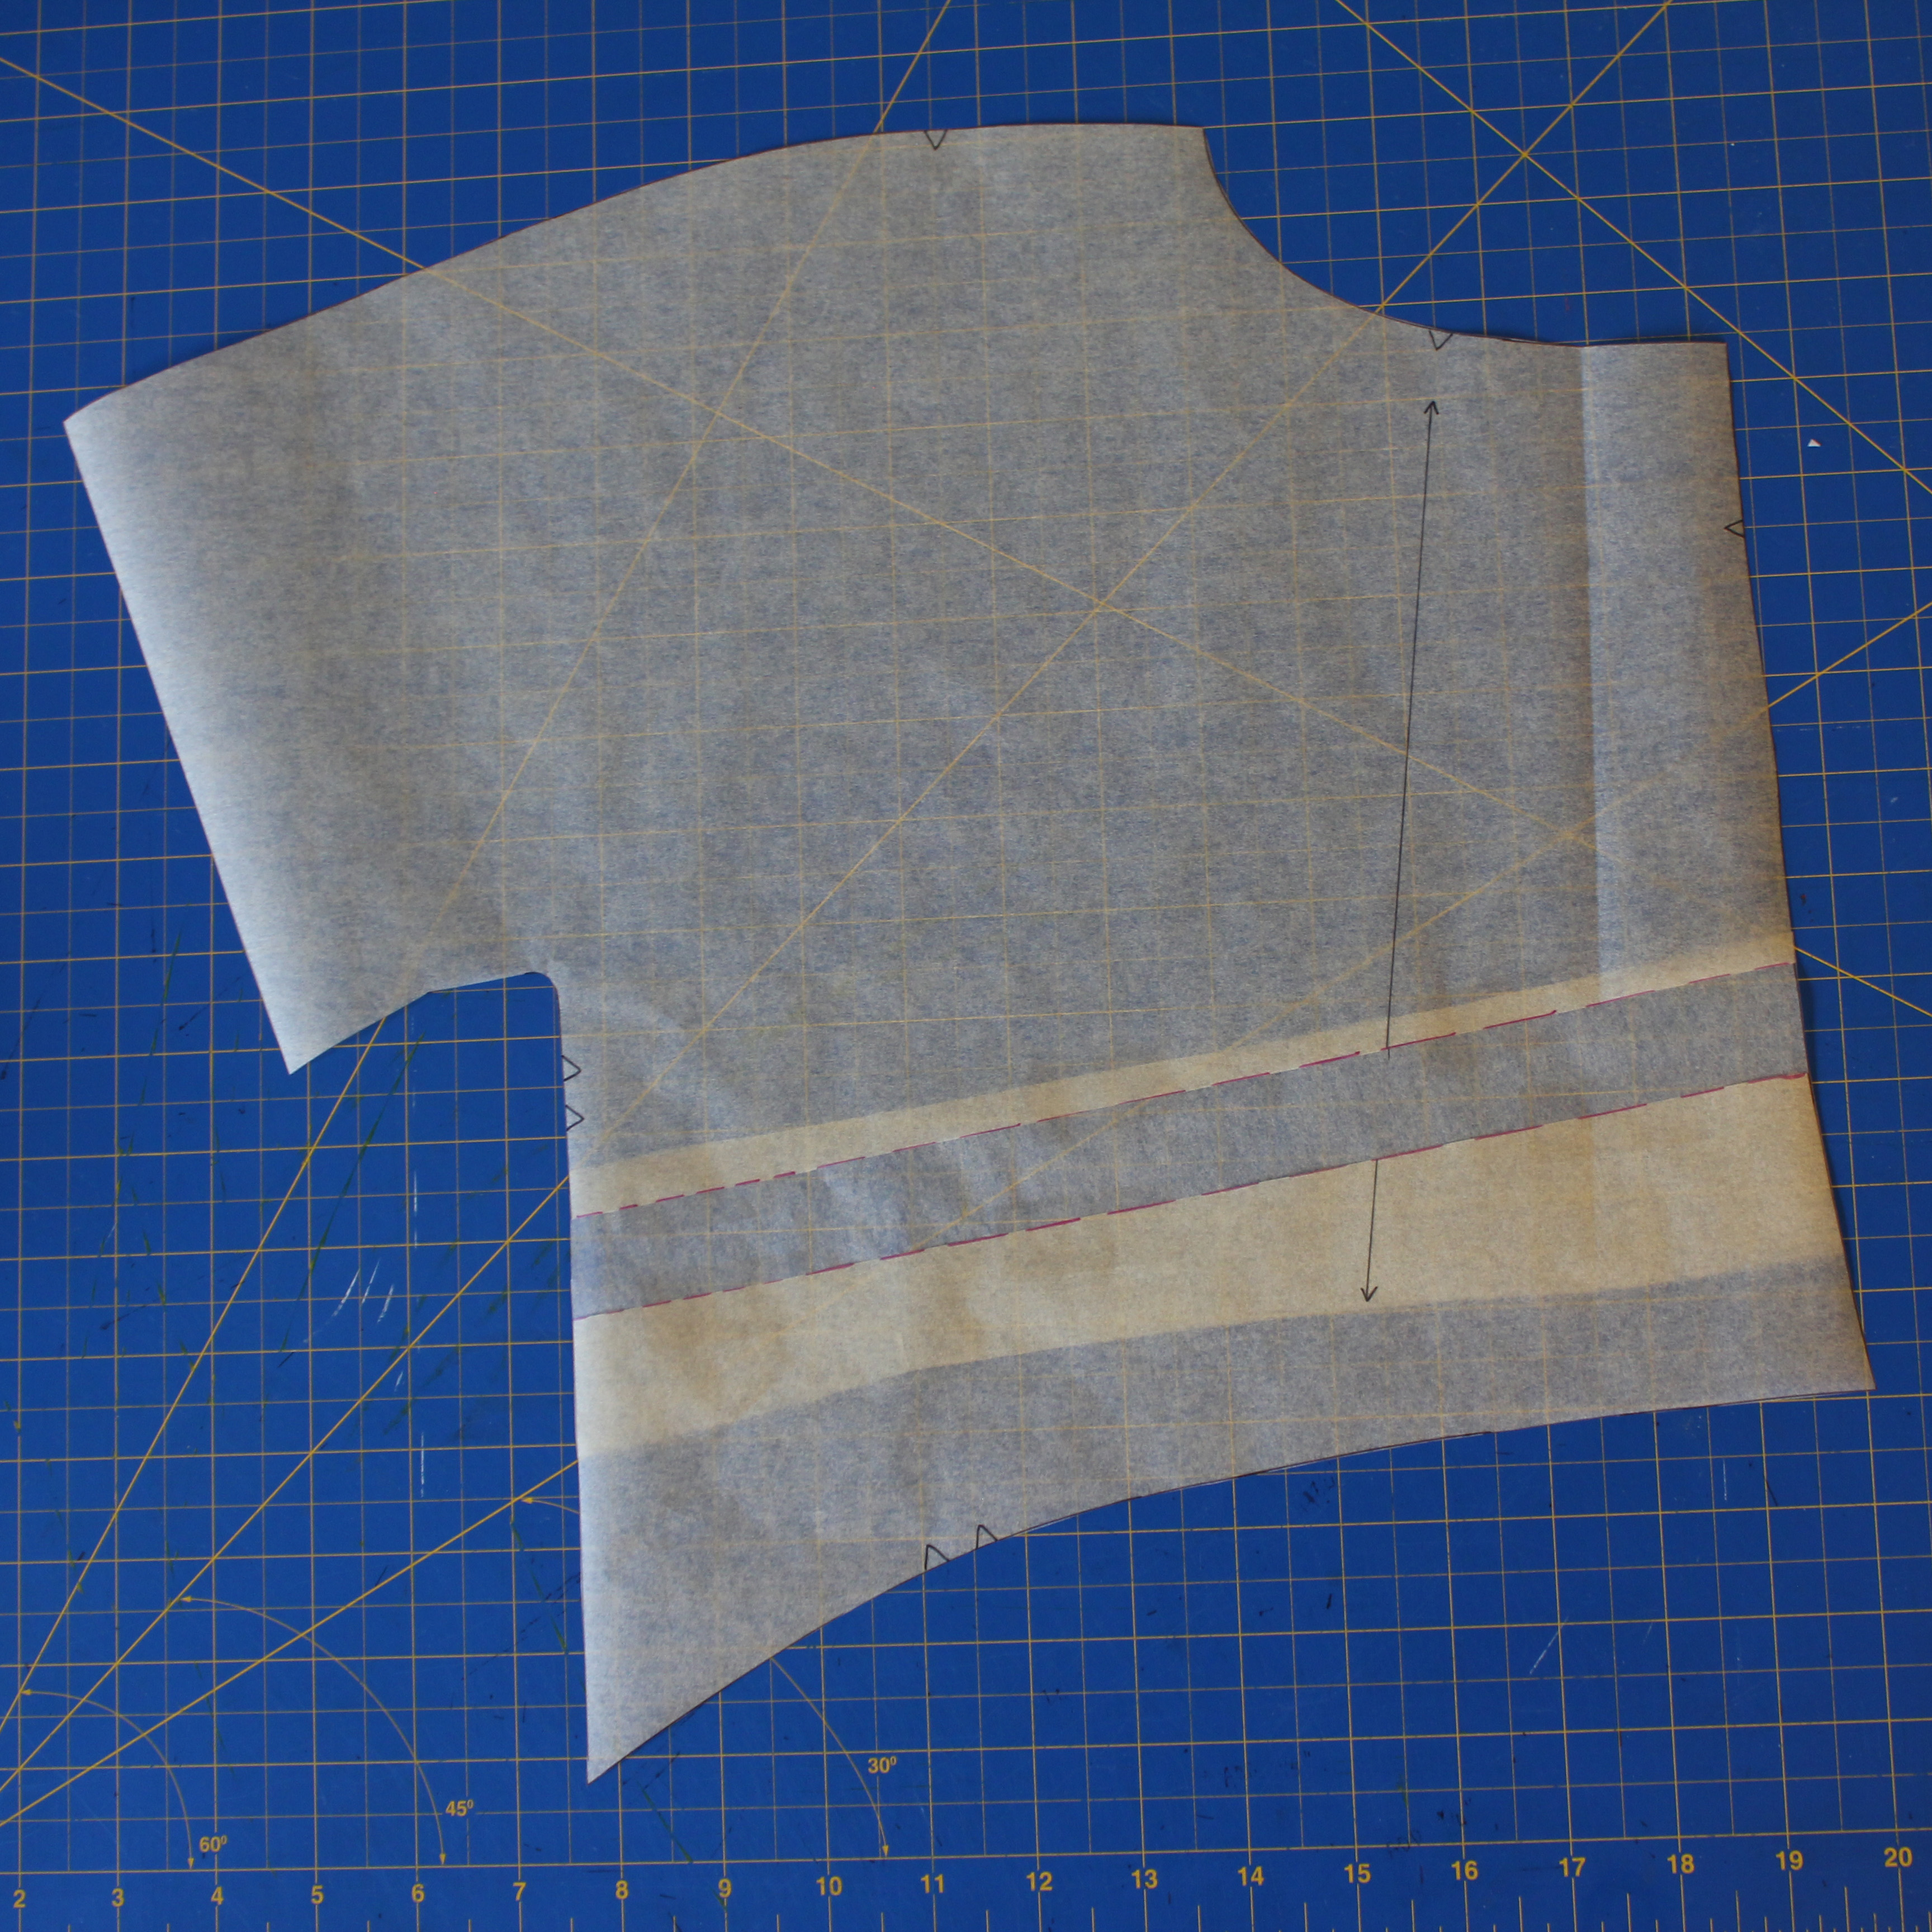
Using a ruler (or a french curve if the seam line is curved, as it is on the right side of my pattern piece), true up the side seams.
Trim away the excess paper and the main bodice piece is done! The same process will have to be repeated for the back bodice piece so that the side seams line up.
The same length we added is going to be taken away from the midriff band. For my pattern, there were notches indicating where the band is to be matched up with the bodice. I drew a line above these notches, perpendicular to the centre (marked in pink). Then, measure up, using the measurement you added to the bodice, and mark a parallel line across (marked in black). Since our measurement is 1″, there is a 1″ gap between the lines.
Now, fold the pink line to meet the black line (make sure you fold evenly the whole way across) and tape the fold down.
The curve will look pretty jagged, but we’ll fix that. Tape a scrap piece of paper under the top of the pattern piece.
Now true up the curve – you may have to chop off the part where the notches are, but just make sure that the line blends into the original curve before you reach the side seam – ideally you don’t want to shorten the side seam.
Mark the new placement of the notches (marked in pink). Trim along the new line that you’ve drawn.
And you’re done! Make sure you make a muslin to be sure that it fits.
It’s important to note that this process will lengthen the bodice – I’m pretty tall, so lengthening patterns is often a step I have to make anyways. If lengthening the bodice will bring it below your waistline, I wouldn’t recommend this process – unless the midriff band in your pattern is quite wide at the side seam. In that case, you can probably shorten the midriff band at the side seam. In my case, I didn’t have the width to spare.
This adjustment is also meant for those who don’t require a small/full bust adjustment – in fact, a full bust adjustment also requires the pattern to be lengthened slightly, so it should also help with the low bust issue. (You can find a tutorial on a FBA here).
This adjustment should also work for a high bust adjustment, if you shorten the bodice and lengthen the midriff band.


 We also had a tour of the facility where all the magic happens, and got to see all the wonderful things that go into making wool products (including their industrial felter!). I was too excited about the dogs saying hello to me during the tour, and failed to get photos of the machinery.
 The shop at Belfast Mini-Mills is amazing. They stock a great selection of yarn and roving milled on-site, including exotic varieties such as qiviut (a type of yak, I believe), samoyed (the dog breed), angora, and more. Their superwash merino comes in beautiful colours and is very reasonably priced. I didn’t buy any yarn, as last year my


 One of my FAVOURITE stops actually wasn’t “on” the Fibre Trail. I found


 I think something a lot of us Canadian makers struggle with is online fabric shopping. There always seems to be such a great selection of fabric available online on American or European-based websites, but it never seems worth it to pay high shipping fees or risk hefty duties. Also, isn’t it nice to support Canadian businesses?