SneakerKit Round Two

Shoes1a

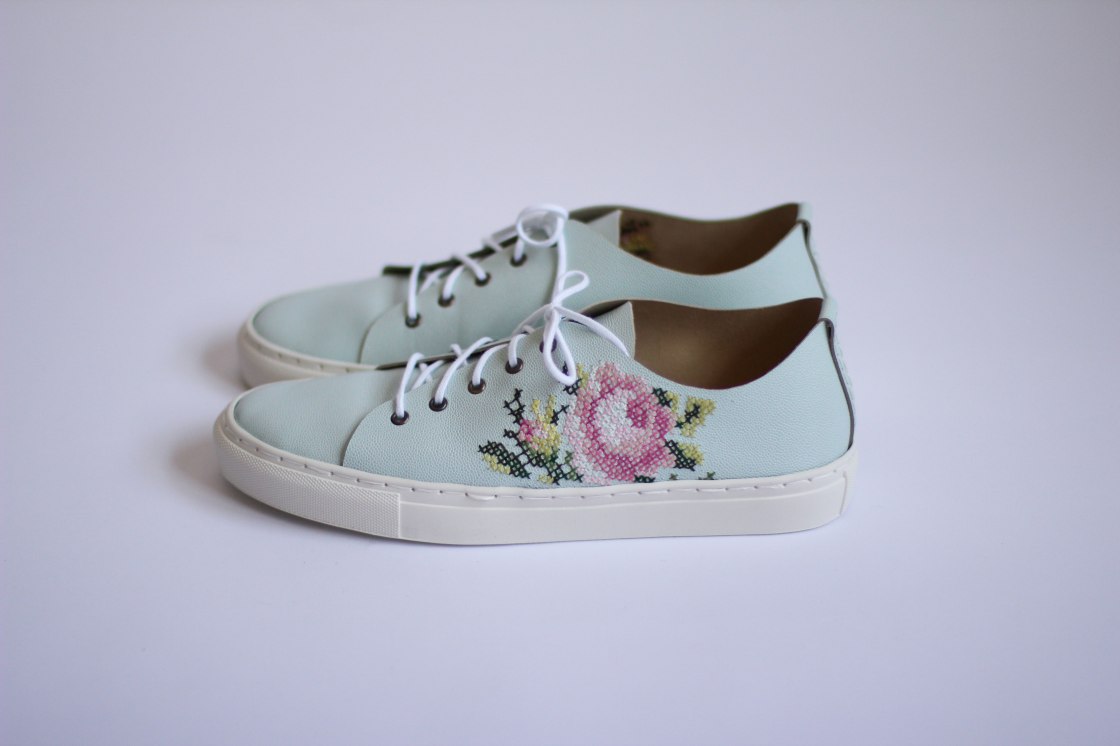
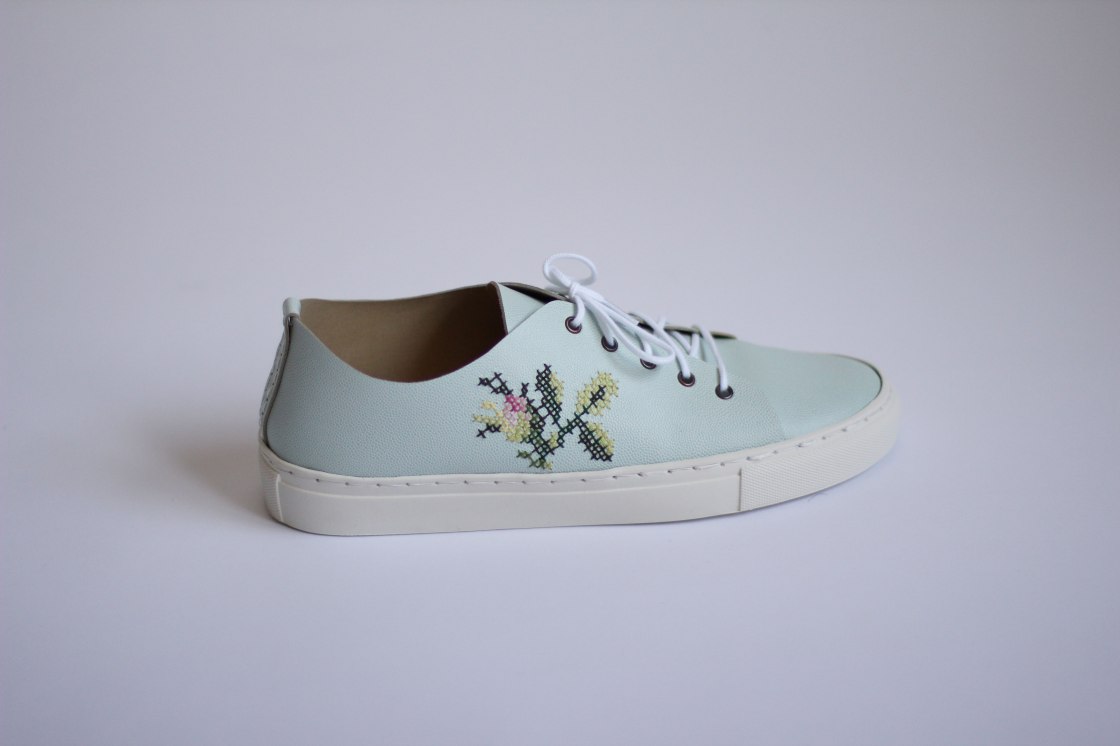
If you can recall, I tried my hand at making sneakers using SneakerKit last summer, but I made the (beautiful) mistake of attempting to cross-stitch leather. I also wasn’t totally pleased with the quality of the kit. Since then, though, the sneaker-making bug came back, and SneakerKit changed the insoles that were giving us trouble. SneakerKit is based in the Netherlands, and since international shipping is pricey, I thought our trip to Amsterdam would be a great chance to get another pair.

I follow SneakerKit on Instagram, and for a long time I’ve been seeing them share sneakers using fabric and a product called Decovil. Considering how much I love fabric, the idea of using fabric to make shoes really excited me. I had never heard of this Decovil stuff before (though I assumed it was a sturdy fusible interfacing – which it is), so I looked for it in Amsterdam and found it quite easily. The idea to use Decovil with SneakerKit isn’t my own, and I figured out a lot of it from @tinesews on Instagram, who has a highlighted story (in German) showing how she did it.

Shoes1c

And now, I’ll show you my way.

I did stay awake in bed for a few nights trying to think of the best way to do it. Tine lined her sneakers by using spray glue to glue the lining to the Decovil on the inside, and then finished the raw edges with bias binding. I didn’t have spray glue, so I wanted to find another way.

First, I used the template that comes with SneakerKit (downloadable from their website) and traced the pieces onto the non-adhesive side of the Decovil. Basically, I followed the same steps for cutting out leather that SneakerKit provides. I didn’t mark the punch holes.

dav

I cut out the pieces and ironed them to the wrong side of my main fabric, making sure to leave a good border all around each piece for seam allowances. I cut out the pieces, but eyeballed a 1/2″ seam allowance along the top edges of the sneaker sides, and around the long part of the centre piece that would be the tongue.

dav

Then I placed these pieces on the lining fabric and cut out the lining using the interfaced main fabric as a template. I sewed the lining to the right side of the main fabric, stitching right along the edge of the Decovil.

I trimmed the seams and clipped the curves, and turned the lining fabric to the inside. I found the lining fabric got kind of tight and pull-y, but I managed to press it out enough that it wasn’t a problem.

Then I topstitched the edges, which also helped keep the lining from flipping out. I also stitched down the open raw edges of the pieces so the lining wouldn’t pull back up.

Once all the pieces were sewn, I marked them and prepared them according to the SneakerKit instructions, but I didn’t punch holes up the back of the shoe/ankle. This is because those holes are used to stitch the two side pieces together (P1 and P3) and I decided I would do this on the sewing machine.

dav

On the tongue, there is supposed to be a little slit in the leather for the laces to be held in place. Since cutting into the fabric would leave an ugly raw edge, I decided to stitch a small piece of bias binding on top of the fabric. I used a very narrow and dense zigzag stitch to tack it in place where marked on the pattern.

dav

I installed eyelets before proceeding. This was a huge pain in the neck. I bought Prym 4mm eyelets in Amsterdam and the tool that came with it kept squishing the eyelets into ovals. To fix this, I used the little hole-punch that came with it and did one or two knocks with the hammer using the tapered end (the end that doesn’t have a hole-cutting…circle) and this helped get things going in the right direction. I then finished them off using the little tool.

dav

Once all the pieces were ready for assembly, I sewed bias binding onto pieces P1 and P3 (at the back) instead of using the small rectangular piece in the pattern (I used the machine for this – it sewed fine through the Decovil using a size 80 needle). I also found that at this point the fabric was fraying on all my pieces, so I covered each raw edge in fray check.

dav

After that point, I assembled the sneakers according to the Sneaker Kit instructions! And that’s it! They say you can finish SneakerKit in a day, but with all the prep I had to do with the Decovil, the lining, and the eyelets, it took me two. Still, not too shabby for a new handmade pair of shoes!

Shoes1b

Adventures in Shoemaking: Desert Boots at Art & Sole Academy

DesertBoots1

I haven’t been sewing much over the last month – between travelling to Prince Edward Island and Boulder, Colorado, I’ve really only had time to work on some gifts I had put off making. I did get in some great shoemaking, though – and it was the real deal this time.

For a long time, I had been wanting to take a class at the Art and Sole Academy in East Toronto. Eitan and I started by taking the Shoemaking 101 class, a quick 2-hour intro to the process of making shoes. It isn’t a class where you get to make anything, but you learn all about the materials and tools that make a shoe. I knew during that class that I HAD to take a proper workshop and make something. After a bit of nudging, Eitan agreed to take the Intermediate class with me starting at the end of June.

At Art & Sole, the classes are pretty small, and each student works on their desired “intermediate level” shoe – we had one student working on heels, three working on Oxfords, and I was working on desert boots. Jen, our wonderful instructor, would spend the class guiding each of us along individually, depending on what we were working on. The class was 5 sessions, but all but one of us needed to come back for several hours (fortunately, Jen includes this time in the tuition). That leaves you with a total of 35+ hours of shoemaking. Phew!

We all started off the same way – by making our pattern. This process actually took almost two sessions. You tape up your last (the wooden form on which the shoe is built) with masking tape, and then peel it all off and put it on card stock. You divide that into pattern pieces, and those are the pieces you use to cut out your leather.

IMG-20180629-WA0000 (1)

IMG_20180705_221018_747 (1)

I bought some lovely kid suede at Perfect Leather on King St., and lovely magenta lamb skin for a contrast lining. I had to cut pattern pieces from both of these, and then sew them together on the sewing machine.

DesertBoots3

Then came a process called lasting, which is basically stretching the leather over the last, and hammering it down on the bottom. Then you glue it all down where you nailed it (shoemaking involves a LOT of glue). Since all the leather gets built up and lumpy on the bottom, you have to do something called skiving. This involves taking a knife and shaving away the leather so the bottom is nice and flat. I struggled with this a bit, and my knife slipped and made a nice little slice in my arm. Luckily Jen had a first aid kit on hand, and she and Eitan bandaged me up.

Anyways, I wasn’t letting a cut stop me! After lasting the lining and a layer of toe and heel stiffeners (a small piece of vegetable-tanned leather that helps keep the toe and heel of the shoe nice and strong), I had to glue on the midsole, which for a desert boot, you cut out extra large and cut away the excess after stitching is done. After glueing on the midsole, I had to glue the upper leather (the suede) to the midsole, and then I had to stitch it down. I did this stitching by hand, using a handy little stitching tool and waxed thread.

Then I had to glue on the heel and the rubber treads. Using a belt sander, I sanded all the edges of the sole smooth, did a little cleaning up, added foam insoles, and they were done!

DesertBoots2

I tried them on, and they were a touch snug, but Jen told me that an easy solution is lightly wetting the insides and walking around in them for a bit. Leather becomes very malleable when wet, and will mould to the shape of your foot quite nicely! The only thing I don’t love about my new shoes is that the soles are a bit thin – I think just one more layer of leather would’ve made them perfect. As is, I can feel the heel through the bottom of the shoe. Still, pretty impressive for a first time shoe-maker!

DesertBoots4

I am already thinking about which classes to take at Art & Sole next! I would love to make sandals some day (which is easier than making shoes), and I’d also love to make ballet flats. I have the knowledge now to make shoes again on my own, but the tricky thing is that shoemaking involves a lot of tools (I may have a sewing machine and x-acto knife, but I don’t have a belt sander…). Lasts are also pretty tricky to find, and are integral to making structured shoes. But, maybe one day I’ll invest in a pair of lasts and sort out some way to make some shoes at home. Until then, I’ll have to stick to Sneaker Kit or going back to Art & Sole Academy!

Adventures in Shoemaking: SneakerKit Review

Shoe1Web

Lately I’ve been really into the idea of making my own shoes. When I looked up at-home shoemaking, I had a lot of trouble finding any resources. I found a few other bloggers who make their own shoes and have shared their experiences, but I’ve learned that shoemaking is generally a pretty guarded secret. What I did manage to find was a small brand called SneakerKit, which began on Kickstarter just a few years ago. They sell at-home sneaker-making kits, which include a sole, insole, thread, needle, and pattern. The shoes don’t need lasts or glue – they’re entirely stitched together. Their website is not terribly informative, and I found it hard to navigate. I also couldn’t find any reviews on the product (I love reviews) – but I convinced Eitan to just jump into it with me.

We each ordered a kit, but found it a bit stressful to choose a size – the website has no sizing guide and every European conversion guide we found online was different. We couldn’t find any information anywhere on the website on how to choose a size right for you, or what the difference is between their “slim” soles and their “regular” (or “Publico” soles). I managed to find this Kickstarter page (scroll far down), which had a conversion chart – we went with our Japanese size, which is really just based on the cm length of your foot from toe to heel (so straightforward!). In US sizes I’m generally a 9.5-10, and I ordered a 41.5. Eitan is a US 11, and he got the 44.5. I’d say both of our soles were the right size for us in the end.

Shopping for leather was a more frustrating endeavour than I had anticipated. SneakerKit does give you the option to order from their selection of leather, but I wanted to shop for it in person and know the feel of what I was getting. I had never shopped for leather before, and headed downtown to Perfect Leather on King St W. I don’t know if this is the case at all leather stores, but at Perfect Leather they only sell by the piece. I needed cowhide, which I thought would be the sturdiest and most flexible option for making sneakers – but that would mean I had to buy an entire cow’s worth – about 20 sq ft (leather is often sold by the square foot – Sneakerkit only requires 2 sq ft). A man working there showed me a selection of goat skins (which are smaller as the animal is smaller), and insisted it was perfect for shoe making. It wasn’t – it was much too thin and would’ve had my toes poking through the top of the shoe. He said they will not cut leather, so I could choose between the small goat skins and the gigantic rolls of cowhide.

Well.

Being the fabric hunting madwoman that I can be, I rummaged through the shelves of goat skin and found a few smaller pieces of cowhide (when I pulled them out and placed them on the table to measure them, the man would scratch his head and tell me “This is cowhide”. Duh.) I found a textured piece of seafoam blue leather that was absolutely what I was looking for, and I also managed to find gray leather for Eitan. While I was frustrated that I didn’t have the rest of the store available to me as an option, I was pretty pleased that I didn’t have to settle.

While I was on the streetcar I had a grand, ambitious idea to cross stitch my shoes. I knew it was too ambitious, but that didn’t stop me. I thought that if I pre-poked a grid of holes in the leather, it would be a cinch. It was NOT a cinch.

Shoe4Web

Leather is, well, skin. It kind of has this self-healing quality, and shortly after I hammered all the holes in with my awl, the holes slowly closed up. This made it incredibly difficult to get a needle through. Also leather is “sticky” (which is why you need a specialty leather needle for a sewing machine), and the needle often got stuck going through (granted, I was using a regular sewing needle. There may exist needles intended for this specific task). Many times I questioned if I should stop and start over with the leftover leather I had. Many. Many. Times.

But I’m stubborn, so I persisted. I decided it would be best to have asymmetrical shoes and have a smaller bud on the other shoe, so that I wouldn’t have to endure the same pain twice. After three days, my hands were cramped and I had blisters on my fingers, but I was pretty dang pleased with myself. As Poison sings, “every rose has its thorn” (or in this case, needle).  I Mod Podge-d the stitching on the inside because I didn’t want my foot to wear away at it too much.

Then came the construction. I was kind of lucky since I took so long to cross-stitch my shoes that Eitan finished his pair before me, so I kind of learned from him, rather than from SneakerKit’s vague online instructions.

The instructions are kind of hard to understand, and the videos don’t have any commentary. The trickiest parts were hard to see. Also, even when you get the gist of it, sewing the leather to the sole is kind of finicky. Both of us had to redo one of our shoes once. It’s pretty much all about getting the tension right. It’s easy enough to pull the stitches and adjust the tension, except that on both of my shoes, at some point the needle split the thread in one of the stitches and it became impossible to pull the stitches tight. I had to kind of bring the loose parts into the inside of the shoe and hope the insole hid them.

Eitan was so excited to wear his shoes the first day – and for good reason, they look great! He wore them for a day at work and when he came home he took the insoles out – the bottoms had completely crumbled. We are waiting for a response from SneakerKit to find out what’s going on, but in the meantime I cut a second pair of insoles out of scrap leather and placed them underneath the ones included in the kit, just in case.

ShoeWearBlog

Otherwise the shoes are pretty comfortable, but they don’t seem to be incredibly practical. When I bend my toe I can see the stitches and the holes in the leather, and I feel like anything could seep inside my shoes with ease. Anyways, I spent so much time on the cross-stitching that I wouldn’t want to wear them anywhere they’d get dirty, so for that reason alone they’re not very practical. Eitan is worried that the stitching will come undone, and I get that (we kept joking about his shoes spontaneously falling apart at the office).

In the end, I wasn’t really expecting that I would spend many days strolling for hours in the first sneakers I had ever made. I’m going to call these my art sneakers, more for show than for wear, but I do still hope to wear them once in a while. It is awfully satisfying to make the things you wear on your feet.