Lately I’ve been really into the idea of making my own shoes. When I looked up at-home shoemaking, I had a lot of trouble finding any resources. I found a few other bloggers who make their own shoes and have shared their experiences, but I’ve learned that shoemaking is generally a pretty guarded secret. What I did manage to find was a small brand called SneakerKit, which began on Kickstarter just a few years ago. They sell at-home sneaker-making kits, which include a sole, insole, thread, needle, and pattern. The shoes don’t need lasts or glue – they’re entirely stitched together. Their website is not terribly informative, and I found it hard to navigate. I also couldn’t find any reviews on the product (I love reviews) – but I convinced Eitan to just jump into it with me.
We each ordered a kit, but found it a bit stressful to choose a size – the website has no sizing guide and every European conversion guide we found online was different. We couldn’t find any information anywhere on the website on how to choose a size right for you, or what the difference is between their “slim” soles and their “regular” (or “Publico” soles). I managed to find this Kickstarter page (scroll far down), which had a conversion chart – we went with our Japanese size, which is really just based on the cm length of your foot from toe to heel (so straightforward!). In US sizes I’m generally a 9.5-10, and I ordered a 41.5. Eitan is a US 11, and he got the 44.5. I’d say both of our soles were the right size for us in the end.
Shopping for leather was a more frustrating endeavour than I had anticipated. SneakerKit does give you the option to order from their selection of leather, but I wanted to shop for it in person and know the feel of what I was getting. I had never shopped for leather before, and headed downtown to Perfect Leather on King St W. I don’t know if this is the case at all leather stores, but at Perfect Leather they only sell by the piece. I needed cowhide, which I thought would be the sturdiest and most flexible option for making sneakers – but that would mean I had to buy an entire cow’s worth – about 20 sq ft (leather is often sold by the square foot – Sneakerkit only requires 2 sq ft). A man working there showed me a selection of goat skins (which are smaller as the animal is smaller), and insisted it was perfect for shoe making. It wasn’t – it was much too thin and would’ve had my toes poking through the top of the shoe. He said they will not cut leather, so I could choose between the small goat skins and the gigantic rolls of cowhide.
Well.
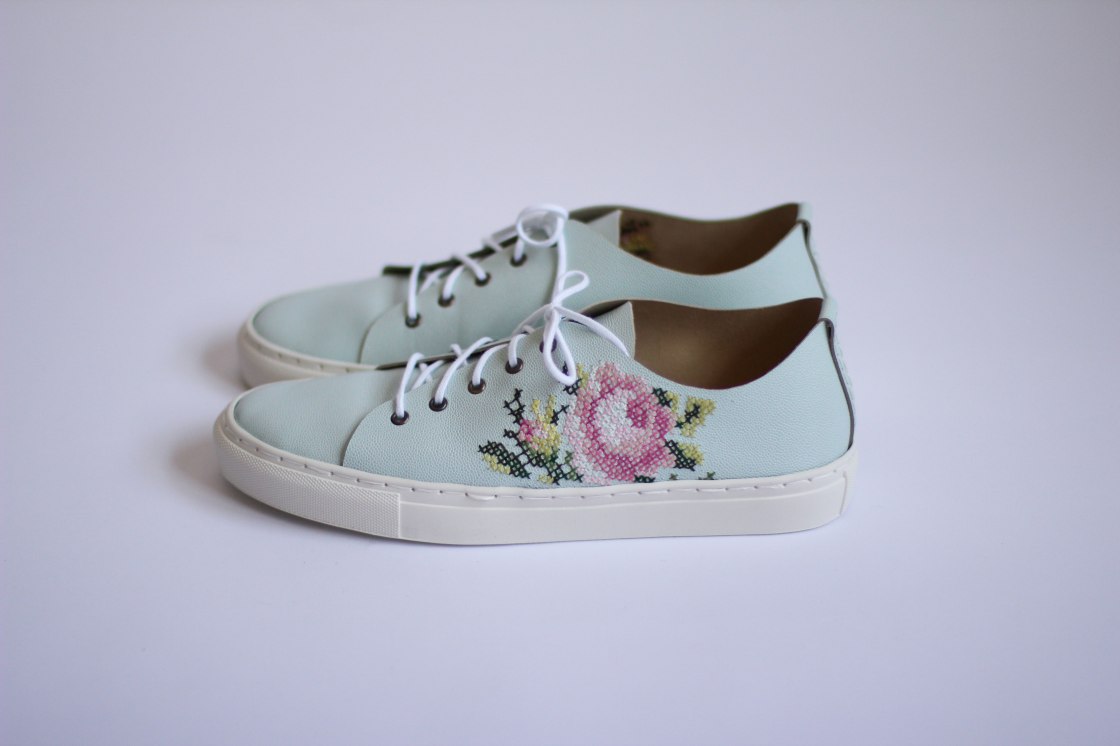
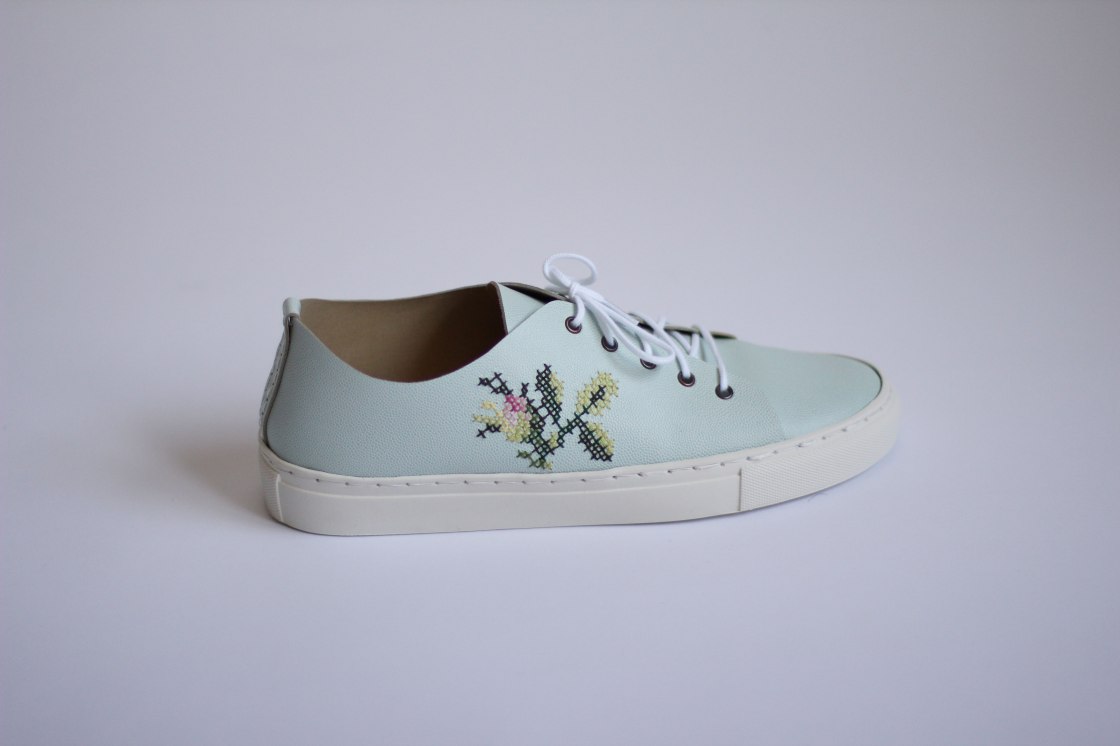
Being the fabric hunting madwoman that I can be, I rummaged through the shelves of goat skin and found a few smaller pieces of cowhide (when I pulled them out and placed them on the table to measure them, the man would scratch his head and tell me “This is cowhide”. Duh.) I found a textured piece of seafoam blue leather that was absolutely what I was looking for, and I also managed to find gray leather for Eitan. While I was frustrated that I didn’t have the rest of the store available to me as an option, I was pretty pleased that I didn’t have to settle.
While I was on the streetcar I had a grand, ambitious idea to cross stitch my shoes. I knew it was too ambitious, but that didn’t stop me. I thought that if I pre-poked a grid of holes in the leather, it would be a cinch. It was NOT a cinch.
Leather is, well, skin. It kind of has this self-healing quality, and shortly after I hammered all the holes in with my awl, the holes slowly closed up. This made it incredibly difficult to get a needle through. Also leather is “sticky” (which is why you need a specialty leather needle for a sewing machine), and the needle often got stuck going through (granted, I was using a regular sewing needle. There may exist needles intended for this specific task). Many times I questioned if I should stop and start over with the leftover leather I had. Many. Many. Times.
But I’m stubborn, so I persisted. I decided it would be best to have asymmetrical shoes and have a smaller bud on the other shoe, so that I wouldn’t have to endure the same pain twice. After three days, my hands were cramped and I had blisters on my fingers, but I was pretty dang pleased with myself. As Poison sings, “every rose has its thorn” (or in this case, needle). I Mod Podge-d the stitching on the inside because I didn’t want my foot to wear away at it too much.
 Then came the construction. I was kind of lucky since I took so long to cross-stitch my shoes that Eitan finished his pair before me, so I kind of learned from him, rather than from SneakerKit’s vague online instructions.
The instructions are kind of hard to understand, and the videos don’t have any commentary. The trickiest parts were hard to see. Also, even when you get the gist of it, sewing the leather to the sole is kind of finicky. Both of us had to redo one of our shoes once. It’s pretty much all about getting the tension right. It’s easy enough to pull the stitches and adjust the tension, except that on both of my shoes, at some point the needle split the thread in one of the stitches and it became impossible to pull the stitches tight. I had to kind of bring the loose parts into the inside of the shoe and hope the insole hid them.
Eitan was so excited to wear his shoes the first day – and for good reason, they look great! He wore them for a day at work and when he came home he took the insoles out – the bottoms had completely crumbled. We are waiting for a response from SneakerKit to find out what’s going on, but in the meantime I cut a second pair of insoles out of scrap leather and placed them underneath the ones included in the kit, just in case.

Otherwise the shoes are pretty comfortable, but they don’t seem to be incredibly practical. When I bend my toe I can see the stitches and the holes in the leather, and I feel like anything could seep inside my shoes with ease. Anyways, I spent so much time on the cross-stitching that I wouldn’t want to wear them anywhere they’d get dirty, so for that reason alone they’re not very practical. Eitan is worried that the stitching will come undone, and I get that (we kept joking about his shoes spontaneously falling apart at the office).
In the end, I wasn’t really expecting that I would spend many days strolling for hours in the first sneakers I had ever made. I’m going to call these my art sneakers, more for show than for wear, but I do still hope to wear them once in a while. It is awfully satisfying to make the things you wear on your feet.

Love the story and the idea of the shoe making….hope you’ll find a solution to the shoe coming apart😄.
LikeLike
Thanks 🙂 I hope they’ll get back to us soon!
LikeLike
I know this is an old post but wanted to mention that I recommend Leather and Sewing Supply on Spadina. They DO cut their hides, so you can get the size you want and they also have a scrap bin where you can search for smaller pieces too.
I’m planning to order SneakerKit’s new sole in “gum” so am doing some inspo research…
I love your shoes – I can’t imagine doing cross stitch on leather – I only make simple stuff.
Thanks for your review – I hope the new soles really are better!
LikeLike
That’s great to know, thank you!
I’m glad I could provide you with some inspo – I had so much trouble finding some when I made mine so for me it was all the more reason to make a post.
I hope yours go well! It’s a really fun project. I don’t wear mine but I so enjoyed making them (for the most part!)
LikeLiked by 1 person
I have an awl that holds a needle and I have used this to sew leather and heavy sail canvas. I put a sewing machine needle in it and it worked really well to hand sew things.
https://www.speedystitcher.com/#the-basics
LikeLike